Reddit mentions: The best kitchen & dining accessories
We found 80,890 Reddit comments discussing the best kitchen & dining accessories. We ran sentiment analysis on each of these comments to determine how redditors feel about different products. We found 28,519 products and ranked them based on the amount of positive reactions they received. Here are the top 20.
1. Hario MSS-1B Ceramic Coffee Mill-Original, Black
- Manual coffee grinder using burrs made of ceramic
- Burrs make for a more consistent grind that’s easily adjustable and set for repeat use
- Ceramic burrs don't transfer heat and shave the coffee beans vs cracking the beans like blade grinders
- 2 Cup Capacity
- Handwash only
- Sleek, slim design makes it easy for storage
- Easy to clean, easy to use
- Can be stored without the handle
- Beautiful ceramic mill, does not rust
- Consistent grind for perfect, fresh coffee
Features:

Specs:
| Color | Black |
| Height | 3.2 Inches |
| Length | 7.3 Inches |
| Number of items | 1 |
| Size | Original |
| Weight | 0.7 Pounds |
| Width | 4.5 Inches |
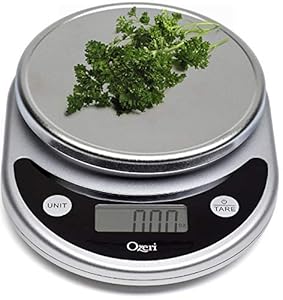
2. Ozeri ZK14-S Pronto Digital Multifunction Kitchen and Food Scale, Black
- Accurate, elegant, easy-to-use digital kitchen scale for your largest and smallest cooking projects - weighs up to 11.24 lbs (5100 grams) with precise graduations of 0.05 oz (1 gram).
- Automatic Unit Button instantly converts between 5 units of measurements (g, lbs, lbs:oz, oz, ml) and displays results on an easy-to-read LCD screen - e.g. easily convert 539 grams to 1.188 pounds to 1 pound 3 ounces to 19.01 ounces to 539 ml.
- Precision Tare Button calculates the net weight of your ingredients by automatically subtracting the weight of any bowl or container.
- Features a newly enlarged weighing platform finished in elegant chrome, and 2 large buttons that generate an audible click confirmation. Cleans and stores easily.
Features:
Specs:
| Color | Original |
| Height | 6 Inches |
| Length | 8.25 Inches |
| Number of items | 1 |
| Size | 8.25 |
| Weight | 0.75 Pounds |
| Width | 1.75 Inches |
3. Hario Ceramic Coffee Mill - "Skerton"
Manual coffee mill grinds beans to your desired textureCeramic conical burrs ensure a precise, uniform grind.Nonslip rubber base keeps the mill in place during grinding.Ergonomically designed crank handle detaches for compact storage and easy travel.Stepped grind adjustment mechanism is easy to use ...

Specs:
| Color | Coffee |
| Height | 13 inches |
| Length | 16 inches |
| Number of items | 1 |
| Size | Original |
| Weight | 1.25 Pounds |
| Width | 11 inches |
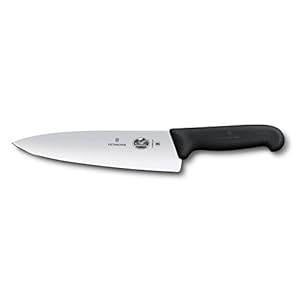
4. Victorinox Fibrox Pro Knife, 8-Inch Chef's FFP, 8 Inch, Black
- For home chefs & professionals. This Fibro Pro chef's knife has been the top choice of both home chefs and professionals alike. Expertly crafted with a tapered stainless steel edge that cuts with ease and efficiency.
- Fit for all tasks. Designed to handle kitchen tasks both big and small, This durable knife's razor sharp and laser-tested blade effortlessly chops, minces, slices and dices. An essential for every kitchen.
- Easy handling. Each knife features an ergonomic handle made from thermoplastic Elastomer (TPE) for a non-slip grip - even when wet. This exceptional knife is weighted and balanced for easy handling.
- Knife Dimensions. Blade made out of stainless steel material - 7. 9 inches in length. Made with dishwasher safe materials for an easy clean.
- Trusted Swiss quality. Expertly crafted in Switzerland in 1884, Victorinox provides a lifetime against defects in material and workmanship. Making a Lifetime commitment has never been so easy.
- Included Components: Fibrox Pro 8-Inch Chef'S Knife, Ffp
Features:
Specs:
| Color | Black |
| Height | 1.25 Inches |
| Length | 17 Inches |
| Number of items | 1 |
| Size | 8 Inch |
| Weight | 0.46875 pounds |
| Width | 4 Inches |
5. AeroPress Coffee and Espresso Maker - Quickly Makes Delicious Coffee Without Bitterness - 1 to 3 Cups Per Pressing
- Popular with coffee enthusiasts worldwide, the patented AeroPress Original is a new kind of coffee press that uses a rapid, total immersion brewing process to make smooth, delicious, full flavored coffee without bitterness and with low acidity.
- Good-bye French Press! The rapid brewing AeroPress Original avoids the bitterness and high acidity created by the long steep time required by the French press. Plus, the AeroPress paper Micro-filter eliminates grit and means clean up takes seconds.
- Versatile: Easily makes 1 to 3 cups of American coffee per pressing in about a minute. Unlike a French press, it can also make cold brew (in just two minutes!) or espresso style coffee for use in lattes, cappuccinos and other espresso based drinks.
- Perfect for home kitchen use, the AeroPress Original is lightweight, compact, portable and durable, making it also ideal for traveling, camping, backpacking, boating and more!
- Includes the AeroPress press, funnel, scoop, stirrer, 350 paper mMicro-filters and a filter holder. Phthalate free and BPA free. Mug not included. Assembled measurements: 9 1/2" h X 4" w X 4" d
Features:

Specs:
| Color | Gray |
| Height | 11.75 Inches |
| Length | 4.75 Inches |
| Number of items | 1 |
| Size | 1 to 4 Cup |
| Weight | 0.4 Pounds |
| Width | 4.5 Inches |
6. Bonavita 1.0L Variable Temperature Electric Kettle, 1.0 Liters, Metallic
- Adjustable in one-degree increments between 140˚-212˚F (60˚- 98˚C).
- 1000 watts for quick heating
- Real-time temperature display
- Hold Button heats and holds at temperatures between 140˚-208˚F for up to 60 minutes. Temperature Set Button for quick access to preset brewing temperatures
- Count-up timer makes it easy to keep track of the brewing process
- Gooseneck spout for precise pour control. Length is 11.00 inch , Width is 7.00 inch and Height is 7.5 inch
- Brushed stainless steel and BPA-free plastic
- Commercial and Household UL Rating. The kettle is 120V, for use in the US and Canada.
- 1-year limited warranty
- Descale the kettle periodically utilizing a descaling powder mixed with water to remove discoloration. Kindly refer to the user manual provided with specific questions.
Features:

Specs:
| Color | Brushed Stainless Steel |
| Height | 7.28 Inches |
| Length | 10.83 Inches |
| Number of items | 1 |
| Size | 1.0 L |
| Weight | 2.76 Pounds |
| Width | 7.48 Inches |
7. Victorinox Fibrox Pro Chef's Knife, 8-Inch
- An all-purpose chef’s knife provides ultimate control to mince your way through any culinary challenge.
- Contemporary, textured handle with a non-slip grip -- even when wet. The handle is ergonomically designed to help minimize tension at the wrist and provides a much more comfortable grip.
- Hygienic, dishwasher safe, slip-resistant and NSF approved. These exceptional knives are weighted and balanced for easy handling.
- Multipurpose chef's knife designed for chopping, mincing, slicing, and dicing with razor sharp, laser-tested, tapered knife edge is ground to form an exacting angle, to hold a sharp edge longer and ensure maximum cutting performance and durability
- Ergonomically designed, non-slip Fibrox Pro handle provides a sure grip and easy handling even when wet, making each knife safer and more efficient
- “Highly Recommended” for over 20 years by a leading gourmet consumer magazine that features unbiased ratings and reviews of cookware and kitchen equipment
- Expertly crafted in Switzerland since 1884; designed for professionals who use knives all day, every day; lifetime warranty against defects in material and workmanship
- Swiss item #: 5.2063.20 is imprinted on the blade. This is the same exact knife as 40520, 47520, 45520, and 47520.US2. The only difference is how the knife is packaged.
Features:
Specs:
| Color | Black |
| Height | 1.968503935 Inches |
| Length | 18.897637776 Inches |
| Number of items | 1 |
| Release date | March 2022 |
| Size | 8" Chef's |
| Weight | 0.50044933474 Pounds |
| Width | 2.5590551155 Inches |
8. Etekcity Infrared Thermometer 774 (Not for Human) Temperature Gun Non-Contact Digital Laser Thermometer-58℉ to 716℉ (-50 to 380℃), Standard Size, Yellow & Black
- NOT FOR HUMAN: Temperature readings from these devices are inanimate objects. The measured temperature for humans or animals will be inaccurate
- BETTER ACCURACY: 12:1 D:S, meaning it can accurately measure targets at greater distances compared to most others; For best accuracy, the distance between the thermometer and object of measurement should approximately be 14.17 inches (36 cm)
- TARGET QUICKER: Measure surface temperature ranging from -58℉ to 716℉(-50℃ to 380℃), with 2 units ℉/℃ to choose; Response time: ≤500Ms; A built-in laser gives you the precision to hone in on the exact space you want to measure
- VERSATILE DESIGN: Infrared technology makes it to measure the surface temperature of various objects especially temperatures above boiling points and below freezing points; Use it for cooking, ovens; AC, refrigerators; or soapmaking cats toy etc
- Note: This color model don't contain emissivity adjustment feature and max temperature feature
- ADDED FUNCTIONS: The LCD screen is backlit, also has an auto-off function to extend the battery life, and features a low battery indicator so you never accidentally run out of juice (battery included)
Features:

Specs:
| Color | Medium Yellow |
| Height | 1.5 Inches |
| Length | 5.5 Inches |
| Number of items | 1 |
| Size | -58 to 716℉, - 50 to 380℃ |
| Weight | 0.33 Pounds |
| Width | 3.5 Inches |
9. GEMINI-20 Portable Precision Digital Milligram Scale 20g x 0.001g (Silver), GEMINI-20
- PORTABLE SCALE: This digital food scale measures 3" x 5" x 0.8", so it's the perfect size for measuring on the go. Use it to measure small amounts of medication, food, and herbs.
- DURABLE & COMPACT: This mini food scale is perfect for travel and can fit in your bag. Plus, it easily converts between ounces, grams, troy ounces, pennyweights, carats, and grains.
- LCD SCREEN: The digital scale's backlit LCD screen makes numbers viewable and easy to read—even in dim lighting. Thanks to high-precision sensors, you'll get an accurate measurement every time.
- BUILT-IN COVER: Keep your electronic milligram scale safe with the built-in flip cover. It will keep your scale looking like new and protect it from scratches, bumps, and everyday wear and tear.
- STAINLESS STEEL: Our digital pocket scale has a stainless-steel surface that's easy to clean. Place your items directly onto the stainless steel or place them in a tray or container for measuring.
Features:

Specs:
| Color | Silver |
| Height | 1.62 inches |
| Length | 4.94 inches |
| Number of items | 1 |
| Size | 100G |
| Weight | 0.2645547144 Pounds |
| Width | 6.5 inches |
10. Instant Pot Duo 7-in-1 Electric Pressure Cooker, Sterilizer, Slow Cooker, Rice Cooker, Steamer, Saute, Yogurt Maker, and Warmer, 6 Quart, 14 One-Touch Programs
- 7-IN-1 FUNCTIONALITY: Pressure cook, slow cook, rice cooker, yogurt maker, steamer, sauté pan and food warmer.
- QUICK ONE-TOUCH COOKING: 13 customizable Smart Programs for pressure cooking ribs, soups, beans, rice, poultry, yogurt, desserts and more.
- COOK FAST OR SLOW: Pressure cook delicious one-pot meals up to 70% faster than traditional cooking methods or slow cook your favorite traditional recipes – just like grandma used to make.
- QUICK AND EASY CLEAN UP: Finger-print resistant, stainless-steel sides and dishwasher-safe lid, inner pot, and accessories.
- PROVEN SAFETY FEATURES: Includes over 10 safety features, plus overheat protection and safe-locking lid
- GREAT FOR GROWING FAMILIES: Cook for up to 6 people – perfect for growing families, or meal prepping and batch cooking for singles.
- VERSATILE INNER COOKING POT: We use food-grade stainless-steel, a tri-ply bottom for more even cooking and perfect for sautéing
- DISCOVER AMAZING RECIPES: Download our free Instant Pot app, so you can create quick new favorites and prepare delicious meals, available iOS and Android.
Features:

Specs:
| Color | Stainless Steel/Black |
| Height | 12.48 Inches |
| Length | 13.38 Inches |
| Number of items | 1 |
| Size | 6Qt |
| Weight | 11.8 Pounds |
| Width | 12.2 Inches |
11. AWS Series Digital Pocket Weight Scale 100g x 0.01g, (Black), AWS-100-Black
- Portable Scale: This digital food scale measures 3" x 5" x 0.8", so it's the perfect size for measuring on the go. Use it to measure nuts, herbs, medications, spices, or jewelry.
- Durable & Compact: This mini kitchen scale is perfect for travel and can fit in your bag. Plus, it easily converts between ounces, carats, grains, and grams.
- LCD Screen: The digital scale's backlit LCD Screen makes numbers viewable and easy to read — even in dim lighting. Thanks to high-precision sensors, you'll get an accurate measurement every time.
- Built-in Cover: Keep your electronic food scale safe with the built-in durable cover. It will keep your scale looking like new and protect it from scratches, bumps, and everyday wear and tear.
- Stainless Steel: Our digital kitchen scale has a stainless-steel surface that's easy to clean. Place your items directly onto the Stainless Steel or place them in a tray or container for measuring.
Features:

Specs:
| Color | Black |
| Height | 0.8 Inches |
| Length | 3 Inches |
| Number of items | 1 |
| Size | 100G |
| Weight | 0.35 Pounds |
| Width | 5 Inches |
12. Precision Digital Kitchen Weight Scale, Food Measuring Scale, 500g x 0.01g (Black), LB-501
- LIGHTWEIGHT KITCHEN SCALE: This digital food scale measures 7.3" x 5.5" x 1.5" and only weighs 1.12 pounds. It's the perfect size for measuring ingredients for your baking and cooking creations.
- LARGE BOWL: With your purchase, you'll receive a large expansion bowl that can help contain your ingredients while measuring. The bowl can hold fruits, vegetables, coffee, and more!
- LCD SCREEN: The digital scale's backlit LCD screen makes numbers viewable and easy to read—even in dim lighting. Thanks to high-precision sensors, you'll get an accurate measurement every time.
- BUILT-IN COVER: Keep your electronic food scale safe with the built-in plastic cover. It will keep your scale looking like new and protect it from scratches, bumps, and everyday wear and tear.
- HEAVY-DUTY PLASTIC CONSTRUCTION: Our portable scale has a durable surface that's easy to clean. Place your items directly onto the plastic or place them in the expansion bowl for measuring.
Features:

Specs:
| Color | Gray |
| Height | 1.5 Inches |
| Length | 7.3 Inches |
| Number of items | 1 |
| Size | 500x0.01g |
| Weight | 1.1243575362 Pounds |
| Width | 5.5 Inches |
13. SC Series Precision Digital Kitchen Weight Scale, Food Measuring Scale, 2kg x 0.1g (Silver), AMW-SC-2KG
LIGHTWEIGHT PRECISION SCALE: This portable digital food scale measures 4.1" x 5" x 0.7", making it perfect for baking or cooking. Use it to weigh butter, sugar, flour, and other ingredients.WEIGHING BOWL: You'll receive a durable bowl that can hold coffee, grains, and any other ingredients that you ...

Specs:
| Color | Silver |
| Height | 1.19 Inches |
| Length | 4.75 Inches |
| Size | 2kg x 01g |
| Weight | 0.0220462262 Pounds |
| Width | 5.31 Inches |
14. Bodum Bistro Burr Grinder, Electronic Coffee Grinder with Continuously Adjustable Grind, Black
- The Bistro Burr Grinder consistently crushes beans between stainless steel conical burrs. This process also preserves the bean’s intrinsic flavor and aroma better than a blade grinder.
- Push button, pre-set timer allows users to grind the exact amount of coffee needed, keeping beans fresh and preventing waste.
- 12 Adjustable grind settings allow users to go from Espresso to French Press with ease.
- Equipped with a friction clutch, which protects the grinding gear by the presence of small stones.
- Dishwasher-Safe Borosilicate glass catcher with grip reduces static cling of coffee grounds.
- Holds up to 7.75 Ounces of Coffee Beans.
Features:

Specs:
| Color | Black |
| Height | 12.5 Inches |
| Length | 7.6 Inches |
| Number of items | 1 |
| Size | 1 EA |
| Weight | 5.6 Pounds |
| Width | 7.1 Inches |
15. Baratza Encore Conical Burr Coffee Grinder
SPECIALTY COFFEE ASSOCIATION AWARD WINNING GRINDERS - Baratza grinders are preferred by coffee professionals and backed by Baratza’s world class support.GO-TO ENTRY LEVEL GRINDER - Baratza’s best-selling grinder, with its small footprint, is THE choice for brewing coffee at home. Available in Wh...

Specs:
| Color | Black |
| Height | 13.8 Inches |
| Length | 6.3 Inches |
| Number of items | 1 |
| Size | 4.7 x 6.3 x 13.8 inches |
| Weight | 6.834330122 Pounds |
| Width | 4.7 Inches |
16. Cuisinart DBM-8 Supreme Grind Automatic Burr Mill
- ENJOY OPTIMUM FLAVOR: Burr grinding provides a uniform grind to your fresh coffee beans with its 18-position grind selector – move the slide-dial from ultra-fine to extra-coarse to ensure your coffee grounds are exactly the way you prefer
- REMOVABLE FEATURES: Our 8 oz. bean hopper is fully removable as well as our built-in grind chamber for ease-of-use and accessibility during the cleaning process
- GRIND CHAMBER: Our removable grind chamber holds enough ground coffee for 32-cups, you won’t have to worry about grinding beans multiple times to brew coffee for the entire household
- ONE-TOUCH GRIND: The one-touch power bar is separate from the unit and complemented by an electric timer that automatically shuts off the unit when your grind cycle is complete
- CONVENIENT DESIGN: Our heavy-duty unit motor doesn’t take away space for additional design features; enjoy the convenience of cord storage and an additional scoop/cleaning brush to declutter, clean and maximize counter space
Features:

Specs:
| Color | Stainless Steel |
| Height | 6 inches |
| Length | 10.75 inches |
| Number of items | 1 |
| Size | Burr Mill |
| Weight | 4.5 Pounds |
| Width | 7.13 inches |
17. Lodge Pre-Seasoned Cast Iron Combo Cooker, 2-Piece Set, 10.25", Black
- Foundry seasoned, ready to use upon purchase
- Use on all cooking surfaces, grills and campfires
- Oven safe
- Sauté, sear, fry, bake and stir fry to heart's content
- Made in the USA
- Included Components: 10.25-Inch Shallow Skillet
- Item Shape: Round
Features:

Specs:
| Color | Black |
| Height | 4 inches |
| Length | 15.3 inches |
| Number of items | 1 |
| Release date | April 2005 |
| Size | 10.25" |
| Weight | 13.2 Pounds |
| Width | 10.8 inches |
18. Paderno World Cuisine 3-Blade Vegetable Slicer / Spiralizer, Counter-Mounted and includes 3 Stainless Steel Blades
- ORIGINAL DESIGN, BOASTING MORE THAN 15 YEARS ON THE U.S. MARKET
- Includes: 1 x Vegetable spiralizer / slicer plus 3 blades for vegetable strands & zucchini noodles
- BPA-Free base. Blades made of ABS plastic frames and stainless steel blades. Dishwasher safe.
- A recommended favorite in Bon Appétit, Food and Wine, House Beautiful, Oprah Magazine and Food Network; reviewed by Cook's Illustrated
- Made by Paderno World Cuisine, a leader in healthy cuisine since 1925. Recognized for its stability, consistently producing long, even noodles and ribbons.
Features:

Specs:
| Color | White |
| Height | 8.63 Inches |
| Length | 9.38 Inches |
| Number of items | 2 |
| Size | 3-Blades |
| Weight | 1.8 Pounds |
| Width | 5.75 Inches |
19. EatSmart ESKS-01 Precision Pro Digital Kitchen Scale, Silver
- Easy to use multifunction home scale - Perfect for cooks, dieters and families
- Max weight 11lbs; Displays ounces/lbs/grams/kgs; Graduation .05 oz / 1 gram
- Includes FREE EatSmart Calorie Factors guide - Portion control and calorie counting made easy!
- Tare feature eliminates the weight of a plate; 3 Minute Auto-Shutoff lets you prepare ingredients while maintaining battery life
Features:

Specs:
| Color | Silver |
| Height | 1.8 Inches |
| Length | 8 Inches |
| Number of items | 1 |
| Size | 1 Count (Pack of 1) |
| Weight | 0.8 Pounds |
| Width | 6 Inches |
20. Capresso 560.01 Infinity Conical Burr Grinder, Black
PRECISION GRINDING: Commercial-grade, solid steel conical burrs with advanced cutting designWIDE GRINDING RANGE: From ultrafine Turkish to French Press coarse and everything in betweenPRESERVES AROMA: Gear reduction motor grinds slow with reduced noise and little static build-upLARGE CAPACITY: 8.8 o...

Specs:
| Color | Black |
| Height | 7.8 Inches |
| Length | 14.6 Inches |
| Number of items | 1 |
| Size | 8.8 oz |
| Weight | 4 Pounds |
| Width | 9.6 Inches |
🎓 Reddit experts on kitchen & dining accessories
The comments and opinions expressed on this page are written exclusively by redditors. To provide you with the most relevant data, we sourced opinions from the most knowledgeable Reddit users based the total number of upvotes and downvotes received across comments on subreddits where kitchen & dining accessories are discussed. For your reference and for the sake of transparency, here are the specialists whose opinions mattered the most in our ranking.
Subcategories:
Interested in what Redditors like? Check out our Shuffle feature
Shuffle: random products popular on RedditTop Reddit comments about Kitchen & Dining:
Summary
1. Hario MSS-1B Ceramic Coffee Mill-Original, Black
- Manual coffee grinder using burrs made of ceramic
- Burrs make for a more consistent grind that’s easily adjustable and set for repeat use
- Ceramic burrs don't transfer heat and shave the coffee beans vs cracking the beans like blade grinders
- 2 Cup Capacity
- Handwash only
- Sleek, slim design makes it easy for storage
- Easy to clean, easy to use
- Can be stored without the handle
- Beautiful ceramic mill, does not rust
- Consistent grind for perfect, fresh coffee
Features:
Specs:
| Color | Black |
| Height | 3.2 Inches |
| Length | 7.3 Inches |
| Number of items | 1 |
| Size | Original |
| Weight | 0.7 Pounds |
| Width | 4.5 Inches |
2. Ozeri ZK14-S Pronto Digital Multifunction Kitchen and Food Scale, Black
- Accurate, elegant, easy-to-use digital kitchen scale for your largest and smallest cooking projects - weighs up to 11.24 lbs (5100 grams) with precise graduations of 0.05 oz (1 gram).
- Automatic Unit Button instantly converts between 5 units of measurements (g, lbs, lbs:oz, oz, ml) and displays results on an easy-to-read LCD screen - e.g. easily convert 539 grams to 1.188 pounds to 1 pound 3 ounces to 19.01 ounces to 539 ml.
- Precision Tare Button calculates the net weight of your ingredients by automatically subtracting the weight of any bowl or container.
- Features a newly enlarged weighing platform finished in elegant chrome, and 2 large buttons that generate an audible click confirmation. Cleans and stores easily.
Features:
Specs:
| Color | Original |
| Height | 6 Inches |
| Length | 8.25 Inches |
| Number of items | 1 |
| Size | 8.25 |
| Weight | 0.75 Pounds |
| Width | 1.75 Inches |
3. Hario Ceramic Coffee Mill - "Skerton"
Manual coffee mill grinds beans to your desired textureCeramic conical burrs ensure a precise, uniform grind.Nonslip rubber base keeps the mill in place during grinding.Ergonomically designed crank handle detaches for compact storage and easy travel.Stepped grind adjustment mechanism is easy to use ...
Specs:
| Color | Coffee |
| Height | 13 inches |
| Length | 16 inches |
| Number of items | 1 |
| Size | Original |
| Weight | 1.25 Pounds |
| Width | 11 inches |
4. Victorinox Fibrox Pro Knife, 8-Inch Chef's FFP, 8 Inch, Black
- For home chefs & professionals. This Fibro Pro chef's knife has been the top choice of both home chefs and professionals alike. Expertly crafted with a tapered stainless steel edge that cuts with ease and efficiency.
- Fit for all tasks. Designed to handle kitchen tasks both big and small, This durable knife's razor sharp and laser-tested blade effortlessly chops, minces, slices and dices. An essential for every kitchen.
- Easy handling. Each knife features an ergonomic handle made from thermoplastic Elastomer (TPE) for a non-slip grip - even when wet. This exceptional knife is weighted and balanced for easy handling.
- Knife Dimensions. Blade made out of stainless steel material - 7. 9 inches in length. Made with dishwasher safe materials for an easy clean.
- Trusted Swiss quality. Expertly crafted in Switzerland in 1884, Victorinox provides a lifetime against defects in material and workmanship. Making a Lifetime commitment has never been so easy.
- Included Components: Fibrox Pro 8-Inch Chef'S Knife, Ffp
Features:
Specs:
| Color | Black |
| Height | 1.25 Inches |
| Length | 17 Inches |
| Number of items | 1 |
| Size | 8 Inch |
| Weight | 0.46875 pounds |
| Width | 4 Inches |
5. AeroPress Coffee and Espresso Maker - Quickly Makes Delicious Coffee Without Bitterness - 1 to 3 Cups Per Pressing
- Popular with coffee enthusiasts worldwide, the patented AeroPress Original is a new kind of coffee press that uses a rapid, total immersion brewing process to make smooth, delicious, full flavored coffee without bitterness and with low acidity.
- Good-bye French Press! The rapid brewing AeroPress Original avoids the bitterness and high acidity created by the long steep time required by the French press. Plus, the AeroPress paper Micro-filter eliminates grit and means clean up takes seconds.
- Versatile: Easily makes 1 to 3 cups of American coffee per pressing in about a minute. Unlike a French press, it can also make cold brew (in just two minutes!) or espresso style coffee for use in lattes, cappuccinos and other espresso based drinks.
- Perfect for home kitchen use, the AeroPress Original is lightweight, compact, portable and durable, making it also ideal for traveling, camping, backpacking, boating and more!
- Includes the AeroPress press, funnel, scoop, stirrer, 350 paper mMicro-filters and a filter holder. Phthalate free and BPA free. Mug not included. Assembled measurements: 9 1/2" h X 4" w X 4" d
Features:
Specs:
| Color | Gray |
| Height | 11.75 Inches |
| Length | 4.75 Inches |
| Number of items | 1 |
| Size | 1 to 4 Cup |
| Weight | 0.4 Pounds |
| Width | 4.5 Inches |
6. Bonavita 1.0L Variable Temperature Electric Kettle, 1.0 Liters, Metallic
- Adjustable in one-degree increments between 140˚-212˚F (60˚- 98˚C).
- 1000 watts for quick heating
- Real-time temperature display
- Hold Button heats and holds at temperatures between 140˚-208˚F for up to 60 minutes. Temperature Set Button for quick access to preset brewing temperatures
- Count-up timer makes it easy to keep track of the brewing process
- Gooseneck spout for precise pour control. Length is 11.00 inch , Width is 7.00 inch and Height is 7.5 inch
- Brushed stainless steel and BPA-free plastic
- Commercial and Household UL Rating. The kettle is 120V, for use in the US and Canada.
- 1-year limited warranty
- Descale the kettle periodically utilizing a descaling powder mixed with water to remove discoloration. Kindly refer to the user manual provided with specific questions.
Features:
Specs:
| Color | Brushed Stainless Steel |
| Height | 7.28 Inches |
| Length | 10.83 Inches |
| Number of items | 1 |
| Size | 1.0 L |
| Weight | 2.76 Pounds |
| Width | 7.48 Inches |
7. Victorinox Fibrox Pro Chef's Knife, 8-Inch
- An all-purpose chef’s knife provides ultimate control to mince your way through any culinary challenge.
- Contemporary, textured handle with a non-slip grip -- even when wet. The handle is ergonomically designed to help minimize tension at the wrist and provides a much more comfortable grip.
- Hygienic, dishwasher safe, slip-resistant and NSF approved. These exceptional knives are weighted and balanced for easy handling.
- Multipurpose chef's knife designed for chopping, mincing, slicing, and dicing with razor sharp, laser-tested, tapered knife edge is ground to form an exacting angle, to hold a sharp edge longer and ensure maximum cutting performance and durability
- Ergonomically designed, non-slip Fibrox Pro handle provides a sure grip and easy handling even when wet, making each knife safer and more efficient
- “Highly Recommended” for over 20 years by a leading gourmet consumer magazine that features unbiased ratings and reviews of cookware and kitchen equipment
- Expertly crafted in Switzerland since 1884; designed for professionals who use knives all day, every day; lifetime warranty against defects in material and workmanship
- Swiss item #: 5.2063.20 is imprinted on the blade. This is the same exact knife as 40520, 47520, 45520, and 47520.US2. The only difference is how the knife is packaged.
Features:
Specs:
| Color | Black |
| Height | 1.968503935 Inches |
| Length | 18.897637776 Inches |
| Number of items | 1 |
| Release date | March 2022 |
| Size | 8" Chef's |
| Weight | 0.50044933474 Pounds |
| Width | 2.5590551155 Inches |
8. Etekcity Infrared Thermometer 774 (Not for Human) Temperature Gun Non-Contact Digital Laser Thermometer-58℉ to 716℉ (-50 to 380℃), Standard Size, Yellow & Black
- NOT FOR HUMAN: Temperature readings from these devices are inanimate objects. The measured temperature for humans or animals will be inaccurate
- BETTER ACCURACY: 12:1 D:S, meaning it can accurately measure targets at greater distances compared to most others; For best accuracy, the distance between the thermometer and object of measurement should approximately be 14.17 inches (36 cm)
- TARGET QUICKER: Measure surface temperature ranging from -58℉ to 716℉(-50℃ to 380℃), with 2 units ℉/℃ to choose; Response time: ≤500Ms; A built-in laser gives you the precision to hone in on the exact space you want to measure
- VERSATILE DESIGN: Infrared technology makes it to measure the surface temperature of various objects especially temperatures above boiling points and below freezing points; Use it for cooking, ovens; AC, refrigerators; or soapmaking cats toy etc
- Note: This color model don't contain emissivity adjustment feature and max temperature feature
- ADDED FUNCTIONS: The LCD screen is backlit, also has an auto-off function to extend the battery life, and features a low battery indicator so you never accidentally run out of juice (battery included)
Features:
Specs:
| Color | Medium Yellow |
| Height | 1.5 Inches |
| Length | 5.5 Inches |
| Number of items | 1 |
| Size | -58 to 716℉, - 50 to 380℃ |
| Weight | 0.33 Pounds |
| Width | 3.5 Inches |
9. GEMINI-20 Portable Precision Digital Milligram Scale 20g x 0.001g (Silver), GEMINI-20
- PORTABLE SCALE: This digital food scale measures 3" x 5" x 0.8", so it's the perfect size for measuring on the go. Use it to measure small amounts of medication, food, and herbs.
- DURABLE & COMPACT: This mini food scale is perfect for travel and can fit in your bag. Plus, it easily converts between ounces, grams, troy ounces, pennyweights, carats, and grains.
- LCD SCREEN: The digital scale's backlit LCD screen makes numbers viewable and easy to read—even in dim lighting. Thanks to high-precision sensors, you'll get an accurate measurement every time.
- BUILT-IN COVER: Keep your electronic milligram scale safe with the built-in flip cover. It will keep your scale looking like new and protect it from scratches, bumps, and everyday wear and tear.
- STAINLESS STEEL: Our digital pocket scale has a stainless-steel surface that's easy to clean. Place your items directly onto the stainless steel or place them in a tray or container for measuring.
Features:
Specs:
| Color | Silver |
| Height | 1.62 inches |
| Length | 4.94 inches |
| Number of items | 1 |
| Size | 100G |
| Weight | 0.2645547144 Pounds |
| Width | 6.5 inches |
10. Instant Pot Duo 7-in-1 Electric Pressure Cooker, Sterilizer, Slow Cooker, Rice Cooker, Steamer, Saute, Yogurt Maker, and Warmer, 6 Quart, 14 One-Touch Programs
- 7-IN-1 FUNCTIONALITY: Pressure cook, slow cook, rice cooker, yogurt maker, steamer, sauté pan and food warmer.
- QUICK ONE-TOUCH COOKING: 13 customizable Smart Programs for pressure cooking ribs, soups, beans, rice, poultry, yogurt, desserts and more.
- COOK FAST OR SLOW: Pressure cook delicious one-pot meals up to 70% faster than traditional cooking methods or slow cook your favorite traditional recipes – just like grandma used to make.
- QUICK AND EASY CLEAN UP: Finger-print resistant, stainless-steel sides and dishwasher-safe lid, inner pot, and accessories.
- PROVEN SAFETY FEATURES: Includes over 10 safety features, plus overheat protection and safe-locking lid
- GREAT FOR GROWING FAMILIES: Cook for up to 6 people – perfect for growing families, or meal prepping and batch cooking for singles.
- VERSATILE INNER COOKING POT: We use food-grade stainless-steel, a tri-ply bottom for more even cooking and perfect for sautéing
- DISCOVER AMAZING RECIPES: Download our free Instant Pot app, so you can create quick new favorites and prepare delicious meals, available iOS and Android.
Features:
Specs:
| Color | Stainless Steel/Black |
| Height | 12.48 Inches |
| Length | 13.38 Inches |
| Number of items | 1 |
| Size | 6Qt |
| Weight | 11.8 Pounds |
| Width | 12.2 Inches |
11. AWS Series Digital Pocket Weight Scale 100g x 0.01g, (Black), AWS-100-Black
- Portable Scale: This digital food scale measures 3" x 5" x 0.8", so it's the perfect size for measuring on the go. Use it to measure nuts, herbs, medications, spices, or jewelry.
- Durable & Compact: This mini kitchen scale is perfect for travel and can fit in your bag. Plus, it easily converts between ounces, carats, grains, and grams.
- LCD Screen: The digital scale's backlit LCD Screen makes numbers viewable and easy to read — even in dim lighting. Thanks to high-precision sensors, you'll get an accurate measurement every time.
- Built-in Cover: Keep your electronic food scale safe with the built-in durable cover. It will keep your scale looking like new and protect it from scratches, bumps, and everyday wear and tear.
- Stainless Steel: Our digital kitchen scale has a stainless-steel surface that's easy to clean. Place your items directly onto the Stainless Steel or place them in a tray or container for measuring.
Features:
Specs:
| Color | Black |
| Height | 0.8 Inches |
| Length | 3 Inches |
| Number of items | 1 |
| Size | 100G |
| Weight | 0.35 Pounds |
| Width | 5 Inches |
12. Precision Digital Kitchen Weight Scale, Food Measuring Scale, 500g x 0.01g (Black), LB-501
- LIGHTWEIGHT KITCHEN SCALE: This digital food scale measures 7.3" x 5.5" x 1.5" and only weighs 1.12 pounds. It's the perfect size for measuring ingredients for your baking and cooking creations.
- LARGE BOWL: With your purchase, you'll receive a large expansion bowl that can help contain your ingredients while measuring. The bowl can hold fruits, vegetables, coffee, and more!
- LCD SCREEN: The digital scale's backlit LCD screen makes numbers viewable and easy to read—even in dim lighting. Thanks to high-precision sensors, you'll get an accurate measurement every time.
- BUILT-IN COVER: Keep your electronic food scale safe with the built-in plastic cover. It will keep your scale looking like new and protect it from scratches, bumps, and everyday wear and tear.
- HEAVY-DUTY PLASTIC CONSTRUCTION: Our portable scale has a durable surface that's easy to clean. Place your items directly onto the plastic or place them in the expansion bowl for measuring.
Features:
Specs:
| Color | Gray |
| Height | 1.5 Inches |
| Length | 7.3 Inches |
| Number of items | 1 |
| Size | 500x0.01g |
| Weight | 1.1243575362 Pounds |
| Width | 5.5 Inches |
13. SC Series Precision Digital Kitchen Weight Scale, Food Measuring Scale, 2kg x 0.1g (Silver), AMW-SC-2KG
LIGHTWEIGHT PRECISION SCALE: This portable digital food scale measures 4.1" x 5" x 0.7", making it perfect for baking or cooking. Use it to weigh butter, sugar, flour, and other ingredients.WEIGHING BOWL: You'll receive a durable bowl that can hold coffee, grains, and any other ingredients that you ...
Specs:
| Color | Silver |
| Height | 1.19 Inches |
| Length | 4.75 Inches |
| Size | 2kg x 01g |
| Weight | 0.0220462262 Pounds |
| Width | 5.31 Inches |
14. Bodum Bistro Burr Grinder, Electronic Coffee Grinder with Continuously Adjustable Grind, Black
- The Bistro Burr Grinder consistently crushes beans between stainless steel conical burrs. This process also preserves the bean’s intrinsic flavor and aroma better than a blade grinder.
- Push button, pre-set timer allows users to grind the exact amount of coffee needed, keeping beans fresh and preventing waste.
- 12 Adjustable grind settings allow users to go from Espresso to French Press with ease.
- Equipped with a friction clutch, which protects the grinding gear by the presence of small stones.
- Dishwasher-Safe Borosilicate glass catcher with grip reduces static cling of coffee grounds.
- Holds up to 7.75 Ounces of Coffee Beans.
Features:
Specs:
| Color | Black |
| Height | 12.5 Inches |
| Length | 7.6 Inches |
| Number of items | 1 |
| Size | 1 EA |
| Weight | 5.6 Pounds |
| Width | 7.1 Inches |
15. Baratza Encore Conical Burr Coffee Grinder
SPECIALTY COFFEE ASSOCIATION AWARD WINNING GRINDERS - Baratza grinders are preferred by coffee professionals and backed by Baratza’s world class support.GO-TO ENTRY LEVEL GRINDER - Baratza’s best-selling grinder, with its small footprint, is THE choice for brewing coffee at home. Available in Wh...
Specs:
| Color | Black |
| Height | 13.8 Inches |
| Length | 6.3 Inches |
| Number of items | 1 |
| Size | 4.7 x 6.3 x 13.8 inches |
| Weight | 6.834330122 Pounds |
| Width | 4.7 Inches |
16. Cuisinart DBM-8 Supreme Grind Automatic Burr Mill
- ENJOY OPTIMUM FLAVOR: Burr grinding provides a uniform grind to your fresh coffee beans with its 18-position grind selector – move the slide-dial from ultra-fine to extra-coarse to ensure your coffee grounds are exactly the way you prefer
- REMOVABLE FEATURES: Our 8 oz. bean hopper is fully removable as well as our built-in grind chamber for ease-of-use and accessibility during the cleaning process
- GRIND CHAMBER: Our removable grind chamber holds enough ground coffee for 32-cups, you won’t have to worry about grinding beans multiple times to brew coffee for the entire household
- ONE-TOUCH GRIND: The one-touch power bar is separate from the unit and complemented by an electric timer that automatically shuts off the unit when your grind cycle is complete
- CONVENIENT DESIGN: Our heavy-duty unit motor doesn’t take away space for additional design features; enjoy the convenience of cord storage and an additional scoop/cleaning brush to declutter, clean and maximize counter space
Features:
Specs:
| Color | Stainless Steel |
| Height | 6 inches |
| Length | 10.75 inches |
| Number of items | 1 |
| Size | Burr Mill |
| Weight | 4.5 Pounds |
| Width | 7.13 inches |
17. Lodge Pre-Seasoned Cast Iron Combo Cooker, 2-Piece Set, 10.25", Black
- Foundry seasoned, ready to use upon purchase
- Use on all cooking surfaces, grills and campfires
- Oven safe
- Sauté, sear, fry, bake and stir fry to heart's content
- Made in the USA
- Included Components: 10.25-Inch Shallow Skillet
- Item Shape: Round
Features:
Specs:
| Color | Black |
| Height | 4 inches |
| Length | 15.3 inches |
| Number of items | 1 |
| Release date | April 2005 |
| Size | 10.25" |
| Weight | 13.2 Pounds |
| Width | 10.8 inches |
18. Paderno World Cuisine 3-Blade Vegetable Slicer / Spiralizer, Counter-Mounted and includes 3 Stainless Steel Blades
- ORIGINAL DESIGN, BOASTING MORE THAN 15 YEARS ON THE U.S. MARKET
- Includes: 1 x Vegetable spiralizer / slicer plus 3 blades for vegetable strands & zucchini noodles
- BPA-Free base. Blades made of ABS plastic frames and stainless steel blades. Dishwasher safe.
- A recommended favorite in Bon Appétit, Food and Wine, House Beautiful, Oprah Magazine and Food Network; reviewed by Cook's Illustrated
- Made by Paderno World Cuisine, a leader in healthy cuisine since 1925. Recognized for its stability, consistently producing long, even noodles and ribbons.
Features:
Specs:
| Color | White |
| Height | 8.63 Inches |
| Length | 9.38 Inches |
| Number of items | 2 |
| Size | 3-Blades |
| Weight | 1.8 Pounds |
| Width | 5.75 Inches |
19. EatSmart ESKS-01 Precision Pro Digital Kitchen Scale, Silver
- Easy to use multifunction home scale - Perfect for cooks, dieters and families
- Max weight 11lbs; Displays ounces/lbs/grams/kgs; Graduation .05 oz / 1 gram
- Includes FREE EatSmart Calorie Factors guide - Portion control and calorie counting made easy!
- Tare feature eliminates the weight of a plate; 3 Minute Auto-Shutoff lets you prepare ingredients while maintaining battery life
Features:
Specs:
| Color | Silver |
| Height | 1.8 Inches |
| Length | 8 Inches |
| Number of items | 1 |
| Size | 1 Count (Pack of 1) |
| Weight | 0.8 Pounds |
| Width | 6 Inches |
20. Capresso 560.01 Infinity Conical Burr Grinder, Black
PRECISION GRINDING: Commercial-grade, solid steel conical burrs with advanced cutting designWIDE GRINDING RANGE: From ultrafine Turkish to French Press coarse and everything in betweenPRESERVES AROMA: Gear reduction motor grinds slow with reduced noise and little static build-upLARGE CAPACITY: 8.8 o...
Specs:
| Color | Black |
| Height | 7.8 Inches |
| Length | 14.6 Inches |
| Number of items | 1 |
| Size | 8.8 oz |
| Weight | 4 Pounds |
| Width | 9.6 Inches |
Hey friend,
Reading posts like yours always strikes a chord with me -- once upon a time, I was a 17 y/o male weighing in at at least 220 pounds. (I say "at least" because I didn't weigh myself for at least two years after I saw that number back in 2007, and it's entirely possible that I gained more and was too afraid to acknowledge it). Being overweight my entire life, I never thought it would be possible for me to be at a weight that bears any semblance to fitness, but I tip the scales around 145 nowadays :)
I came to the realization that the reason for my weight gain and constant tiredness over the years was from lack of portion control and all the refined carbs I was eating (despite getting at least 7-8 hours of sleep every night). I just want to share what I've learned from LoseIt over the last year:
Weight loss is 80% diet, 20% exercise. In short, you can't out-train crappy nutrition. Even if you hit the gym fairly regularly, your results will be stunted by what you are fueling your body with. Start taking control over what you eat -- lean meats, eggs, fish, legumes, and VEGGIES should take priority.
If you feel like you're starving yourself, then you're doing it wrong. Diet-wise, lean protein and fiber are your best friends. You'll stay full and be more satisfied than if you ate a bunch of carbs and starch. Lean meats, eggs, nuts, lentils, greek yogurt, quinoa and veggies are staples in my kitchen now. Whatever it is you're eating, though, start logging it all. You're much less likely to want to gorge on a double-cheeseburger or hot fudge sundae if you force yourself to log it and watch it blow up your calorie numbers for the day. MyFitnessPal (website/smartphone app) is a great tool that takes almost all of the guesswork out of food journaling. Of course, you need to tell it how much food you're eating, so I highly recommend making a small but worthwhile investment in a digital kitchen scale and use it in conjunction with a tool like MyFitnessPal in order to provide you with the most accurate results and insight into your personal calorie consumption :D
In the first couple of weeks, you may find it difficult to wean yourself off of certain unhealthy foods that you may have grown accustomed to. Here are a few simple substitutions that you might be able to make to your daily meals:
Breakfast - Instead of cereal, have two eggs and fill the rest of your plate with steamed vegetables. Sprinkle a bit of cheese and salsa over the whole thing. The healthy fats and proteins from the eggs and cheese, coupled with the fiber of the vegetables will keep you full and happy all morning.
Lunch - A better alternative to sandwiches is just to try taking what you would normally make a sandwich with and put it on a salad instead. A big spinach salad with turkey breast or tuna on it saves you a great deal of unnecessary carbs. When it doubt, wrap it in lettuce.
Dinner - Try switching up the traditional "meat & potatoes" meals. The meat can stay, but try giving mashed cauliflower a try. When made properly, it tastes just like the real thing :D
If you are constantly hungry, you may not be getting enough protein, fiber, or healthy fats to keep you satiated -- this ultimately causes that uncontrollable urge to snack. Make sure you're eating a fair amount of lean meats, leafy greens, nuts/legumes. Once you start filling your stomach with things that are satiating, you'll probably find that the urge to snack will subside considerably. In absence of that, try keeping some healthier snacks around the house if possible -- I buy 5-pound bags of baby carrots to munch on constantly :)
In terms of drinks, you should be limited to water, tea, black coffee, and milk. No soda -- even diet. If you're used to drinking soda or other sweet drinks and find that the sweetness is a difficult thing to give up, try cutting up some citrus fruits and putting letting them steep in a pitcher of ice water. The refreshing hint of sweetness is usually enough to satiate your cravings! It also helps you to meet your daily water intake goals, which should be at least 72 oz. per day -- it's very common for the body to misinterpret thirst as hunger. You'll also find that staying hydrated will give you more energy to work out / study, etc.
If you find that you want to make your own meals, nothing is easier than getting a pack of boneless/skinless chicken breasts and brushing them down with a little bit of olive oil and herbs/spices and throwing those bad boys in the oven at 350 for about 30 minutes. Serve with a heaping helping of frozen vegetables, and you've got yourself a cheap, filling, nutritious meal :D
> how I should go about starting to run when I have no experience,
There is a great program out there called "Couch-to-5K". It's geared specifically toward beginning runners with no experience who eventually want to work their way up to being able to complete a 5K without stopping. It's very specific, gradual, interval-based training that many Redditors enjoy (so much so that they've created a subreddit just for the program!) Check out [r/c25k](http://www.reddit.com/r/c25k]!
While running and other cardio is decent for getting fit, I would advocate strength/weights/resistance training as soon as you think you're comfortable with it. The extra muscle you'll build not only helps you look better, but it will burn more fat/calories as it sits on your frame.
I've been using the program outlined in the book The New Rules of Lifting. It gives you detailed instructions, pictures, and a 52-week workout schedule. I started noticing amazing progress in both strength and appearance after about 2 weeks, and just began the fifth phase in the series. I've never felt better!
To help monitor your progress, continue to take photos of yourself in various poses and states of undress every few weeks or so -- you'll be happy later that you have them for reference. Because you look at your body every day, it's often difficult to notice small, incremental change. Having the "before" photos handy will definitely allow you to more easily see the progress you're making down the line. I would recommend an official weigh-in once or twice a week. Make sure it's under the same circumstances (first thing in the morning, in the buff, after you've expelled any waste, before a shower, and before you eat/drink anything).
I'm so proud of you for acknowledging that you want to make change and taking the first steps towards making that happen. It doesn't get any easier as time goes on. I went through all of high school obese, and all of college overweight. I always thought I was a reasonably happy person, but after graduating college, losing weight and looking back on the last 6 years of my life, I realized how unhappy I actually was and how much happier I probably would have been. After losing the weight and starting to see my body take on a shape I thought it would never have, I have such incredible confidence, happiness, and exuberance for life that I never imagined possible. I have no doubts that you could easily experience similar results if you stick with it :D
Like I mentioned before, getting healthy should be more like a marathon rather than a sprint -- you're in this for the long haul.
Please keep in touch and don't hesitate to reach out to me if you need any more advice -- diet/exercise tips, meal ideas, a crying shoulder, you name it. I wish for nothing more than to see you succeed.
“There is nothing noble in being superior to your fellow man; true nobility is being superior to your former self.”
~ Ernest Hemingway
So go forth and kick ass, friend :D
Cheers,
Dave
edit
Please be fucking careful. Don't be stupid. Take the time to accurately prepare your solution and to diligently track your usage. Don't use too much, be careful what you combine this with, and don't get careless. There are few drugs more susceptible to overuse than cocaine. I can personally say that switching to this method made me eventually get tired of coke, because once you can do it non stop all the time it loses it's appeal and you start to feel a bit like a junkie.
I would highly recommend keeping your solution strength as low as possible and limiting your use to no more than two days per week with at least 3-5 days between sessions, and taking a month or two off every once in a while is always a good idea. You'll spend way less money and will feel better physically, and you will be more able to maintain that sweet spot where you are feeling good but are still mentally sharp.
Typical nasal spray bottles seem to be designed to coat your entire nasal cavity with a widely dispersed mist, which means most of the solution ends up being absorbed by the nasal mucosa and having to travel through the blood vessels in your nasal cavity to the brain. Something that allows you to target (idealy) the olfactory epithelium and or the trigeminal nerves in the nasal cavity will allow faster delivery to the brain and reduced waste. This will also help to limit damage to the nasal mucosa by allowing you to use less solution while delivering more directly to the brain. See:
Ideally you'd try to find something like Impel NeuroPharma's POD (Precision Olfactory Delivery) device, which is designed to target the spray more effectively to the nerve clusters in the upper nasal cavity. However, it seems to be nearly impossible to source one of these devices online. That being said, there do appear to be at least a couple available devices that might come closer to the POD than standard nasal spray devices:
Note that you'll probably want something with a clear bottle, which makes it much easier to see how much solution is left in the bottle and allows you to spot any impurities in your product (cocaine should rapidly dissolve and leave the solution nearly completely clear, while many adulterants will take longer to dissolve or will not dissolve at all, leaving the solution cloudy with particulates at the bottom of the bottle.
I haven't personally tested these devices so I can't say for sure if they are any more effective than a standard spray device, but it looks like they should give you greater control over the dispersion target. If anyone knows where to find one of the specialized delivery devices, please let me know.
Once you have your nasal spray device, you'll probably want some way to consistently prepare your solution. A simple oral syringe will allow you to measure an exact amount of solvent (saline solution):
Saline Solution:
A digital milligram (.001g precision) scale will allow you to measure your solute (the powdered, water soluble drug) with reasonable (but not perfect) precision:
Scale:
A funnel will make it easier to get everything into the bottle and is recommended:
Once you have all the necessary supplies, unscrew the cap on your nasal spray device and put the funnel into the bottle mouth. Figure out your desired strength for your solution and then measure out the corresponding amount of saline solution and cocaine. The trick with this delivery method is figuring out the correct concentration for your solution depending on how strong you want each spray to be. I've found that 25mg/ml is perfectly sufficient, 50mg / ml is more than enough, and anything stronger is a bit of a waste. In fact, there seem to be diminishing returns anywhere past around 20mg/ml, and in many cases 15 or even 10 mg/ml seems to work just fine.
First pour the cocaine into the funnel (you don't need to pulverize it), and then using your oral syringe squirt the saline solution onto the cocaine in the funnel where it will rapidly dissolve and fall into the bottle. You could mix the solution in the oral syringe or elsewhere, and you could add the saline solution before the cocaine, but then you'll either end up with wasted solution in another container or a funnel that still has some powdered cocaine on it. If you pour the cocaine straight from the scale into the funnel and then use the solution to wash it down, you should end up with very little wasted cocaine and a nearly clean funnel.
I'd recommend to start with a weaker solution and try it out, you can always add more cocaine until you figure out the optimum concentration. If you decide to do this, replace the saline you've used each time you add more cocaine so you can accurately track the strength of your solution at each interval.
At this point you're ready to screw the cap on and use the spray. I'd recommend one pump in each nostril - any more and you'll end up with wasted solution dripping down the back of your throat. However, you can limit waste by laying over the edge of a surface and tilting your head back so that gravity naturally draws the solution towards the olfactory epithelium. In this case two or three sprays per nostril seems to deliver a stronger dose with negligible waste. 30 seconds to one minute seems to be long enough to avoid excessive waste, and 15 seconds may in fact be long enough.
I think that pretty much covers it. Be forewarned that this delivery method makes it much easier to redose, which would probably contribute to an increased risk of addiction and a tendency towards excessive and chronic use. Also, some have said that this method doesn't deliver the same powerful "kick" as snorting powder, which makes sense as you are using much less of the drug per spray than you would if you snorted a line. For an illustration, lay out what would be a typical line for your and weigh it with your scale. The spray devices listed above typically deliver 0.1ml of solution per spray, so if you have a solution with a concentration of 50mg/ml, then you're only getting 5mg of cocaine per spray, as opposed to something like 20mg for even a small line of powder. I haven't personally tried making a high strength solution, but you could try mixing your solution such that each .1ml spray delivers an amount of cocaine equivalent to a typical line of powder. This would also minimize the total number of sprays needed and the total volume of liquid you'd need to spray into your nose, perhaps limiting irritation.
However, I've found that even though the absolute dosage is lower the efficacy is much greater, perhaps due to the added liquid facilitating easier absorption and almost certainly due to the decreased waste from powder dripping down your throat or being dispersed and carried elsewhere by the mucous in the nasal cavity.
As a final note, even though the saline solution will moisturize your nose, I'd still recommend using the plain nasal spray to irrigate and clear your nose periodically or at least at the end of the night, as the solution is quite irritating (though of course much less so than dry powder).
Good luck and be careful!
Thanks! No blog, but what are you looking for? I generally tell people it's not actually about the recipes themselves (which is counter-intuitive), because everyone has a different palette & likes different things, it's more about:
This is the macro calculator I usually use for recipes:
https://www.verywellfit.com/recipe-nutrition-analyzer-4157076
I typically set the serving size to "1" (one) and then set the serving size again to the standard size (ex. 24 brownies), that way if I want to cut 20 larger brownies in the future, I can just do the math on my smartphone, because I have the macros for both the whole recipe & for the standard serving size.
Once you learn how to calculate your own macros (using a calculator, buy a scale, adopt a meal-prep system, etc.), the world is your oyster, because with IIFYM, you can make any recipe out there fit your diet! I do use a handful of modern tools to help me cook; in particular:
That scale is the newer version of what I have. You can find cheaper versions for like $15 on Amazon, but I like this one because it does both imperial & metric (so whether the recipe calls for ounces or grams) & has a pull-out display for when you're measuring stuff in a bowl, like say chopped chicken - super convenient!
The Instant Pot is an electronic pressure cooker (nice & safe, won't blow up like the old ones!) that gives repeatable results & cooks food mostly automatically; also great for liquidy meals like stews, chilis, soups, and bisques, for which I storage batches with Souper Cubes. Sous Vide is a bit more of an in-depth discussion (we can chat about that if you're not familiar!), but it basically involves vacuum-sealing your food (primarily meat & some veggies) & cooking them slowly underwater for perfect results every time. The vacuum-sealer is great for use with sous-vide (I vac-seal nearly all of my meats & stick them in my freezer) & also for storing leftovers, like shredded chicken & pulled pork.
The Baking Steel is an amazing device that lets you cook incredible pizzas at home, as well as various breads (I do a lot of no-knead breads, which, if you haven't been introduced to that, is SUPER easy & gives you amazing results!). The Inverter microwave is a newer microwave design that can actually module the power level (most microwaves only operate at like, full power, and "blink" it on & off to simulate a different power level). The main difference with an inverter model, and this one in particular, is the the "sensor reheat" feature, which actually does a ridiculously good job of figuring out how to reheat your food properly, instead of just being hot & rubbery on the outside & still frozen in the middle. The deep freeze speaks for itself...just a place to store my raw & cooked food; I get huge costs-savings because I can buy food in bulk, vac-seal it, and freeze it literally for years.
Now, keep in mind, this is all stuff I've built up over years of cooking, so first, don't feel pressured to buy anything, and second, don't feel like you need to get everything all at once. I enjoy cooking, but most of the time, cooking is a chore, and anything I can do to make that chore easier means that I'll do it more consistently because it's not such a hassle. Like, I can dump an 8-pound pork shoulder (bone removed & chopped into fist-sized chunks) with 1/2 a cup of water into my Instant Pot basket, set it for 70 minutes on Manual, dump it into my electric mixer bowl & shred it in about 60 seconds, let it cool down, and then vacuum-seal up 8 one-pound packages of pulled pork, which is good for 2 to 3 years in my freezer (vac-seal = no air = no freezer burn!). I can then use that pulled pork for BBQ pulled pork sandwiches, quesadillas, loaded baked potatoes, etc. & calculate my macros based off the quantity that I use.
A lot of people take the meal-prep approach of making 25 trays of the same food, but man, I get pretty sick of eating the same thing all the time, haha! So that's why I use appliances (to make it easy) & picked up a deep freezer (to store raw & cooked foods in). Again, most people are pretty shocked when they start tracking how much they truly, actually spend on food every month - everything from grabbing snacks at the gas station convenience store to the extra goodies you get at the grocery store to the quick take-out stuff you get for lunch or on the way home - and once I realized how much I was spending, it was pretty easy to justify some home kitchen equipment purchases over time to help me in both saving money in the long-term & in hitting my macros.
Once you get a personal recipe database built up & create an efficient workflow, IIFYM is actually fairly easy to stick with. I literally eat better than anyone I know & have a better (lower) food budget than most people I know. As far as eating schedules, you can do one meal a day, three meals a day, six meals a day, doesn't matter, as long as you hit your macro numbers for the day! I like to do 7 "meals" (more like snacks, really), as I have reactive hypoglycemia & find that eating smaller meals every few hours does a better job of keeping my energy up than just 3 big meals a day.
part 1/3
Well this is gonna get kinda long and will only scratch the surface but I'll break down the pros and cons of some of the most popular entry-level gear in as un-confusing of a way as I can. First up, let's look at grinders.
First off, you want a burr grinder, particularly a conical burr grinder because those blender-y blade grinders they sell at wal-mart for $5 don't get any kind of a consistent grind. Varying sizes in a grind means varying levels of extraction in the cup and that means off flavors. Because burr grinders are more expensive, hand crank conical burr grinders are commonly recommended to beginners because of their lower price point compared to similar quality electrics. They're cheap and work well but do have some drawbacks beyond the extra effort involved in grinding. First, most of them don't have actual grind settings and you adjust the grind size by twisting a wheel until it looks as fine/coarse as you want it to. If you use different brew methods and switch grind size a lot, this can be a bit of a pain. Second, most hand grinders aren't ideal for french press because of the way the burrs are stabilized; they'll give fantastic fine/medium grinds but the coarse grind is a tad inconsistent. That said, I use a hand grinder for french press all the time and am relatively happy with the results. A few common ones are:
The Hario Skerton. I personally have one and love it. As I said, not perfect for french press but it's a durable daily driver that never lets me down and can do an espresso grind damn near as well as a $300 baratza
The hario mini is essentially the same grinder in a different, smaller package. Perfect for travel
The porlex JP-30 is a tad more expensive but has grind settings that, while unmarked, do "click" into place making adjusting grind coarseness a bit easier
If you wanted to go the electric route, I've seen refurbished Baratza encore grinders for around $100. This will give you a mediocre espresso grind but a perfect and much easier drip and french press grind
Next up: preparation methods
French presses use a metal mesh filter, which gives you all of the oils in the cup and lets a tiny bit of really fine coffee solids through, which gives the cup a rich, full-bodied, velvety character They're also very easy to use as there's pretty much one accepted way to brew in them. And here's Philly's own Todd Carmichael demonstrating it. As far as which one to buy, they're all pretty much the same: a glass tube with a stick in it and some mesh on the end of the stick. I like my sterlingpro a lot but the bodum chambord is hugely popular and looks just as nice. Even a cheapo will do the job just as well, though, even if it doesn't look as nice.
pourovers do essentially the same thing as a drip coffee machine just with a lot more input from you, which is good because all but the most ludicrously expensive drip machines are very inconsistent and don't work as well as just doing it your own damn self. With a pourover, you're going to use a kettle or measuring cup with a spout to pour the water over the grounds in a set amount of time (3-4 minutes depending on the grind size) and usually in a very specific manner. Because these use a paper filter, there are no oils or insoluble solids in the cup so the coffee is clearer, tastes cleaner and usually a bit brighter than french press coffee. Popular models include the Hario v60 which is one of the more finicky models. If you decide on one of these, be sure to use a gooseneck kettle like Mr. Carmichael was using in the french press video above. Slightly more forgiving are the kalita wave and the melitta both of which would work fine with a normal kettle so long as it has some type of pour spout. If you want something with very thick filters, so as to produce a very clear cup, and also looks very nice, the chemex is a beautiful thing that produces great coffee, has a built-in carafe, and can make more than one cup at a time. Really more of a replacement for a large-volume drip machine than most pourovers.
The Aeropress is an absurdly popular, extremely versatile, and very well priced coffee brewer which is essentially a huge syringe with a paper filter instead of a needle. There's a thousand recipes online with different ways to use it, all of which produce a different cup.
Also worth noting is that you may want a kettle with temperature control, coffee should be brewed at 195-205F, so knowing what temp your water is helps reduce a lot of the headaches of cooling off boiled water for a vague amount of time. This bonavita is a little on the pricey side but has temp control and a gooseneck, which is always useful
Kitchen knife selection is going to depend largely on the user. How you sharpen (or don't), your comfort with carbon steel, your preference in handle, your preference in knife thickness... there's a lot that you can buy with $150. I'll throw out a few possible suggestions.
If you want to save a lot of money, buy a Victorinox. They're soft, they're easy to hone, they're comfortable, and they can survive ridiculous levels of abuse. If you keep it sharp you'll never really need to buy another knife.
If you want a German knife, Messermeister is king. I like the steel better than Wusthof, Henckels, or F. Dick and the fit and finish is extremely consistent. They also lack the full bolster that makes sharpening most other German knives a pain and a half. The Elite lines feature three different handle materials that have nothing to do with the blade, but for the record I think the olive wood handles are extremely classy.
For an entry level Japanese knife, I like the Fujiwara FKM a lot. The steel on it is harder than almost any western chef knife, though it's the softest Japanese knife on this list. The knife itself is comfortable and inexpensive. If your experience with Japanese knives is limited to Shun and Global, this thing will open your eyes.
If you sharpen on plates or stones or you would consider having the knife finish sharpened, the Kagayaki CarboNext is a semi-stainless clone of the much more costly Ichimonji TKC at a much lower price. I have heard about a few fit and finish issues with them and the edge that normally comes on the knife is often bad. It will likely need new, cleaner bevels to be worthwhile. Even so, the steel and the geometry are great.
If you're willing to consider a wa handled knife, look at a Tanaka Ginsan.
The fit and finish on the handles is usually pretty poor, though I've heard they've recently been improving. Still, an hour or so rounding the spine and choil and sanding the handle would probably help this knife out. With that attention this knife is excellent.
If you want a nicely finished wa handle, a Gesshin Uraku is inside your general price range. The steel in it is not really on par with silver #3 or the proprietary mix used in the CarboNext, but the fit and finish on these knives is notoriously good. If you don't use a lot of kitchen knives you would probably never notice the difference in steel, but your would definitely notice the difference in the handle. It also includes a saya.
If you're willing to consider carbon steel, which at this price range you really should, you have even more options.
On something of a budget, the Richmond SAB mirrors a classic French knife pattern in a better and harder steel. It's also lighter and doesn't have a full bolster. The handle is workable and comfortable, but boring. The fit and finish on these is pretty good, but there's not a lot to fit or finish.
Another Gesshin Uraku, this time the W#2 with a kurouichi finish, will have the same quality of fit and finish as the stainless I mentioned above with the bonus of a top notch blade steel. It will probably take the best edge of the knives listed, though I have admittedly not used this one. This knife does not offer a lot of knuckle clearance, so if you have big hands, this isn't the knife for you.
The Minamoto Nashiji is a very delicate knife. It is one of the lightest western handled knives I've ever used and I found it charming and easy to sharpen. Again, if you have big hands, this one is a little compact, but with my large glove sized hands I found it perfectly workable.
Outside your price range but worth considering is the Kohetsu Aogami Super. The core steel in this knife takes and keeps the best edge on this list and the handle is a classic, no-nonsense design.
All of the knives I linked are the 210mm/8" versions except the SAB which is offered only at the 250mm length. I usually suggest people move up to a 240mm/10" knife, but it's a personal preference. Most 240mm gyuto feel more like an 8" German knife in the hand than they do a 10" knife because of the almost universally lower weight. I also suggested knives that have pretty middle of the road grinds. The exceptions are the Kohetsu Aogami Super, which is actually quite thin in the 210mm length but pretty middle of the road at the 240mm length, and the Minamoto, which is extremely thin. If you want a big, fat knife or a skinny knife they certainly exist in your price range.
Any other information on your use or any reflections on the above could help someone suggest different and very possibly better suited knives for you. For the record, I would suggest a Messermeister or the stainless Gesshin for most people depending on handle preference.
I'm a little late to this party and having read through some of the conversations already posted here, i've got a couple thoughts/ideas.
-my personal experience-
For me, to lose weight, I have to do all of the following: reduce my carb intake to ~50g per day, 30-40+ minutes of cardio every other day, and 3-4 days of heavy weight training per week. If I skip out on any one of these I'll stall out and just maintain. The scale put me at 13.7% body fat/49% lean muscle this morning just to give an idea of my physique.
-my thoughts-
You mention that you reduced your carbs but largely didn't calculate the rest of your daily intake. Considering weight control is, in a nutshell, calories in vs calories out - I have a few recommendations.
Figure your TDEE using an online tool, I like this one. Use this to help you calculate a deficit. It sounds like you're interested in super low carb so I'll echo other's recommendation of /r/keto. They're a pretty decent community and love to help out. After you've got some macros figured out, buy a food scale. Boom. $13 on amazon. Use this scale to actually measure your foods so you can actually know close to what your actual caloric intake is like.
Don't be afraid of dietary fats. It sounds like you might not have been getting enough during your cutting phase if you were left fatigued and lethargic. Dietary fats are critical components of many body processes as well as rich in energy. This could be a limiting factor in testosterone production as well as other hormones/chemicals/etc.
Why weight lifting is critical to losing fat. I'll keep it super simple, and it'll probably come off like common sense. When the body is faced with a caloric deficit, it has to get energy to function from somewhere. It typically won't rob the organs as a first line of defense. That leaves body fat and body muscle. The body knows that muscle is expensive to maintain and the proteins in it can be used to perform other bodily functions. If the body has no need for maintaining muscle mass it will consume the muscle mass as a priority. If you exercise with heavy weight lifting your body will produce hormones and chemicals that signal your metabolism that the muscle is critical for survival, get the energy from somewhere else...body fat.
Supplementation to help fat loss - People have been losing weight for years just by modifying their diet and exercise. There's no reason (assuming you are a typically functioning human) that you shouldn't be able to get as lean as you want without trying to artificially regulate your systems. There are some supplements that can help especially if you're deficient in some area but that should show up on blood tests. I would recommend putting supplementation out of your mind unless you get a blood test that clearly shows that you're deficient in something.
-what next?-
Consume less calories than your body needs but make sure to get enough protein and fat since they're the most important. Perform heavy weight training several days per week to keep your body in a mode that will prioritize keeping your muscle and using your body fat for energy. You don't have to be trying to get huge in the gym, just make sure you're not curling the 2.5lb dumbbells and calling it a day. Starting Strength is a great program for beginners that would probably fit your bill pretty nicely assuming you have access to a gym. Cardio is great exercise and can really boost your cardio-pulmonary health. Use cardio as a tool to drive up your TDEE and make your caloric deficit more efficient. I know you said you're more interested in looking at the mirror instead of the scale, and I 99% agree that this is the best measure of success. However, a scale that can measure your body fat% would be very useful in measuring progress. You might not see the .5% body fat loss but the scale will tell you. It might not be super accurate to an exact body fat % but after owning this one for a few months, I can say it does a good job of showing my ups and downs.
-as far as supplements go-
daily multi-vitamin - for obvious reasons
daily psyllium husk - start with 5g and that's probably enough. helps with appetite, makes bathroom time effortless, helps with digestion, and overall leaves you feeling good and fresh.
caffeine - dont overdo it but sometimes some caffeine or a preworkout can give you that boost of energy you need to get through something.
whey protein - if you physically have too much difficulty eating enough protein from food, this can be useful. it's not a magic muscle saving serum or anything...just another form of dietary protein.
You and I are probably similar. I had never cooked before spontaneously deciding I was going to cook all of my own food from scratch on my 37th birthday. I also spent HOURS slaving away on often so-so dishes and felt discouraged. I pushed through that initial 2-3 month window of crappiness and now I'm 2.5 years into cooking 6 days a week and it's been life changing. That said, I still don't LIKE cooking, but I don't mind it, and I love the feeling that I finally know what I should be eating.
I think it was J. Kenzi Lopez Alt who said that good food is the result of:
Good recipes: I can't believe there's 41 comments and no one's mentioned Budget Bytes. She is the queen of pragmatic, low cost, fast-enough, from-scratch, healthy weeknight dinners. For your first couple of months of cooking try focusing on just her recipes. They're beginner friendly and very well written.
At least until you develop the sense of what makes recipes good, avoid YouTube, gif recipes, Pintrest, and the obnoxious blogs full of too-well-staged-photos. They're interested in views and shares, not cooking.
Here's some other sites that produce consistently good food:
Here's some confidence building fantastic recipes:
Good Ingredients: In the beginning I found that cooking was often way more expensive than I'd ever imagined. That was in part because I hadn't built up much of a pantry (oils, vinegars, spices, other condiments), but the main reason was because I was shopping a supermarket. For both cost and quality reasons, each week try finding a new market in your area. In particular, look for ethnic markets frequented by people of the biggest ethnic culture in your area. The asian, mexican, and middle eastern markets in my area have better quality food for quite seriously 50-75% less than a supermarket. The closest supermarket charged $7/lb for prepackaged ground beef. The mexican place nearby charges $3/lb for ground beef they grind themselves.
Speaking of ethnic markets, try to find an ethnic market with a dry goods section where you can scoop out as much of an ingredient as you want into bags for cheap.
If you live in a metropolitan area find a Penzeys. They sell spices that are much higher quality than a supermarket for about 25-50% less than supermarket prices.
You're going to need tons of chicken broth. Until you inevitably start making your own large batches in a pressure cooker a year from now, stick with Better Than Bouillon(https://www.betterthanbouillon.com/wp-content/uploads/2018/06/BTB_Package_8oz_Roasted_Chicken_Base-2017.png). It's cheaper and better than the crap you get from a can or carton.
Good Equipment: The most important thing is a sharp knife. Here's the $27 knife everyone usually recommends. Even if you already have a knife, it's probably dull if it's not new and you haven't sharpened it; get it sharpened or buy a new one for now. Learn to hone it before or after each use.
Go to a kitchen supply store, Smart & Final, or Amazon and get a couple of 1/4 sheet trays ($4?), ten or so bar towels ($1 each), and a prep bin ($4) so that your prep area looks like this. Also get a bench scraper ($5). The 1/4 sheet trays keep your ingredients organized and ready to go. The prep bin saves you from having to keep a trash can nearby and keeps things tidy. The bench scraper is a time-saving godsend for moving stuff around. A proper prep station alone will probably cut your cooking times by 10-20%.
Good Technique: Once you have an organized prep station and you get your workflow down, the biggest time saver is going to be knife skills. Onions & garlic will be your most commonly chopped items, so watch several videos and make sure that each time you chop one of those it's meaningful practice. To avoid cutting yourself: get a sharp knife, while cutting always consider what would happen if your knife slips, and every time something awkward/unusual happens, take a small pause before you continue cutting.
The art of home cooking by recipe really comes down to heat management. Get an infrared thermometer for $20, they're incredibly valuable when starting out. For the vast majority of sauteing, turn your pan to medium high (just guess) and measure your pan with that thermometer until it's around 300 then pour in whatever oil you're using. Keep checking them temp with the thermometer until that oil is around 330-360 then toss in your meat or vegetables. If you wait a few seconds, slide the food out of the middle of the pan, and check the temp again you'll see it's in low 200's because the food saps the heat out of the pan. Your goal is to keep that heat in the 300's. Note that as the food heats up the pan will get hotter quicker, so as you're learning keep monitoring that pan and get used to the sounds it's making so eventually you'll manage heat through sound & instinct.
The last thing is: use more salt. If you're cooking a recipe that looked great, and got great reviews, and it doesn't seem like you made any big mistakes yet it's still bland, it's because you didn't add enough salt 100% of the time. It took me a while to realize that when I add salt to a dish someone else has made, they had already put a good amount of salt in it. So when salting a dish that makes four portions, you're not going to just shake in some salt from a shaker, you're going to pour in a teaspoon or more.
The "all or nothing" personality is something I struggled with. I recognized it, as you have, but what really made the biggest difference was making it my primary focus. The reason I never seemed to reach my goals, time and time again, was because I burnt out. I was fueling myself with the initial rush of motivation, forgetting that I would soon have to switch fuels to something I wasn't ready for: discipline. So, it's important for us to start small. Have you read "The Hobbit"?
Bilbo Baggins didn't go straight from his comfortable little hobbit hole straight to the Smaug's lair. His first step was simply leaving his hobbit hole, which he never would have done if he knew from the start that he'd be facing a dragon.
So, you need to start small. You have these goals, which are great, but they are the long-term goals. We need to break these things down into small, do-able goals that won't result in burnout. You need to leave your hobbit hole before facing your dragon.
---
You want to start going to the gym, among many other things. Going to the gym involves:
(a) convincing yourself to go to the gym, even on a rainy day or when you're super comfortable at home
(b) getting off your ass, into the car for ~15 minutes, into the gym where you would feel guilty for working out less than 30 minutes since you drove there, driving back home for ~15 minutes
(c) paying for a membership
Is this sustainable right off the bat? Remember, this is about building habits. We want to make this so easy that you will have no problem doing this. So start small and reduce the barriers of entry that will likely burn you out after your 2 weeks of motivational fuel runs out.
I did this simple routine. You can do it at home, it takes 20 minutes max, and all you need is a pullup bar. How much more doable does this sound?:
(a) convince yourself to get off your ass and walk 10ft to your pullup bar
(b) do pullups, pushups, and squats for 10-20 minutes
People may chime in about this program is missing this or that or how barbell squats cured their cousin's cancer. Fuck 'em. Doing something consistently is infintely better than doing the "ideal workout" inconsistently for 4 months before tapering off working out altogether. And guess what? Once you have built the habit of working out and want to go to the gym, you can!
---
You want to keep up with housework. So, using the same principles, start small! I mean so fucking small that you would laugh at yourself if you couldn't even do that. Turn on your favorite song and do housework until that song is over. You aren't obligated to do any more than the length of that song. Sure, you may not have cleaned the entire house, done all of your laundry, and roasted a fucking turkey. But, you may have done the dishes, or at least half of them. Again, something consistently is infinitely better than nothing. And, again, guess what!? Once you have built the habit of doing housework for the length of a song, you can play two songs!
---
You want to be healthier and take better care of yourself. Well, working out and doing some housework certainly falls under this. Let's address healthy eating. Again, we want to make this as simple as possible. Here is what I do that has been working really well:
Toss the following into a pressure cooker:
Meat (Choose 1):
Veges & stuff (choose 4):
Sauce (choose 1):
Seasoning:
I don't even cut anything. If anything, I just use my hands to split the green beans, carrots, etc. Again, low barrier of entry. Keep it simple!
At the same time, on the stove or in a rice cooker, make something to put this all on top of:
It takes about ~30 minutes to make a ton of healthy and tasty food. I do this twice per week.
For breakfast, I toss 1 cup of oatmeal in a bowl, 2 cups of water in that bowl, cover and microwave it for 4 minutes, and add a tbsp of brown sugar and maybe some peanut butter. Simple, easy, fast, little barrier of entry.
---
---
---
We've added quite a few (doable!) things for you to work on. You said you want to start studying programming. I would caution you to not start doing that now. You don't want to burn yourself out. Remember, start small, we're building habits here.
This doesn't mean you won't ever study programming. In fact, what if you start now? What if you burn out in 1 month and don't touch programming again? What if this leads you to stop working out, stop doing housework, stop cooking? It's not worth it.
So how do you know when you're ready to add studying programming? Read this. Only make 3 cards: workout, housework, cook.
Once you are done with these 3 cards, you can create a new one for programming. But make sure you follow the same principles of starting small! Only commit yourself to 10 minutes a day. You can always do more, but 10 minutes is success.
-
Enjoying this? Looking for another adventure to go on after 7 weeks of programming? Fix your sleep schedule. Make a card for light's out at : pm.
-
At this point, we're getting closer to facing Smaug. You want to add another thing? Add meditating. Again, start small! Start with 5 minutes a day, or maybe less! Whatever sounds so doable that there is no way you couldn't do it. I don't give a shit if that means 1 minute per day.
---
Don't feel bad if you don't fill out these cards perfectly. Remember, something is better than nothing. If you only have an X for half of those days, you've still improved yourself enormously.
There will be fuck-ups. Bilbo fucked up, but he still got to Smaug's lair. Use your fuck-ups. Fucking abuse those fuck-ups. When you fuck-up (which you will, it's part of the process), make it a point to learn from it. Make yourself glad you did it. Didn't workout today? Do something you otherwise wouldn't have done that day: maybe go for a short 5 minute walk, or call your mother to tell her you love her, or send an email to your favorite band or author and thank them for existing, or read a short story on /r/writingprompts, or write a haiku, or tell yourself you're fucking awesome. It doesn't have to be big, but I guarentee it will be worth doing.
Remember, the first step is coming out of your hobbit hole. There will be many, many challenges along the way. You might have to fight some spiders in Mirkwood, you might have to get in some barrels to escape some wood-elves, you might find a ring. Your life is a book, you aren't going to go directly from your hobbit hole to Smaug's lair. Along your journey, you likely won't even be thinking about Smaug's lair, because you should be focusing on the present, your 3 minute dishwashing session, your 10 minute workout. There will be a point you will look back and see how far you are from your hobbit hole. Before you know it, you'll be standing in front of a dragon's lair and realizing that back in your hobbit hole, you never in 100 years would have expected to be standing right there.
Now go take your first step toward becoming Bilbo.
TLDR: I made a shopping list at the end.
​
I think most people who are serious about having a good set of knives would advise you to not actually buy knives in a set. It is useful to keep in mind that most knife sets, especially at your budget range or lower priced, are sets for marketing reasons and not a value buy. Certain traits like the number of items included in the set make them seem like you are getting a lot of items for your money, and then shortcuts are taken to increase the number of items versus the quality items. This is a marketing trick. It sounds like you are getting more value the higher the number of stated pieces there are.
For example of typical cost saving shortcuts used in sets: you typically want a bread knife to be 9 or 10 inches, or a 8 inch chef's knife, but shorter lengths will be typical when in a set. You probably don't need to be concerned about having the 6 or 8 steak knives of low quality (again, to increase the number of pieces in the set to make it seem like a good value). In fact, just 3 or 4 high quality knives will perform everything you need of them. For the most part, you can get by on 90% or 95% of what you might do with just a workhorse chef's knife if you need to.
​
My recommended path therefore is to build your own set. This also has the benefit of letting you pick and choose for each specific piece rather than being locked into one brand or one style, and can allow you to budget things out to pick up a quality piece when you can afford it rather than thinking you should have everything all at once.
In order of how you should acquire your pieces:
First, knives are tools that are subject to degradation in performance as they are used. It is important that you mitigate this by investing in protecting the edge of the knife when not in use and that you are able to regularly maintain the edge. You will want either a good wood block or knife edge guards or a good drawer holder to keep your knives safe from non-use related damage. I would lean towards definitely having a wood block or wood drawer holder. It is probably worth planning for the future here, so get what you need. This item should last for a long time so the money will not be wasted.
Look for something that will hold everything you eventually need. Make sure there is a slot that will hold a honing rod. You might want a kitchen shears in the future, so a slot for that is good, too. Ideally, there will be more than one slot that will handle a larger knife (2 inch wide or larger, for more than one chef's knife, santoku, etc.) and if it is an angle block the high positions will be long enough for 10 inch or longer knives. I really like the 17 slot options from cutlery and more. These are normally $50 or so, but can go on sale multiple times per year. Again - this will last you for your lifetime so find what you want for your ultimate plan and go for it.
Again, since it is not worth having a knife that doesn't work, you will need to maintain the edge. You do not need to be an expert sharpener, as you can find this as a service, but regular honing is a good way to only need this service maybe once or twice per year. Keep in mind that a sharp knife is safer than a dull knife, because you can stay in control and not need to use excess force with a sharp knife. An ER visit because of a dull knife will cost a lot more than what you spend on a good knife that can be kept sharp. You can shop around for this, but I would still look for something of quality. The Shun honing steel has a nice feature where it has a built in angle guide (this is at 16 degrees, but that is very close to common for a lot of knives).
So now that you are finally ready to look at knives, you want to start out worried only about 3 good knives: A chef's knife, a bread knife, and a paring knife. You do not need to spend a lot on the bread or paring knives to get you going, in fact some of the options at low price ranges for these are really good performers.
For a bread knife, the Mercer Millennia 10 inch wavy can be found for about $15. (as mentioned before, you'd likely get a shorter length in a normal set in a big box store). For a paring knife, a Victorinox 3.25 inch will be just a few dollars. It's nothing fancy and perhaps the handle seems small and thin, but for getting going this works great.
The chef's knife will be your main workhorse, easily taking care of 90% or more of what you are doing in the kitchen. It is very worthwhile to invest in this piece.
It is also worthwhile, in my opinion, to have more than one chef's knife (or mix with other workhorse knives, i.e. a nakiri or santoku, etc.). I would recommend making a long term plan to save for a quality piece in this category eventually (and with my approach of your knife block being able to handle more than one of a main type of knife you will not need to worry about storing it safely). Eventually you might want to look at the $130+ options in this category, but that is for the future.
In the meantime, with the budget range, I would go for the Victorinox Fibrox Pro 8 inch chef's knife. Usually around $35-$45. I have knives 3 times as expensive but still grab this if I need to swap to a clean knife or think I will need to be a bit more rough with the chopping.
​
Current Shopping List (prices subject to change with sales/economics):
This would fit in on the low range of your current stated budget and set you on a good path towards adding pieces (because of the knife block choice) once you can determine what you want and save towards them.
Keep in mind that if you can set yourself up to cook at home more and enjoy cooking and all of that, you will automatically shift your budget towards being able to keep improving your home cooking experience as you save from not eating out and wasteful food practices, etc.
​
Good luck!
Congrats! It's the tool that'll make the single-biggest difference in your cooking: a good knife can be used for many more tasks than a bad one, you'll be more accurate with your prep, and you'll just be more effective in the kitchen because you get more enjoyment from using it!
Re: your other post about the chef's knife, there are obviously a billion options at every price point, but there are also some sure-fire safe places to start. German knives like your Wusthof that use Solingen metal are deservedly popular. Solingen is a city in Germany that's famous for making knives, swords, scissors, razors, everything. Seki City is the Japanese equivalent. You can nerd out about this stuff all day long, but the only important bit is that Seki steel holds a sharp edge just a little longer than Solingen. Anthony Bourdain recommended Japanese knives for home chefs for this reason; not because they're better, they aren't, but because casual cooks are less likely to take frequent care of their equipment than cooks who use it every day for their job. You take care of your German knives? They're wonderful.
Wushtof and Henckels are the most visible German brands; Global is probably the Japanese brand most US shoppers are used to seeing. Moving up a bit in price, but without getting unreasonable, are Shun and Mac, two very good Japanese brands. I have knives by both—an 8" santoku-style Shun and a 10" French-style Mac. You'll almost certainly be able to find both on deep sale for Black Friday, if you need to give your parents a hint ;). At the other end of the price spectrum, possibly the single-most popular chef's knife in the US that didn't come in a set as part of a wedding present is the Victorinox Fibrox 8" or 10". Professional cooks who don't bring their personal knife collections to work use these. They cost about forty bucks and they're awesome. They don't look awesome. The handles are molded plastic, the blade tangs don't have a sexy reveal all the way down like any of the other knives we're talking about here, and if you let yourself get bothered by this sort of thing—which is OK, people do—they can feel like something you'd use if you were working back of house at The Golden Corral. But. Like most staples in any industry, there is a reason that everyone, everyone uses them. They're sharp, reliable, inexpensive and easy to replace if needed. I honestly recommend that every home cook have at least one, even if you also have a fetish-level artisan kitchen knife collection, because you never know when you're going to need to break down a raw chicken and finely slice a head of fennel at the same time. In fact I tend to compulsively order their 3.25" paring knives anytime I need to bump a purchase over the free-shipping threshold on Amazon, because I know you can never have enough of the damn things. They're like flashlights or AA batteries.
That's a lot of text in defense of a cheap knife, but those other knives sell themselves, and TBH a lot of it's overkill. Between my Shun santoku and my Mac, I recommend the Mac for two reasons. One, the Shun is just way thicker than the Mac, and regardless of which knife you go with that's something to consider. If the top of the knife is more than a couple of millimeters thick, then it doesn't matter how sharp it is; it's going to give you a headache when you try to slice something that's taller than it—like a large squash or a really big sweet potato, for instance. The Mac is a much slimmer knife, which makes it more useful. Two, the santoku thing is kind of a fad. Blame the Food Network, I guess. Santoku knives attempt to sit the fence between French-style knives and Chinese chef's knives. Chinese chef's knives are cleavers and are, to be fair, the Swiss Army Knife of knives. They do everything. They are badass. But unless you're going to go full-tilt with a proper Chinese knife (just about anything that Dexter-Russell makes, by the way, is legit) then just get a French chef's knife. It's worked the way it works for as long as it works for a reason. The santoku's height is meant to simulate a cleaver, meaning in practice that you can safely turn it on its side and bang it with your fist to smash something like garlic. French chefs have been doing that just fine for centuries.
Depending on the size of your hands (you said you're a teenager, so you're probably still growing) I think an 8" knife is probably great for you. 10" is more the norm in a professional kitchen, but even 7" is usually more than enough for anything you're going to come across at home. If you don't feel like waving around a sword, go with one of these.
Welcome to your new addiction!
your BP isn't just thin, she's emaciated. you need to put some weight on her, but you need to do so gradually. you also really need to feed her f/t before she gets injured by live prey. if your enclosure is meeting her needs, and you're not causing her stress by handling her unnecessarily, she should eat f/t for you just fine. i guarantee she wasn't eating f/t at petsmart because she was stressed due to poor husbandry.
i'm going to dump a TON of information on you. some of it may be redundant, some of it may be useful. first, three detailed care sheets, a tub setup tutorial, and product recommendations to cover all types of enclosures. then i'll give you a breakdown of how i handled my emaciated BP, simultaneously putting weight on her safely and switching her from mice to rats. you'll fine more generalized feeding tips in the third care sheet. read everything thoroughly, then come back with any questions.
since i don't see any mention of what your enclosure is like, i'll start with this: glass tanks can be very challenging for ball python husbandry due to the high amount of air flow with the screen top and the total lack of insulation with the glass walls. it's generally recommended to use tubs or pvc reptile cages instead. wood enclosures can also be suitable if they're designed well and sealed properly to protect the wood against moisture. glass tanks can work, but they require a lot of modification and maintenance, which you'll find tips for in the second link.
now for a suggested feeding regimen. if your BP will genuinely only eat live right now, you can safely start her on appropriately sized rat pinkies/fuzzies/pups. if their eyes haven't opened yet, they won't be able to bite her hard enough to cause injuries. once she fills out a little and can more comfortably skip a few meals, you should start working on switching her to f/t.
at the time of rescue, my BP's weight was 140g, meals were one fuzzy mouse with an estimated weight of 5g, meal schedule was "once every few weeks". here's a breakdown of the meal sizes, schedule, and switch from mice to rats i used. this is all f/t, so dealing with live will be a little different.
i continued scenting her rats for another couple of months, but that was more because it was easy [i have a corn who eats mice] than it being necessary. she was readily eating unscented rats within five months. a couple years later, i usually don't even have to warm up her rats beyond room temperature, though she does require some dangling with the tongs as she won't eat anything she hasn't "killed".
Welcome! This is a lot of info, but it's all stuff I wish someone would have told me before starting. I hope it helps you!
>How do I start?
Read this, this, and this. This beginner's guide by /u/nothingtoseehere28 is excellent. Make sure to familiarize yourself with everything on the sidebar -->
Then, calculate your macros.
Many people enter these in an app like My Fitness Pal, and then log all the food you eat throughout the day, trying to meet your goals. I use an app called CarbsControl which I like quite a bit.
My experience, and the folk wisdom around here, seems to be that it's crucial in the beginning to log everything you eat and not to guesstimate. I have this $15 food scale, which has been pretty invaluable in keeping track of what I eat.
After a few months of this level of tracking what goes in your body, you'll probably be able to gauge accurately enough to not have to worry about this step anymore. If you find you're plateauing or gaining weight again, start logging again.
Print out that google doc I linked to with all of the keto-friendly foods and their carb counts. Go through your cupboards, fridge, and pantry, and donate or toss anything that isn't on there. Highlight all of your favorite foods from the list, and make a grocery list.
My suggestion here would be to keep your list as simple as humanly possible, not worrying too much about cooking elaborate meals or doing any of the many amazing-looking substitute recipes people link to on here. For instance, my grocery list looks like this:
And my breakfast is almost always: coffee with heavy whipping cream, an egg, 2 slices of bacon and some avocado. My lunch is almost always: tuna salad on spinach with cheese. And my dinner is almost always cooked meat with a vegetable.
> What has helped you stay on track?
The biggest thing for me was making it as easy as possible for myself. This is super personal and you might have to do keto for a bit before you figure it out. For me, it means:
Other than keeping it as simple as possible, the other thing that keeps me on track is visiting this sub. The pictures and personal stories are always inspiring and you can get answers to almost any problem you're having.
Good luck!
> I really want to learn to make good coffee at home so that my wife is happy to wake up in the morning. Plus, I'd like to save some money instead of going to Starbucks every morning. I don't personally like coffee (I wish I did. Closest I came to enjoying coffee was drinking a caramel brulée latte from Starbucks last Christmas) but I find the craft of it absolutely fascinating. And I'm really interested in learning to get my wife's perfect cup of coffee down to a science. (And if I learn to enjoy coffee, all the better)
So I started down this exact path about 8 or 9 years ago for my gal as well. I also had no interest in coffee but enjoyed the convergence of art & science.
Anyway the following is what I ended up with [and what I paid].
You can be patient like I did and buy over time to get things on sale but after owning each item for multiple years now I can wholeheartedly recommend each component.
All in a buddy was using a Keurig for the past few years and when it broke he reached out to me for the same thing. He bought everything but the scale (it was almost $70 when he was buying) and his wife is in LOVE with the setup. The neat thing is once you get the grinder and scale your options to multiple brewing methods opens up. Then with the water kettle you can then use it all for the Aeroporess, Kalita Wave, Chemex, V60, Clever Dripper (ETC) brewing methods.
Anyway once you have good enough gear you can then start trying finding local roasters and different beans. We have tried a few local joints and just recently found a few beans roasted fresh that are substantially better than anything we were purchasing in grocery stores. Alternatively there are SO many online stores to try (and a biweekly friday thread on r/coffee for what beans people are currently trying).
Compared to the $5+ a drink at starbucks we make great coffee at home for typically less than $1 a cup and it takes less than 5 minutes all in, including cleanup.
There are some very affordable burr grinders out there, and it's worth the investment. You'll use it pretty much everyday. Hand grinders can be very cheap, and work great. Hario Skerton is a popular choice (I've seen it around for cheaper, but this is at least what's on amazon). Plenty of options, all varying in price. There's a pretty decent burr grinder from Kona I've used before, which I got for like $20.
But manual grinding can take some time. And if you're like me, and you want some quick coffee in the morning, then it's worth investing in an electric. There are some pretty decent electric burr grinders out there. You really don't have to pay a fortune. Here are a few cheap options:
Capresso Infinity
Bodum Bistro
Baratza Encore
But you can get far snobbier than just grind...
What kind of water are you using? Hopefully filtered, not tap. And definitely not distilled, since you want some of those minerals for flavor. Now, if you want to get even fancier, try using these mineral packets. I think each packet mixes in with 1 gallon of distilled water. I haven't tried it myself (I just use a brita) but I've heard good things. The quality of water makes a huge difference. This was the first "eureka" moment for me, when I moved from tap to filtered.
Next, how are you making your coffee? There are some great, cheap equipment out there. In this sub, here are some pretty cheap and popular choices:
Aeropress
Chemex
Pour-over
French press
We're getting pretty deep in the rabbit hole, right? Not yet! How about measuring the weight of the coffee? Consistency is important. You need the same, proper coffee-to-water ratio for the best cup. You can find people debating over the best scales, some costing hundreds. I'd just get a cheap one if I were you. You can find some decent cheap ones from like $10 to $30. If you want the best bang for your buck, look into American Weigh Scales.
I guess I can mention temperature of water as well. You can get thermometers or even electric kettles with built-in thermometers (like this). I think temperature matters so much more for tea than coffee, but it's something you need to keep in mind for coffee as well.
Here's probably the most important thing, in my opinion: where are you getting your coffee? What is the roast date? Unless you're buying your coffee directly from the roaster, you're probably not buying freshly roasted beans. It makes a world of difference. Try finding a local roaster and getting your beans from them, freshly roasted.
I'm sure there's plenty of other ways you can splurge money on coffee, but I'll let you figure it out!
(edited to fix the links)
Red light isn't good, you'll want a heat mat (MAKE SURE you have a thermostat for it or it will get too hot) and possibly a ceramic heat emitter (also needs a thermostat) for air heat. What are the temps and humidity and how do you measure them? Glass tanks usually don't hold humidity well and often aren't good for bps. You need at least 2 good hides, one for each side. They should be snug and enclosed with only one opening, preferably identical, half logs don't work.
Someone should come by with a really good care sheet, read it, it has some great info. I know this might be a lot of information, but having a good setup is important and will save you headaches in the future.
Edit: I found the care sheet. Credit to u/_ataraxia.
Glass tanks can be very challenging for ball python husbandry due to the high amount of air flow with the screen top and the total lack of insulation with the glass walls. It's generally recommended to use tubs or pvc reptile cages instead. wood enclosures can also be suitable if they're designed well and sealed properly to protect the wood against moisture. glass tanks can work, but they require a lot of modification and maintenance, which you'll find tips for in the second link. i'll give you product recommendations to cover options for tanks, tubs, and pvc/wood enclosures.
Hey man, let me hit you with my personal coffee journey. It worked super well for me, and it starts pretty entry-level. I highly recommend.
So, first and foremost, you need to start with pourover. Here's a pretty cheap starter set. Then you'll also need a kitchen scale, here's one of the smallest, most accurate ones I've found.
I'd also recommend getting an automatic burr grinder, which isn't exactly entry level, so it could be a secondary purchase if you find that you really want to get ball-deep into coffee. I started off with the Infinity Grinder, which worked well for me until I got an espresso machine (more on that later). But for pourover and most other methods (aeropress, coffee maker, even shit like siphon coffee, it's perfectly fine). Having an electric grinder is just going to make your life easier overall. But if you don't want to jump right into that, you could use the grinder included in the set I listed (I've never used it - it's probably not great, but I'm sure it'll work).
And that's all you need to make one god damn good cup of coffee. I've spent thousands of dollars on coffee equipment over the years, but for me, the best way to brew a simple cup of coffee is using a pourover method. And it's incredibly fun!
Now, once you've got a few months of pourover under your belt, it may be time to move onto other methods of brewing. Grab yourself an Aeropress. Aeropress effectively is the midpoint between normal coffee and espresso. It absolutely does not make real espresso, regardless of what anyone tells you, but that doesn't mean what it makes isn't super delicious. Plus it lets you start experimenting with the closest thing you'll be able to get to cappuccinos, and other fun things like flavored lattes when you have company over and want to impress them with some tasty java.
The Aeropress is fantastic, and it's ridiculously easy to clean. It's a nice way to be able to travel with a decent coffee maker, too.
Then, once you've got a couple years of delicious coffee down, it's time to get into the big leagues. Espresso.
Holy fuck dude. Espresso is complicated, and you really have to throw away everything you thought you knew about coffee. I know how pretentious that sounds, but it's super true. What I went with was a Crossland CC1, which was mainly because I got it for cheap on Craigslist for $400. But, warning, the Infinity Grinder will not grind accurate enough for espresso. For that you'll need something like a Baratza Hario or Sette 270 (I went with the Sette 270).
Anyway, that's waaaaaaaaay in your future. I'd highly recommend just starting off with pourover and some great beans (check locally, or order from Intelligentsia).
Enjoy your journey, bro. It's a great world out there.
Background: I was in a similar situation last year, albeit a bit lighter. 5'6" 175lbs, 27 years old, hadn't exercised at all since a weight training class in high school. I'm now a regular solo gym-goer ... still nowhere near being a fitness expert, but I do know some things and I did go through the "noob" phase very recently.
Diet
I can't emphasize enough the importance of good eating habits. In your current situation, losing fat is a major priority, and therefore it is absolutely essential that you adjust your eating habits accordingly. All the exercise your body can handle (at least, in its current state) can't make up for eating at a major calorie surplus every day. (Anecdote: I once lost thirty pounds in four months by maintaining a calorie deficit, and no exercise beyond walking 1mi twice a day.)
Use a TDEE calculator to find out how many calories your body is using, and multiply that number by 0.8 to find out how many you should be eating. Some say subtract 500 instead; you can experiment a bit and figure out what works for you, but the important part is to settle into a healthy and sustainable calorie deficit.
It can be a huge, gigantic, unbelievable pain in the ass to count calories, estimate calories, and deny yourself treats because they have too many calories, but ultimately none of us can escape physics: To lose weight, calories-in must be less than calories-out. It definitely gets easier with time, as what are now strange and inconvenient methods become almost instinctive processes.
Keep a special eye out for liquid calories - it's okay to have some, but make sure they're counted! Coffee with cream and sugar, juice, and alcohol are the three big issues I've seen with people who claim to be counting calories perfectly, setting a healthy deficit, and still not losing weight. It also doesn't help that getting drunk makes it really easy to eat a lot of junk food.
If you don't cook, start cooking. If you do cook, start cooking healthy things with known calorie quantities. A simple $20 kitchen scale is incredibly helpful in putting together meals to target calorie goals.
Exercise
Hiring a personal trainer was incredibly helpful for me. If you can afford it, do it. If you can't afford it, ask if your gym offers any complimentary or discounted "intro" sessions. When I got back into the gym, I had no idea what to do, and I was afraid that whatever I might do, I would get get wrong. Having a professional helping me out made all the difference in getting me started and establishing the right habits. I used to have the same issues you did - not knowing what to do, not being confident that I could do it right, etc. - and I now work out three times a week on my own with full confidence that I'm "doing it right."
You should definitely decide on a routine and stick with it. The getting started section of the wiki has links to some good programs. I highly recommend either Starting Strength or Stronglifts 5x5. I'm doing SL5x5 now and I really enjoy both the simplicity and the results.
As for needing a spotter: Well, it's helpful, but it's not strictly necessary. Let's use SL as an example. It has five exercises: squat, deadlift, overhead press, bench press, row. If you can't make it through a rep of deadlift, row, or OHP, you can just put the weight back down. If you can't make it through a rep of squat, let the bar sit on the rack and crawl out from underneath. If you can't make it through a rep of bench press, considering the low weights you'll be starting with, just lower the bar to your chest, and roll it down and off your body. (I'm mostly parroting the SL5x5 site right now. It describes this all in much better detail.)
It's also worth noting that you'll be starting at very low weights and gradually increasing them. This will help you develop a sense of when to go for one more rep and how to recognize that your body can't handle another one.
As for your girlfriend's ability to spot you: You'd be surprised. Until you get up to really high weights, a spotter won't have to do a ton of work to help you through a rep you can't finish. Let's say you're trying to do a set of five bench presses at 100 lbs. You make it through four reps but are struggling with the fifth one. At that point, you're still probably capable of pressing something like 80-90 lbs, so she'll just have to help you with the last 10-20 lbs. And of course, if you need your spotter to help you finish a rep, that means the set is over.
Best of luck with your fitness journey, and please feel free to PM me if you have any questions.
That grinder will possibly give you issues with pour over. V60 is really picky too, and you will probably want a gooseneck kettle to use with it to make it much easier to get a good cup. The potential issue with that grinder (or similarly priced ones, which are all knock-offs of another hand grinder) is that it might give you a really inconsistent grind with a lot of fines, which could cause your pour over brew times to vary wildly and take far too long (ruining your coffee).
How much coffee do you want to make at once? If only one cup, here's what I recommend:
If you want a larger amount of coffee (though you might find making your own coffee with fresh beans gives you more of a kick of caffeine than a cup from McD), then pour over is a good way to go, but will probably require more and better equipment in order for it to not suck. The V60 is the pickiest pour over about grind consistency. I don't make large batches, so maybe someone else can chime in with recommendations for devices that might handle a lower quality grind. But no matter what, a better grinder will improve both your ability to make pour over, and the taste of the coffee. If you want to stick with pour over, here's what I recommend for equipment in order for it to not be hard and get coffee that doesn't suck out of it:
And I would recommend going with white/bleached filters instead of the natural/brown ones. The nat/brown ones always have a strong paper taste you can't really get rid of.
This really comes down to preference. The good thing is that a lot of these methods are inexpensive, although I don't know your financial situation.
First, you'll want a kettle with controllable temp. There are better, but this Bonavita is ~$50 and totally gets the job done. You'll be able to use this to boil water for cooking, control temps for different types of teas, as well as tweak your brew temp for coffee. I use mine a ton! This device is useful with pour-over, Aeropress, French Press, moka pot, and manual espresso methods. A digital scale is also useful for weighing your beans/grinds, and potentially weighing your cup when pouring.
You can get a ceramic (personally I would pass on plastic) dripper for $12-$20. There are two filter styles: V60 (cone) and Melitta (flat-bottom). Some people love the V60 - I haven't tried one though. I have a Melitta flat-bottom style. I get my filter paper from Trader Joe's; I think it's $1.99 for 100.
The Aeropress is ~$30 and an excellent brew system. It does seem to prefer finer grinds, which oxidize very quickly so fresh-ground is important. French Press is similar in cost, somewhere in the $20 - $40 range for a basic press. You may want to watch this video if you go with the press.
You can't go wrong with these three as starter methods - they all produce good, and slightly different, coffee. However, there's one thing that we need to address, as it's also important:
Grind and bean selection.
Using whole beans and grinding fresh can make a huge difference in your coffee. In addition, the consistency of the grind makes a difference as well, including the amount of fines that your grinder generates. (Fines are ultra-small particles, like dust.) If you are on a budget, you might want a good hand grinder like the Hario Skerton (~$45 - not so great for course grinds though). If you have a bit more money, you might want to look at the Capresso 560.01 (~80). Both of these selections have shortcomings, but they're pretty inexpensive too while still providing a decent quality result. These are just two quick picks - please take the time to dig some more and do your own research. People are highly opinionated about grinders. ;)
OK, last but not least, bean selection. There's a lot of different flavor profiles to be had out there. One problem with Keurig brewers is that the K-cups tend to have pretty cheap, low-quality coffee in them. There's an issue of both the beans that are being used, and your own preferences of different roast levels, and even what roast levels work the best with the given beans. There's no shortcut here other than your own personal experimentation. But I will advise, generally, that you should neither blow your budget on boutique coffee when starting, nor should you go as cheap as possible.
You could potentially stop by a local coffee shop and inquire about pour-overs and French Press. It'll cost a little more but they'll let you pick exactly which beans to try, and you can even contrast methods as well.
Good luck!
You're new to the industry, and new to cooking. Quite frankly, your skills are at the point where you won't really have a huge preference one way or the other, and you won't perform any differently with a 50 dollars knife versus a 5000 dollar knife. Similarly, fancy whetstones, glass stones, sharpening systems, etc won't make a difference either.
Right now, get the basics. Good solid stuff that's relatively cheap so that you can figure out what you like, and don't like. You have 1300-1500 to spend-- Good. Save it for now. Industry doesn't pay much. Here's the basics to start you out that has the best bang for buck, and gives you some different styles and feels to try out, so that you can figure out what you'll eventually enjoy the most. If you want more information on any of the knives, let me know.
https://www.amazon.com/Tojiro-DP-Gyutou-8-2-21cm/dp/B000UAPQGS
This is a knife that's full tang, VG-10 steel(same as Shun), and has decent heat treat. Western style handle, with a westernized santoku Japanese style blade. At 60 bucks, it's a steal.
https://www.amazon.com/Victorinox-Fibrox-45520-Frustration-Packaging/dp/B008M5U1C2
Ubiquitous western style knife. Steel is the same as the more expensive Wustofs, Mercers, and anything that claims to use "German Stainless Steel". It's all x50crmov15, with slightly different heat treats. Victorinox does it right.
http://www.chefknivestogo.com/kohawagy21.html
HAP40 high speed tool steel. This is the high tech stuff used in blade competitions. Japanese style handle, maintains a really sharp edge for a really long time. A little more expensive, but that kind of steel for that price is really, really worth it.
https://www.amazon.com/Winco-Chinese-Cleaver-Wooden-Handle/dp/B001CDVXUK/ref=sr_1_7?s=kitchen&ie=UTF8&qid=1485154695&sr=1-7&keywords=cleaver
Look, a cleaver's a cleaver. You don't need fancy steels or anything-- You just need a whole lotta force behind a whole lotta steel. Hone and sharpen often, and this'll do great for you.
Speaking of cleavers, though...
http://www.chefknivestogo.com/cckcleaver2.html
Chinese cleavers are awesome. They're not actually cleavers though, don't use them on bones and the like-- They're the Chinese version of the all purpose chef knife or gyuto knife. Chinese chefs are expected to be able to do everything with this knife, from fileting to tourne to peeling to chopping to brunoise, so they're actually quite versatile. Speaking of which-- This also fills in for the Japanese Nakiri role. Tons of fun to use.
https://www.amazon.com/King-Sided-Sharpening-Stone-Base/dp/B001DT1X9O/ref=sr_1_1?s=kitchen&ie=UTF8&qid=1485154779&sr=1-1&keywords=king+1000+6000
This is a fantastic stone, one that Master Bladesmith Murray Carter uses. I ran a knife sharpening service, and this is the one I used for most knives as well. Since you won't have to deal with weird recurves and tantos and nightmare grinds and the like that can show up on folding knives, this will serve you very well.
https://www.amazon.com/dp/B00004WFU8/ref=twister_B010SQ9IXK?_encoding=UTF8&psc=1
This is in case you get some gnarly chips on any knives. This'll get it out quick and easy. Bonus-- Use it to flatten and maintain your King stone. This and the King stone is all you really need for sharpening. You can easily get a shaving edge with it.
Besides those, stick with what you got in the Mercer kit for the specialty knives. You really don't need fancy versions of those. You also really don't need a serrated utility knife at all. In the professional kitchen, the three knives that saw the most work were the overall chef knife(even for fileting and some light butchering), the 4 dollar Victorinox paring knife(quick and easy to sharpen), and the Mercer tourne knife.
Buying all this will amount to 431.31, giving you a combination sharpening stone, a flattening/reprofiling stone, and 5 fun knives of all different kinds to play with, at a fraction of the cost. You'll notice I didn't put any Super Blue or White #1 steels in there-- That's because A) They're more difficult to take care of, and B) They're really overpriced for what they are, simply because their "japanese" moniker makes people think they're super laser swords from a land of secret steels(they're not). The HAP40 steel beats these steels in pretty much every category.
Hope you found it helpful! Have fun with whatever you decide to choose.
Epicurious is a good source for recipes online. You'll want to stick with recipes that have a lot of reviews and have 4 to 5 stars, so you know that the recipe is a good one. One common frustration for new cooks is that they fail to make good tasting dishes, but don't realize that the main problem is that they're working from bad recipes. Keep in mind that you'll want to stick to dishes with 4 to 8 ingredients and not too much prep work when you're first starting out.
Make recipes from Mark Bittman's minimalist column on the New York Times web site. There's a printed recipe and an instructional video for each one. He's entertaining and most of the recipes only have a few ingredients, they're also delicious. His cookbook, "How to Cook Everything" is a great all-purpose cookbook to have around.
You need to get past the pay wall to print the recipes from the New York Times, but that involves hitting the "X" or "Stop Loading" button in your browser window a second or so after the page loads.
Learn the basics of using a chef's knife, to make your slicing go more quickly and safely. When cutting with a chef's knife, use a pinch grip and protect the fingers of your "guiding hand" by curling the tips of your fingers inward, as shown here:
http://culinaryarts.about.com/od/knifeskills/ss/knifegrips.htm
One of the most frequent things you're going to do, if you don't hate onions, is to chop or mince onions as prep work for your recipes. This is the best way to do it:
http://startcooking.com/blog/64/How-to-Mince--Dice-and-Chop-Onions
Good tools are important because they won't get in your way and they'll help you cook efficiently, I'll go ahead and mention some of the things I use in my kitchen that I'd have a very hard time doing without.
As for knives, I'd recommend a Forschner Victorinox Chef's knife with a Fibrox handle in the 8-inch or 10-inch size, they're under $30 and very good. You can do just about everything with a Chef's knife, you do not need expensive knives, please trust me on this one. You'll want to have it sharpened every 4 to 8 months or so if you're cooking about three or four times a week. Once you can no longer slice into the skin of a tomato easily, it's probably a good time to get it sharpened.
http://www.amazon.com/Victorinox-40520-Fibrox-8-Inch-Chefs/dp/B000638D32
These spatulas are great, they're made of very thin, very flexible heat resistant nylon:
http://www.oxo.com/p-564-nylon-flexible-turner.aspx
These are perfect for moving things around in the pan when you're sauteing or stir-frying, also great for scraping stuff away from the bottom of a nonstick pan so it doesn't burn, for instance risotto, polenta, a cornstarch-based pudding or scrambled eggs:
http://www.amazon.com/OXO-Good-Grips-Wooden-Turner/dp/B0000CCY1M
I prefer to use teflon-coated thick aluminum pans like this one (they often come with a blue heat-resistant removable handle, and can be found at restaurant supply stores and some discount stores, like Job Lot in the Northeast), never (never ever) touch them with metal utensils and they will last for a long time, I have a 12", two 10", and one 8":
http://www.webstaurantstore.com/12-vollrath-arkadia-n7012-non-stick-aluminum-fry-pan/407SEW1030.html
This won't be 100% relevant but I already have it typed so I'mma just copy paste it here and make some notes at the end:
>Well here's the thing about coffee, it's finicky stuff. Much moreso than most Americans would give it credit for. Automatic machines like you have can deliver quality coffee, but unless the one you have cost $200 or more, it won't really be up to the task of making cafe quality coffee. If you want coffee of the same quality (or even better) you'd find at a cafe, you're going to have to know a couple things. Don't worry, I'll tl;dr this with a few specifics at the end, but right now I'm going to go over the things that affect how coffee tastes:
>Bean quality: probably the most esoteric and taste-dependent part of coffee, it's not much worth getting into grading, processing, etc, just suffice it to say that folger's is definitely not using top-rate beans and they're mixing robusta (high caffeine, very bitter) in with arabica (moderate caffeine, much better flavor), whereas a decent coffee shop is using 100% arabica
>Freshness: Coffee goes stale quick and the flavors dull within about three weeks, a month tops after roasting. Those mass market beans are months old by the time you get them off the shelf. The good news is that there's almost definitely a roaster near you who sells decent beans that are nice and fresh roasted. The bad news is that the cheapest decent coffee you'll find is ~$10/lb most places.
>Grind: piggybacking on my last point, coffee, even when sealed in those cans, goes stale VERY fast after being ground (like, within an hour), so buy whole bean and grind it yourself right before brewing
>Grind consistency: if the grind isn't uniform, the coffee won't extract evenly and will taste off. The normal blade grinders you think of when you think "coffee grinder" won't work, you'll need a burr grinder, whether hand crank or electric. Doesn't have to be fancy but it does have to be a burr grinder
>Brew ratio: coffee will optimally be brewed (for most methods) with 16 or 17g of water (a fat tablespoon) for each gram of coffee. You can guestimate it but digital kitchen scales that read in grams can be had for dirt cheap on amazon. IME people who don't know about brewing coffee tend to use way too little coffee for the amount they brew. This extracts too much from the grounds and makes it watery and bitter
>Brew time: each method has its own ideal brew time but for most, like pourover or french press, ~4 minutes is optimal
>Water temperature: Coffee should ideally be brewed between 195-205Fthis is where the vast majority of home drip machines fail, the reason that /r/coffee approved drip machines start off at like $200 is that they have big, heavy copper heaters that can reach ideal brew temp, most drip machines have crummy weak heating coils that end up brewing at lower temperatures and making the coffee taste flat and sour.
>#TL;DR
I know this seems overwhelming, so I'll give you a nice, easy starter kit and instructions how to use it to get you started. And I know you said your bank account was getting crushed, so I'll make this nice and wallet-friendly
>For a grinder, go with either this manual one which has the advantage of being really cheap and producing decent grinds, but will take some effort to grind your coffee (2-3 minutes) and setting the grind size can be a pain, or if you want to spend a little bit more and get an electric, go for this one, it's not the greatest in the world but for a starting point it works ok and it's darn cheap.
>You can either keep brewing with your auto drip or, if you're still not satisfied, get a french press. They're crazy easy to use (weigh coffee, put in press. Place press on scale and tare. Pour in water. wait four minutes. drink), and they can be had for damn cheap
>Then find someone who roasts coffee near you, get some beans, and enjoy!
>Anyway sorry to bombard you with the wall of text but coffee's a complicated thing and we're hobbyists (and snobs) around here. Hope that helps! Feel free to ask more questions
>EDIT: forgot to add in Todd Carmichael's awesome instruction video for the french press.
If you're brewing for one, though, I'd look at the Aeropress, the learning curve is a bit steeper than FP but it makes wicked good coffee, is extremely versatile, and (my favorite part) cleanup is super quick and easy. And if you're willing to shell out a little more for a grinder take a peek at the Baratza encore.
EDIT: link to the aeropress and just one of many, many recipes for it. I actually used that recipe just last night and it came out fantastic. Might make myself one right now, actually...
I own a virtuoso and I love it. Grind quality for anything that isn't espresso is going to be about as good as anything that isn't $2700. The Lido is of course a great grinder, but I really think the no-effort aspect of the Virtuoso is underrated. I just made three cups of the same coffee in different ways - a side by side test is so much better than comparing days apart. I don't think I would have done that if I had to manually grind it out each time.
Pourover, V60 or Kalita are your best bet. Kalita is more forgiving but I think the V60 is more flexible once you get used it it. You should also look at getting an Aeropress - it is what got me used to stronger coffee and ultimately espresso.
Other gear, if you're doing pourover you need a gooseneck kettle. This one is great if you can swing it, otherwise any gooseneck will do. A scale like this one will be your best friend too.
EDIT: Disclaimer: I would not plan on using either of those grinders on espresso. The Lido is certainly more capable for that specific task, but ultimately you will want a grinder for espresso use only for two reasons:
1). Grind quality is SUPER important for espresso, and the Lido might get you to mid-range in that capacity. Plus adjustabilty is an issue here, so while the Virtuoso can grind to espresso fineness, it can not take small enough steps to get a truly great cup.
2). Switching from brew to espresso is a pain, and it will decrease the quality of your espresso. You need to "dial in" espresso, which is finding a very specific grind setting and recipe for a specific bean. Switching back and forth will completely disrupt that process on top of just being a pain.
Now, both grinders will be fantastic for brew and I would highly recommend both of them for that purpose. The above just something to be aware of.
Don't listen to the Aeropress people (like me). They're a cult. ;-)
J/K (sorta) . . . but if his general aesthetic shies away from the modern, he may use it quite rarely. I love my Aeropress, but it still feels all "modern and plastic" to me, and there are times I just don't want my coffee to involve anything modern or plastic, so I leave it in the cabinet and reach for my Chemex or French press.
In general, for any hobby, I recommend the things that are both the most useful and the least specific.
I honestly wouldn't get him any brewing device, since he's still at the stage where he's learning what he likes. If he decides he doesn't like an Aeropress or a V60 or a Chemex or anything else we like, it'll never be used. However, a good kettle, a good scale, and a good grinder are all very versatile (he can use them immediately with his press) and very non-specific (he can use them with any brewing method he settles on).
My recommendations are:
You're right to leave the beans out of your calculations. Besides being entirely a matter of taste, it goes stale very quickly (a month old is pushing it). Though a gift certificate to a local coffee roaster wouldn't be amiss!
I'm not sure what your price range is, but since you say that a nice mug was one option, I'm going to guess it's $30 or less. In that case, probably the hand grinder or the scale are your most likely options. Either of them will be something he'll use forever (regardless of what brewing methods he ends up liking), and will be a great contribution to his hobby.
(Also, my gf just asked me, "So what are you telling her?" Maybe I can spin this for some good gear for me too! :-D )
Edit: As far as the scale goes, a cheap electronic scale from Harbor Freight in the $15 range is perfectly serviceable (and in fact, I use one from there at work). You're looking for hundredths of an ounce or tenths of a gram precision.
My favorite thing about coffee as a "hobby" is that, like some have said, it's a hobby that isn't just a waste of money. Fresh beans are a huge 1st step, they really just have tons of flavors that change almost as you work through the bag, and sometimes I feel like the first sip of a french press is different than the middle, etc. For me the different methods I use just work better for different beans, I'm still figuring that out myself. I prefer to french press african beans, pour over on more typically "harsh" beans, and I'm still dialing in aeropress, but I feel like it takes a lot out of the coffee so it seems to work best if I'm like "hmm I'm not sure I like this bean", aeropress... oh nevermind it's great.
You could buy:
Good grinder ~$140
Scale $15
Kettle $25
And three interesting and different types of brewers:
Aeropress ~$30
V60 ~$20
French Press ~$20
That's all the gear for now, you're SET until you become a crazy coffee nut, but for me 90% of the coffee I make is in one of those 3 methods. I have a moka pot, and they're cool too. But that's $250 for gear, and you could probably save a bit with different grinder options but plan to drop the biggest amount of that.
Add in $20 for some high quality beans (S&W is great and their reddit discount is on this page somewhere) and you're around $270 to be brewing great coffee a few different ways. Now you have 4+ different coffees, 3 ways to make it, and the equipment to make sure you're doing it "right".
Okay that's a lot and I hate this "if you buy a cup of coffee a day" crap, but let's just say you drink work swill most of the time, but get a cup of coffee out 3x a week. At $3/cup maybe you tip a quarter each time, you pay off this stuff in 6 months and these things pretty much last forever.
The point is, yes, some of the costs of entry (specifically the grinder) can be a little daunting, and sometimes we get carried away, but overall, the cost of making great coffee at home is significantly less than going out. You're actually getting BETTER coffee too, trying different ways to make it, and enjoying yourself. Wow, okay rambling there. Good luck!
Here's u/ataraxia's classic link dump I found on a other post. Although the informstion is written for bps (most common snake people have trouble with it seems- mostly due to the humedity) but the suggestions could definitely help you for the humedity aspect needed for your boa.
You should definitely read it through.
i'm going to dump a bunch of helpful links on you. the first three links are detailed care sheets, then a tub tutorial, and the rest are product recommendations. read everything thoroughly, come back with any questions.
glass tanks can be very challenging for ball python husbandry due to the high amount of air flow with the screen top and the total lack of insulation with the glass walls. it's generally recommended to use tubs or pvc reptile cages instead. wood enclosures can also be suitable if they're designed well and sealed properly to protect the wood against moisture. glass tanks can work, but they require a lot of modification and maintenance, which you'll find tips for in the second link. i'll give you product recommendations to cover options for tanks, tubs, and pvc/wood enclosures.
Well my other post is getting downvoted to oblivion for some reason so here's the main post from that thread:
As I mentioned in my previous post (here: http://www.reddit.com/r/Coffee/comments/214lbh/im_thinking_about_selling_my_extraunneeded_coffee/ ), I've recently upgraded both my kettle and my scale and since both are still in really good condition, I thought I'd offer them for sale at a decent price here on r/coffee.
I'd prefer they go to someone who wouldn't be able to afford purchasing these items new as a way to give back to the r/coffee community who have helped me so much on my coffee journey over the last few years. Obviously I have no way to verify so I'm going on the honor system here but if you're just looking for a good deal and trying to be frugal, please don't attempt to buy these from me. These are both great products and well worth their price new if you can afford them.
With that said, here's detail on the two items I'm selling:
Bonavita 1.0L Electric Kettle
American Weigh Scales AMW-SC-2KG Digital Pocket Scale
Shipping within the US = $5 per item
Some additional information:
Photos: http://imgur.com/a/2mIRB
Videos of both items showing that they are both in working order:
Notes:
Sale Info:
Sale to be completed through Paypal and payment must be made before the items ship. As to picking the "winning" recipient(s); if you are interested in either/both of these items, please PM me which items you're interested in and what country you live in (commenting in this thread won't count). I'll use a RNG to pick both "winners" by the end of the week and update the post accordingly. If for any reason that person can't take possession of the item, I'll RNG another person. Hopefully that sounds fair to everyone. :)
I've tried to answer all the questions I could think that you'd want to ask but if I missed anything please let me know and I'll answer as best I can. Thanks!
I highly recommend you read the below information. Guaranteed that you'll be completely redoing your set up after reading all of this.
Credit: u/_ataraxia
The first three links are detailed care sheets, then a tub tutorial, and the rest are product recommendations. Read everything thoroughly, come back with any questions.
Glass tanks can be very challenging for ball python husbandry, due to the high amount of air flow with the screen top and the total lack of insulation with the glass walls. It's generally recommended to use tubs or pvc reptile cages instead. Wood enclosures can also be suitable, if they're designed well and sealed properly to protect the wood against moisture. glass tanks can work, but they require a lot of modification and maintenance, which you'll find tips for in the second link. I'll give you product recommendations to cover options for tanks, tubs, and pvc/wood enclosures.
If you set up a good enclosure, and the temperatures and humidity are correct with no special treatment, the most work you need to do is feed every 1-2 weeks, spot clean the substrate and clean the water dish as needed [once or twice a week], and do a full enclosure cleaning every 1-6 months.
Ok I am going to try to answer every question
Lastly, and most importantly, BUY A GOOD BURR GRINDER. Freshly ground truly does make all the difference. A good starter is the Hario Skerton availiable on Amazon, or a Hario mini mill, also on Amazon.
I hope this helps! Good luck man!
Before we begin, I know that by just looking at the length of this that you might find baking bread to be a bit daunting, trust me, it’s not and I’ll do my best to explain everything as best as I can. I will also tl;dr after every section.
I’m writing up this recipe because all it requires is flour (2 types), salt, and water. I know these days butter is quite expensive and going out and buying yeast is a pain (You can buy a big loaf of it at costco but what are the chances that you’re going to use 5 lbs of yeast?). If by chance you have enough money to buy butter and yeast (those recipes are so much simpler), I’ll post those up as well upon request.
This recipe is adapted from Chad Robertson of Tartine Bakery. Mr. Robertson’s method doesn’t require a standmixer but it does require a kitchen scale and more importantly time. I’ve lowered how much water is in the recipe (known as hydration), because more water makes bread difficult to handle and shape. As you get better, feel free to up the hydration, the original recipe has 750 grams of water, I’m toning it down to 675 grams. I have also made some slight modifications to make it easier for those without much baking experience.
stuff you’re going to need:
A kitchen scale
Knife
A jar or similar type of receptacle
Whole Wheat Flour
Bread Flour
Water (hopefully filtered)
A few of big bowls/tubs
Oven safe cooking vessel i.e. tray pan, cast iron pan, dutch oven, baking stone etc
Oven mitts/thick towels to protect your hands
Oil (veggie/olive oil/pam spray)
Starter
Now to create the starter is going to take some time, and by “time” I mean around a week or two. Yes, you have read that correctly. BUT there isn’t much work required (just time is needed) and once you have your starter, you just have to maintain it (meaning you don’t have to do the 2 week from scratch).
TL;DR – to create starter mix equal parts water and flour. Leave alone until stinky and bubbling. Discard most of mixture and replenish discarded portion with equal parts water and flour daily until mixture rises and falls in a predictable fashion.
Create your leaven
In layman’s terms this mixture that you will mix into the bread later on that is going to give your bread a lot of flavor and also be the cause of lift for your bread.
TL;DR – to create leaven, mix equal parts flour mix and water with tablespoon of starter, wait around 8 hours.
Bread Time!!
A) If you have a dutch oven or a cast iron combo cooker then
i) preheat your oven to 475 degrees with your cooking vessel(with lid) inside on the middle rack.
ii) when the oven is ready, carefully, and I cannot stress this enough, CAREFULLY with oven mitts/towel, take out the cooking vessel. Invert your bowl of bread so the smooth side of the bread that you put face down into the bowl when you let it rise is now facing up and carefully place onto/in your cooking vessel.
iii) with your knife, score your bread
iv) with mitts/towels protecting your hands, place lid on cooking vessel and put in oven. Drop the temperature to 450 degrees. Cook for 20 minutes.
v) After 20 minutes, with mitts/towels protecting your hands, take off the lid and let the bread cook for 20 more minutes, or until the top is dark brown.
B) If you don’t have a cast iron pan or a combo cooker
i) preheat your oven to 475 degrees. Then you’re going to have to STEAM YOUR OVEN
ii) when the oven is ready, invert your bowl of bread so the smooth side of the bread that you put face down into the bowl when you let it rise is now facing up and carefully place onto whatever device you’re going to use to transport your bread into the oven.
iii) with your knife, score your bread
iv) Steam your oven, lower oven heat to 450
v) put your bread in the oven
vi) cook for 30-40 minutes until the top is dark brown.
tl;dr - Mix flour, water, and leaven then letting it rest for 30 minutes. Add more water and salt.
Let it rise for 3-4 hours “turning and folding” every 30 minutes. Portion dough and let it rest. Shape dough and let it rise. Cook bread.
I've typed this up as fast as I could, so if you see any mistakes or if anything is ambiguous please let me know.
Wow I'm sure you're hookah knowledge will come into play at some point. That's more than I got. At least you're familiar with identifying flavor profiles and knowing what ingredients compliment each other.
I have no past history of flavor mixing except some basic cooking skills. What's worse, I'm really only into tobacco flavors, at least for now. So ya, we all know bananas and strawberries go well together, throw in some pineapple or orange and you got a great smoothie. Transferred to ejuice logic that means you just gotta experiment with percentages. Not saying it's easy, but nevertheless, common knowledge lets us know what flavors might work. But tobacco? I mean, I've had some luck with 3 recipe mixes but I see these 7-10 ingredient recipes for tobacco on e-liquid.com and wonder how the f anyone could decide on what goes where lol.
Here's a tutorial for e-liquid calculator in case you buggered it.
For the VG/PG problem, check and check again that you're entering the correct values into the calculator. Also, your flavors are most likely PG base. On e-liquid calculator, PG is set by default for the flavors so that shouldn't be a problem. But if you're using a different calculator, it might be the reason. Your nic is also probably PG based.
But if you enter everything into the calculator properly this shouldn't be happening.
Also, do yourself a massive favor and start mixing by weight! It's FAR more accurate and has the added benefit of being way easier to clean up.
Here is the scale most mixers use. It's only 26 bucks! Will save you so much trouble in the long run.
And I think I linked this to you already, but when you're scale arrives, this tutorial will explain all. Very simple and quick and clean once you get the hang of it.
As far as I can tell, you won't need algebra thanks to our handy e-calculator. Although, math knowledge def won't hurt. If you're using a box mod of any kind and building your own coils, some math is advised. re: Ohms law and calculations for battery safety. I have lots of handy resources on that if you're in need :)
Another handy trick with mixing single flavor recipes to start.. Provided that they are all the same PG/VG ratio and same nic content, you can go ahead and combine the individual 'single flavor mixes' after they've steeped to further test how a combo might taste. That would give you a decent idea of how a 2 flavor recipe would taste. *Not sure if I wrote that thought clearly lol.
E-liquid recipe sharing is a big thing in the DIY community and it's f-ing amazing. When you browse e-liquid-recipes.com, be sure to sort by rating cuz those are recipes that several users have tried. So 5 or 4 star recipes are generally a safe bet I'm guessing.
Once you sign up to the site go to my page and follow me. I have no followers so I'll know it's you and follow you back :)
Def keep in touch. I can't wait to not be a noob lmao.
I am a bot programmed to automatically provide the following content by /u/_Ataraxia when summoned. Link to the most recent version of this content here
The first three links are detailed care sheets, then a tub tutorial, and the rest are product recommendations. read everything thoroughly, come back with any questions. Let /u/_Ataraxia know if any of the links don't work.
Glass tanks can be very challenging for ball python husbandry due to the high amount of air flow with the screen top and the total lack of insulation with the glass walls. it's generally recommended to use tubs or pvc reptile cages instead. wood enclosures can also be suitable if they're designed well and sealed properly to protect the wood against moisture. glass tanks can work, but they require a lot of modification and maintenance, which you'll find tips for in the second link. i'll give you product recommendations to cover options for tanks, tubs, and pvc/wood enclosures.
Ball Python Care Guides
Set-up Recommendations
Copypasta version 7/24/2018 (c) /u/_Ataraxia
I am a bot, and this action was performed automatically. Please contact the moderators of this subreddit if you have any questions or concerns.
You need a couple of things but we can make it with the lower end of your budget.
A good burr grinder. Your biggest investment but also the most important one. For pretty much everyone here I would recommend the Berata Encore. A fantastic electric grinder that grinds really well for every brewing method out there except for real espresso.
If you think you might want to get a grinder that will be great for espresso as well, look into high end manual hand grinders like a Lido. They costs between $200 and $250. They require manual labor of course but it takes about 20 to 25 seconds to grind for a single cup. Not that big of a deal.
An Aeropress itself. Around $40 I think. Comes with paper filters that will last you a long time. They also sell reusable metal filters that give a distinct, more french-press like, tasting coffee. Worth a try but non essential.
A kettle/water cooker. Probably have those already. Don't need anything especial like a gooseneck for Aeropress. If you're looking to invest, buy a gooseneck kettle with build in thermometer like this one. They will be very helpful if you expand the hobby beyond aeropress.
A 0.1g scale. A scale that works with a precision of 0.1grams. Costs around $17 on Amazon. If you buy one, buy one with a build in timer. Very handy it doesn't cost more. If you have a regular kitchen scale, this one is a bit optional but if you want consistent results you need a precise scale.
About Aeropress. It's one of my favorite brewing methods. Very fun to use and can brew a wide range of coffee. However, it doesn't do espresso. It can make a very strong cup of coffee. It can even do crema if you use it right. Just not actual espresso. It just can't. Doesn't provide enough pressure.
That's actually a really decent breakdown to hit. I would be eating the 3 servings of 4 ozs of chicken, or 100 grams to be even more specific (I recommend a Digital food Scale (this is the one I have). 100 grams of chicken breast contains 43 grams of protein, so 3-100 gram servings is an aggressive amount even.
Once at this level, focus on getting to the right amount of calories, and fat content. Eggs are a great way in a low-fat diet to be eating good fats, in each egg there are about 5 grams of fat, so 2-3 in the morning is a great way to start the day. Milk is also a great way to get good fats, and it's cheap, and both of the above items have enough protein to put you well over your protein goals.
What I would do is go to the grocery store and dollar general, and start writing down some prices and nutrition facts, it'll be a lot of work at first, but an excel file on your computer, or a google doc on your phone is a great tool for eating healthy and cheap. Stay away from the highly processed foods, even granola bars have tons of preservatives, and a list of ingredients that rival the constitution. Make your own if you want, it's super easy to do with some brown sugar and butter together in a pan and pouring over a sheet pan of almonds, pumpkin seeds (SUPER CHEAP), oats, dried cranberries or raisins, puffed millet (like rice crispies). Mix it together, and bake at 350 until it all hardens together, let cool and cut. It's super easy to make your own granola bars, and they won't have all the crud in them. The nuts will help you to reach your fat goals, some protein, and then the sugar and oats will help with carbs. (Can also use honey, agave, or just sugar and water together. The oats will release starch if using sugar and water which will help to bind it in the oven, but still don't use a lot of water, more sugar, just enough to make a light syrup)
Use the document you create to either meal prep, or organize your meals for the day/week or even month.
TBH I don't even monitor my protein intake anymore, because I definitely eat more than enough with the amount of chicken, my protein shakes, my homemade protein bars (1/2 cup protein powder [unflavored or flavored], 1/2 cup ground/blended oats, 1/4 cup milk, chocolate for coating it. Combine all the dry ingredients and then add the milk, it will be a thick texture, but don't add more milk, it needs to have a consistency to mold into bars, and I coat in a think coating of chocolate so that it all holds together. This makes about 4 bars and costs about 2.50 depending on how much the protein powder costs, and how much chocolate you coat it in) the nuts, eggs, broccoli, spinach, lentils or quinoa, peas, all of these things have significant amounts of protein. I only monitor my calorie intake, and then my fat intake, if those are on, I am typically over my protein goal slightly, and under in carbs, but I also have studied nutrition a lot, so eating cheap is both easier and harder because I want what I can't afford when I'm in the grocery store. Have the discipline, put in the work, and stick to your budget, and this'll be no problem for you. I hope some of these suggestions are helpful, I'll say eating on this budget doesn't mean a lot of variety, but just keep in mind the health benefits. You'll get really good at cooking chicken!
Yeah just look into the solution and make sure it's clear.
Also make sure you're measuring your weight of substance and how much solution you're gonna use. I recommend the AWS Gemini scale. It's not accurate at super low ranges (hence the need for volumetric solutions), so you weigh out how much you're gonna use before hand. I like to weigh the bag before (full) and after (making solution) to compare how accurate the measurement was (obviously both could be off but they're usually within +/- 5mg which isn't much at this scale. (no pun intended lol).
A cardstock type paper is really good for weighing the powder with a crease down the middle, or what I use: cheap chinese wax weigh papers because the powder doesnt stick to them at all, and they're cheap and disposable. pour the powder into the vial (don't spill!) (here's a list of a bunch of bottles, it's hard to find what you exactly need and they usually come in big packs). My bottles actually came with a little aluminum funnel which doesn't work too good cuz the powder gets stuck to it, so I just kinda crease the paper and pour it into the vial opening very slowly being sure not to spill. Do it over a piece of paper or something if y ou're worried about spilling, since you've already measured it you can just take that paper and pour the "spilled" product into the botttle.
I don't have the full set of these but one of these like this with one scoop end and one flat end is really useful for the flat end to get into corners of baggies and whatnot, so I'd recommend something like this as a a scoop:
My vials are 60ml but I like to have extra space to shake the solution (important) so I only put 50ml at once to leave room for shaking. So say for 10mg/ml of etiz I would do 500mg etiz + 50ml PG. (1ml = 10mg, personal preference). If I was doing flualp I would do 100mg flualp 50ml PG. (personal preference of 2mg/ml since I usually dose between 0.6mg (0.3ml) and like 1.8mg (0.9ml).
To measure the PG you're gonna either need a graduated cylinder or, what I use which is probably slightly less accurate but there of course is a small margin for error as long as you know about the concentration, I use a 10ml syringe to fill the vial. 5 10ml pumps = 50ml.
For dosing lots of people will tell you to count the drops and that "there are 20 drops in 1ml no matter what" which is completely untrue, the only way to know exactly how much you're taking is using oral syringes. They're super cheapa if you can stand to wait a month from china, but you get like 20 (which is kinda required because after a while the lines start to fade on them. each tick is a 0.1ml so a full syringe is 1ml so if you have a 10mg/ml solution a full syringe is 10mg of etizolam, so if you only need 2mg or something it cuts down on the amount of PG you have to ingest. Lots of sites that sell premade solutions overcharge insanely for how little work it is to make yourself, and on top of that give you weak ass solutions like 2mg/ml (of etiz) or 4mg/ml (not even divisible by 10 so it gets confusing trying to dose that!) which make you intake way more PG than necessary. (It is food safe but it's pretty gross and some people can have adverse reactions).
Anyways...
There's lots of threads out there about this too if you need a full on step by step guide just google "etizolam solution" (most common one, it's the same for every substance, you just might want different concentrations for different strengths of drug). I tend to try and make my solutions as potent as possible so I don't have to eat an unnecessary amount of PG, or spend as much time making solutions!
Good luck and sorry for being judgemental earlier, glad you're at least willing to learn and I'm sure your friend was okay, just blew my mind knowing how I reacted to .250mg of flualp with no tolerance, lol.
Also you caught me on a pretty stimmy day so enjoy the fully cited guide, I don't think I missed anything. I don't necessarily use or endorse any of the specific products I linked just used them as examples of things you'd need; except the AWS Gemini 20, which is a must if you're weighing powders.
Sorry for the stim rant but I hope I helped out. Edited to add 1ml syringe dosing information.
I'm in a similar situation as you, and I've recently gotten my coffee tools up to a level that I'm happy to stick with for a while. Last week I bought a cheap CuisinArt burr grinder on sale for $50. This grinder is a huge step up from my blade grinder. It obviously isn't as consistent as a $200+ grinder, but it does exactly what I need it to do.
Last week ago I also ordered one of these as a cheap substitute for fancier pouring kettles. It just came in a few days ago and it works great. It's a lot smaller than it looks in the pictures (check the dimensions on the website), but it's perfect for brewing a single cup like I typically do.
We have one of those pour-overs at work and it works pretty well, but honestly I don't use it enough to have a good opinion on it. It's definitely better designed than a Melitta though (I like the wide whole at the bottom, compared to Melitta's dripper). I personally use a Chemex, which isn't too cheap, but I've fallen in love with the coffee it produces. (On a side note, the Chemex filters are what do the trick, and I've even heard about people using the filters with the harios. I'd look into it if it sounds like something you might be interested in.)
Also, I think the major thing that will make you better coffee with a simple setup like this is to find good beans. I found a local roaster that makes some beans I've quickly fallen in love with. (And I must be doing something right because I think I make better coffee than what I can order there.)
When I first got into DIY 2 years ago, my first goal was to craft a green tea recipe from scratch. I've probably put more study into green teas than any other type of flavor, but this was the verdict in the end:
After a ton of experimentation, I came up with this recipe: Shinto
If you're planning on creating a new green tea recipe, stay at or below 1% FLV Eisai Tea. It is very strong.
--On your question when it comes to flavor retailers, one of the very best is bullcityflavors.com. They stock nearly everything and at very competitive prices. If you ever can't find a particular flavor you're looking for, there, check ecigexpress or the flavor manufacturer's own website.
--On nicotine: the most cost-effective and simple to use mix is 100mg/ml nicotine in a 100% PG base. You'll find this mix on most nicotine retailer's sites. Nicotine does not mix well in VG, so you end up with a lot of hotspots if you get it in a VG base. The best nicotine comes from Carolina Xtracts, period. Second best is Liquid Nicotine Wholesalers.
--Stop mixing your flavors at 10% or some arbitrary number, or you're going to end up with a lot of shitty mixes. Every flavor has a particular percentage that works best, either by itself or in a particular recipe. FW Blueberry, for example, is great at 6%, but if you put 6% FLV Eisai Tea in a bottle you would probably throw up.
On that note, the greatest thing that changed everything about how I mixed was getting a scale. A huge amount of people on this sub are currently using this scale.
The next best thing was finding the best recipe calculator available, which is EjuiceMeUp. Free, offline software that simply works.
I think to best answer this request, we'll need a bit more info. Are you ok with a manual grinder, or do you prefer an electric grinder? Do you want a drip brewer or a pour over set up? Are you looking to get into espresso? And, what is your actual budget in your local currency?
And now for a guess at what might work for you...
A [Melitta Plastic Pour Over Dripper](https://www.amazon.com/Melitta-Ready-Single-Coffee-Brewer/dp/B0014CVEH6/ref=sr_1_1?ie=UTF8&qid=1527536804&sr=8-1&keywords=mellita) $5 to $6 (a lot of grocery stores carry these in stock)
A box of #2 Cone filters at your local grocery store $2
If you want an automatic drip brewer, and you are making smaller amounts for just you, the [Bonavita 5 cup](https://www.amazon.com/Bonavita-BV1500TS-Carafe-Coffee-Stainless/dp/B00SK5IXPQ/ref=sr_1_4?ie=UTF8&qid=1527537674&sr=8-4&keywords=bonavita+brewer) is wroth a look. it runs about $66. I have the 8 cup for the wife and I and we love it.
Filters can be purchased, again, at your local grocery store for about $2.
[Brewista SmartPour Kettle w. Thermometer](https://www.amazon.com/Brewista-Variable-Temperature-Kettle-BKV12S02NA/dp/B01CFBBUVY/ref=sr_1_1?ie=UTF8&qid=1527537033&sr=8-1&keywords=brewista%2Bsmart%2Bpour&th=1) $40. There are cheaper ones, but I personally have this one and have loved it.
[Scale](https://www.amazon.com/Jennings-CJ-4000-Compact-Digital-Adapter/dp/B004C3CAB8/ref=sr_1_1?ie=UTF8&qid=1527537139&sr=8-1&keywords=Jennings+CJ4000) This is a must. $30
[Bratza Encore](https://www.amazon.com/Baratza-Encore-Conical-Coffee-Grinder/dp/B007F183LK/ref=sr_1_1_sspa?s=home-garden&ie=UTF8&qid=1527537371&sr=1-1-spons&keywords=baratza+encore&psc=1&smid=A302OQK4GZWXCC) Grinder is the default recommendation around here, and for good reason. It's high quality, and easily serviceable. New they run $139, but you can save $40 and pick up a [refurb](https://www.baratza.com/product/encore-refurb/) (still with the 1 year warrantee) for $99 direct from Baratza.
If you want a cheaper option, and don't mind a manual hand grinder, there are a few options, but the [Hario Skerton Pro](https://www.amazon.com/Hario-Skerton-Ceramic-Grinder-MMCS-2B/dp/B01MXJI90S/ref=sr_1_1?ie=UTF8&qid=1527537536&sr=8-1&keywords=hario+skerton+pro) is about the lowest cost / still decent quality grinders, grinder that most would recommend. It runs about $60, and personally, I'd spend the extra $30 on an Encore refurb.
Happy Mug Beans are a pretty great option. I really enjoy the Big Foot Espresso blend (despite it's name) as a pour over, and even like it in my drip brewer. The Inspirational Artist Blend is a great option too. But really just try them out and see what you like. Their bags (for 1lbs of whole beans) run $11 - $13
Hope that helps.
Broke college student here, I'm also a barista that's use to having amazing, freshly roasted coffee. So far, no one has lied. AMAZING espresso IS expensive. But can you make a latte as well as your local cafe? With a little practice, time and money, yes.
My current home setup consists of a Delonghi EC155, this is a true espresso machine, it's not steam powered and with a little modification and practice makes good espresso. Modification wise the only thing I'd recommend is depressurizing the portafilter basket, which is easy. If you ever want a better machine but don't want to spend the money you can modify it even more. They're vary popular machines and can be modified to pull amazing shots. They go anywhere from 70-130, however, occasionally things get repacked or the packaging gets damaged in the warehouse. They'll offer them at a hefty discount, I just got mine "reboxed" from amazon for 47 dollars, wait a few days and one will come up. If you use your student email you can get Amazon Prime for free, take advantage of that.
http://www.amazon.com/DeLonghi-EC155-Espresso-Cappuccino-Maker/dp/B000F49XXG/ref=sr_1_1?ie=UTF8&qid=1396498476&sr=8-1&keywords=delonghi+ec155
I also got this tamper, works well, it's a little light for my tastes but for home use it's fine. The EC155 has a 52mm basket, if having a 50mm tamper bothers you then pay the extra few bucks for a 52mm tamper. Personally doesn't bother me, and it was only 7 bucks.
http://www.amazon.com/Espresso-Tamper-Sizes-Alloy-Coffee/dp/B0001XRNEM/ref=pd_bxgy_k_text_z
Here's a milk frothing cup, you'll need it to properly froth milk. You can poorly froth milk in a microwave but why do that when you can spend an extra 8 dollars and do it properly? I personally got mine for a dollar from a thrift store.
http://www.amazon.com/Update-International-EP-12-Stainless-Frothing/dp/B000MR6I9I/ref=pd_bxgy_hg_text_y
I got one of these grinders years ago for around 20 dollars. I've seen them used, repackaged, and refurbished for about that much. Wait around and a deal will come up. You can also get a Hario Mini and a number of other hand grinders. But this one does just fine. Now out of the box it won't grind fine enough for espresso, however, with about 20 minutes worth of work you can shim it and it'll grind perfectly for espresso. It's not hard and anyone can do it with a screw driver and some tin foil.
http://www.amazon.com/Cuisinart-DBM-8-Supreme-Grind-Automatic/dp/B00018RRRK/ref=sr_1_1?s=home-garden&ie=UTF8&qid=1396498766&sr=1-1&keywords=cuisinart+grinder
At this point if you're willing to wait for a deal on the EC155 you've only spent 107 dollars. Even less if you're willing to wait on a deal for the burr grinder as well. If you want AMAZING coffee you can spend another 27 dollars and get an Aeropress, or wait for a deal and get it for 20 dollars. It will make a coffee concentrate which will taste "okay" for a latte.
At this point, I cannot recommend going to your local coffee houses and asking if you can buy green beans. They typically sell green coffee for 5-8 dollars a pound. You can roast your own coffee with a skillet and a whisk, or a popcorn popper, there are hundreds of ways to do it cheaply and it easy. You'll save money and you'll be drinking tastier coffee.
Don't let these people get you down, good espresso doesn't have to be expensive. Feel free to message me if you have any questions!
Which is better really comes down to what you prefer and what you will be using a knife for. Classic European cooking, for example, really benefits from being able to rock chop as Jacques Pépin does in this video. Of course you don't have to do any of that to process garlic but rather its just one set of techniques and styles. In this realm, Wusthof and knives like it do very well. There's also Messermeister, Zwilling, and more. The caveat is while they all offer good quality knives, they also offer some very poor quality ones. Make sure you do the research and go for top tier products if you're going to get one.
On the other end of the spectrum we have French and Japanese style knives like a Sabatier and a gyuto which can rock chop but you're not going to be able to come close to what Jacques did to that garlic. Of course there are santokus which you mention. These don't rock chop at all but are great for slicing, dicing, and mincing. I find a classic Wusthof nothing but a pain to mince with. Even santokus come in different styles. On one hand you have this Tojiro DP santoku with a big of a curve compared to this Kohetsu which has very little.
Somewhere in the middle we get things like this Victoronix 8" which is one the best values available. The profile is not quite European and not quite Japanese.
So, back to your original question: which is better, the Shun or Wusthof santoku? If I had to choose one I would go with the Shun simply because it is a Japanese manufacturer making a Japanese knife with Japanese steel. The steel used its harder than the Wusthof which pairs very well with how a santoku is meant to be used. You get all the benefits of a harder steel (ie. edge retention) while not having to worry about its toughness which can be an issue while rock chopping since it can cause twisting. However, I would also recommend you look beyond the Shun if you have other options available to you. Not including any import tax, the Fujiwara Santoku on japanesechefsknife costs about the same and has a much better steel (though it is reactive). Its fit an finish might not be as good as the name brand's but other than that I personally think is a better knife in every way.
Idk what cookware you do have but roasts (like a pork loin or whole chicken) tend to be cheap and pretty easy to cook. Eggs is a staple for cheap food. White fish or tuna are cheap too but don't eat tuna more than a couple times a week because of mercury. Protein powder is a very cheap source of protein however the upfront cost can be jarring.
Frozen veggies are my preferred choice but canned is good too.
The only spices you really need are salt and pepper. Kosher salt and a pepper mill are god tier. After that I'd say garlic powder, paprika, cinnamon, cayenne, cumin, ginger powder.
If I had to pick cookware that was reliable af I'd easily choose a cast iron skillet, enameled Dutch Oven and a small nonstick pan. The first two are both Lodge brands and you can do like 95% of cooking in just those two... possibly just the Dutch oven. There's also this 2 in 1 combo that might actually be the best of both worlds.
I'm a big fan of the Dollar Tree for kitchenware. One of the best purchases I made was a micro shredder and I use it for blocks of cheese. Way cheaper that pre-shredded. The only thing I wouldn't buy from there or any shopping center would be a knife. On a budget I love my Kiwi brand knife (~$8) and I've heard great things about Kuma but haven't had the opportunity to try one yet. Most cooks recommend Victorianox Fibrox but I can't recommend that on an extreme budget.
Also replacing breakfast with only coffee is a great way to save money. I had something else to say but I can't think of it at the moment. Cooking delicious on a budget is a hobby of mine.
Edit: oh yeah, DRINK WATER
Hello and welcome! Please look through the Sub Guidelines, the Kratom 101, and this important Guide To Phrasing. Headshops definitely charge premium prices. I know you will be able to find better value here but your account is too new and does not have enough sub-related karma to make postings. You are welcome to join in any ongoing discussions. We look forward to getting to know you.
Thank you and please let us know if you have any other questions.
*****
In addition to that Daily Vendor List here is a list of [Current Sales and Discount Codes](https://www.reddit.com/r/kratom/comments/5q5n3t/deals_steals_0125_youll_feel_like_you_picked_a/
There are a handful of more popular quality vendors. All of the vendors on that sales posting are top rated trustworthy vendors. You can't go wrong with any of them. Canopy Botanicals is another great one they are just not having a sale right now so they are not listed in the deals posting. Most of those vendors sell samplers or smaller quantities like ounces. If you need more help picking out what is right for you, contact this guy and he will get you started by customizing a sampler with 5 different ounces for $25 including shipping.
As far as what would be closest to headshop "Maeng Da," that is hard to say. Products sold at headshops are often labeled with advertising in mind and the name of the product is not always an accurate descriptor of the actual product itself. With something called "Maeng Da" that doesn't even come into play yet since they is a very broad term that literally means "pimp grade" and has come to be attached to just about any strain a vendor wants to denote as kind of premium. There are countless 'Maeng Da" strains. Your best course of action is to try a handful of different strains and keep notes - dosages, effects, pros & cons, etc. If that sounds daunting, Krajournal is a very easy to use tool for doing so. (It is best to use a scale for measuring dosages). You can narrow things down from there.
Finding what works can take some time, patience, and trial and error but it can be worth it. Many times people starting out think that it is not 'working' at first. Some of that is about managing expectations.
There is a lot of good information here. Familiarize yourself with more of the content already here and narrow down strains based on what effects you are looking for. There is a section in the Kratom 101 that explains strains in general. Here are two other great things to read:
'
First of all. It's very good you recognize that you need help in learning how to care for the snake.
Second, here is a big link dump created by another regular user u/_ataraxia all credit for this goes to her.
the first three links are detailed care sheets, then a tub tutorial, and the rest are product recommendations. read everything thoroughly, come back with any questions.
glass tanks can be very challenging for ball python husbandry due to the high amount of air flow with the screen top and the total lack of insulation with the glass walls. it's generally recommended to use tubs or pvc reptile cages instead. wood enclosures can also be suitable if they're designed well and sealed properly to protect the wood against moisture. glass tanks can work, but they require a lot of modification and maintenance, which you'll find tips for in the second link. i'll give you product recommendations to cover options for tanks, tubs, and pvc/wood enclosures.
Hey there. I'll give you a little summary of what I think most people on here will tell you in response to your questions.
Books: Blue Bottle ,Coffee Comprehensive and Uncommon Grounds are all good books to cover most of coffee and its processes.
This Capresso Infinity is considered a pretty decent burr grinder for the price. It will not do espresso but will be good enough for most other coffee brewing methods.
Getting a set up that is acceptable for "real" espresso is kind of expensive. A Gaggia classic is considered the bare minimum espresso machine for a "real" espresso. A Baratza Virtuoso is considered bare minimum for a decent espresso grinder. Now, you can (and many people do) find these items used, which obviously reduces the cost greatly. But depending on your area, finding these items up on craigslist or similar sites can be pretty rare.
I'm not from Rhode Island, but googling local roasters will provide some results. As for online ordering, tonx, blue bottle and stumptown are favorites around here for their price and quality. Beans are broken down on what region they came from, how they were processed and how dark they are roasted. Each region has different flavor profiles in their beans. African beans are known for being more fruity than other beans, for example. A little warning, most people on this subreddit believe Starbuck's espresso roast coffee to be too dark. However, many of Starbuck's light/Medium roast coffees have been reviewed as pretty decent. Most websites that sell the beans will list a flavor profile of the beans. The basic saying on this subreddit is that if you have crappy beans, no matter what, your coffee will be crappy. If you are going to overspend anywhere in the process, overspend on quality beans.
The espresso machines that you will be using at starbucks are machines that will basically produce espresso at the push of a button. They will grind, tamp and extract the espresso without any input from you. You should just know right off the bat that there is a whole other world to espresso making that is the exact opposite, with people grinding the beans to the right size, tamping by hand, and extracting shots with a lever that controls pressure. Neither way is right or wrong, you should just know that there are many different types of espresso machines and baristas.
I'll share a little bit of advise, take from it what you will. I was an ambitious college student coffee drinker just like you. I asked for a Breville espresso machine as my first real coffee making device (even before a grinder, how silly of me). I just wanted an espresso machine because that was all I was getting from these coffee shops. Since then I've gotten a nice grinder, a melitta pour over, french press, gooseneck kettle, aeropress, V60, moka pot, and chemex. I'm ashamed to admit that I haven't turned on my espresso machine in over a year. There is so much more to coffee than espresso. There are so many methods to brew coffee that are cheaper, more complex and more interesting. If I had a chance to do it all over again, I'd buy the burr grinder I linked, and an Aeropress or any french press (Starbucks sells some pretty nice ones. You could get one with an employee discount) and just learn to love coffee on its own, without frothed milk and flavorings.
There is a ton of info on this subreddit if you stick around for awhile. Questions like yours are posted all the time and answered by very knowledgable people. Your enthusiasm for coffee is extremely exciting to see. Please don't let any of my advise subtract from your enthusiasm. Everyone takes a different path while exploring coffee. That's part of the excitement. You will learn a lot at Starbucks and you will learn a lot if you stay here. Enjoy your stay.
u/ataraxia has amazing information for ball pythons. You should definitely read it through. Glass tanks are not ideal for Bps, so this should help. Here is her normal dump of information I took from another post.
i'm going to dump a bunch of helpful links on you. the first three links are detailed care sheets, then a tub tutorial, and the rest are product recommendations. read everything thoroughly, come back with any questions.
glass tanks can be very challenging for ball python husbandry due to the high amount of air flow with the screen top and the total lack of insulation with the glass walls. it's generally recommended to use tubs or pvc reptile cages instead. wood enclosures can also be suitable if they're designed well and sealed properly to protect the wood against moisture. glass tanks can work, but they require a lot of modification and maintenance, which you'll find tips for in the second link. i'll give you product recommendations to cover options for tanks, tubs, and pvc/wood enclosures.
To answer your question, the strength of your coffee is mostly influenced by how much coffee you're using versus how much water. For a strong cup with your Keurig, go with the setting with the smallest amount of water. The Keurig is by no means the "best" method to make coffee, but it will make coffee. If you decide to get a manual brewer (French press, Aeropress, Kalita Wave, etc.) the brew time has some leeway, but I'd recommend just using more coffee than trying to push the recommended brew time too far. Coffee can/should be strong without being bitter, and keeping the water and coffee together too long will create bitterness.
What follows is everything you need to know about making great coffee. Warning, this may be overwhelming:
and 2) Those are your best bet. Although I wouldn't necessarily recommend it, you can get an automatic blade grinder if you might have an issue with manual grinding/don't want to drop a lot of money. I will mention that darker roasts are easier to grind manually so there's less worry for your wrist. The problem with blade grinders is you get a bunch of differently sized bits, which makes it more difficult to get consistency and figure out a grind size/brew time you like.I would recommend a French press (1 2 3 4) or Aeropress for someone just getting into coffee. They're much more forgiving than pour-over methods, meaning you're less likely to make a bitter cup. They each have their own drawbacks, too. An Aeropress is easier to clean up, but can only make one cup at a time. A French press takes more time to clean, but can make about 3 cups at a time. (By cups I mean a standard 12-ounce mug.) Definitely get a grinder, too (see above). A scale (1 and 2) is optional but recommended. For beans, seek out a local roaster/coffee shop, but there are tons of online options available, too.
Welcome to the wonderful (and sometimes crazy) world of coffee!
I assume you have the combo cooker since you say you put the bread in the deeper part of it. The walls of the dutch oven/combo cooker should not be there to keep the doughs shape. All it does is give the dough a steamy environment for it to rise properly in the oven (called oven spring). Using the lid will eliminate the need for parchment paper (you can dust some corn meal or spread some oil on it) and is the combo cooker's strength when it comes to baking bread. You can also score it right after you've placed it on the lid.
The way I do it (I only have a dutch oven and not a combo cooker) is cut some parchment paper to a little bigger than the proofing basket. I then put my cutting board on top and flip everything. You should be able to hear the dough exit the basket. I then score the bread before I lift and gently place it into the dutch oven, which has been in the oven preheating at 260 degrees. I put the lid on and wait 20 minutes before I remove the lid, lower the temperature to 230 and bake for another 20-30 minutes. The finished dough should have an internal temperature of 95-100. I've had great success with this method. Here
Now, I can't stress this enough: the dutch oven/combo cooker should not be there to support your dough's shape. If it is you are not shaping it/developing the gluten enough. You might get some good bread either way, but you will never get that open crumb structure that everyone's after. If you want to get a nice open crumb here is what you do:
Hope this helps and wasn't too long of a description. Good luck with future bakes!
I haven't tried Dewberry Cream or Strawberry Milk, but there are MYRIAD versions of fruit+cream DIY recipes out there, and most don't suck! (LOL!!)
Here's my recommendations for starting-The fact that you've got Amazon Prime helps in the shipping costs! First, head over to the DIY site of your choice. There's a TON of info over in the sidebar at /r/DIY_e_Juice! Here's the beginner's guide to get you started. If you'd like the TL;DR version, here it is:
Once you've gotten these items ordered, go have a look at some recipes either at /r/DIY_e_Juice, alltheflavors.com or e-liquid-recipes.com Here's a Unicorn Milk clone that seems right up your alley. find two or three more recipes that sound good and don't take a whole helluva lot of flavor concentrates, then order up the concentrates for those recipes only. It's tempting to buy a slew of concentrates that sound good. Some might be winners, some less so. The thing you don't want is a bunch of concentrates that you never do anything with!(This was the mistake I made-I now have a bunch of concentrates I don't use and are going bad) When you order concentrates, stick with the small bottles to start. This will allow you to make plenty of juice while you're getting your feet wet.
Sorry it took so long to answer you-I think I've covered everything. If I haven't, shoot me a PM and I'll apologize profusely while covering whatever base I missed!
Sourcing everything in your first order from the same vendor will save on shipping costs.
I don't know your budget, but I recommend getting the AWS-LB501 Digital Scale from Amazon, currently $35 USD. This way, you never have to touch pipettes, syringes, beakers, cylinders, etc. and just pour everything into the bottle you'll end up carrying the juice in. You can easily exceed $35 buying all that other mixing crap so just start off mixing by weight using the scale. Super easy.
Bottles: Get whatever size you like to buy in store. I like 30mL bottles but that's because I'm constantly switching flavors (which you might start doing too once you see how fun DIY is!). Having said that, I'd also recommend getting a set of 10mL "tester" bottles. This lets you try out recipes and experiment without wasting too much flavoring / nic / VG / PG.
Also as /u/chewymidget saidbuy flavorings for specific, well reviewed recipes instead of random flavorings. I didn't do this when I started out and regret it. This helps make the initial mixing experience more enjoyable since you'll be making good juice right off the bat.
Here's a quick list: ###
I hope this helps out. Good luck and above all else, have fun with it!
What exactly do you mean by 'healthy?'
Is it about calorie reduction or getting more nutrients? Or both?
A very simple, tasty one is roasted cauliflower. Cauliflower really benefits from browning. Preferably roasting. Just wash and dry it (thoroughly), cut into equally sized pieces, whether it be bite size or "steaks," toss in olive oil, salt & pepper (and garlic if you want), spread evenly on a roasting pan, but don't crowd it too much, and roast in the oven on the middle rack or higher at about 425-450F until brown... even nearly black in a few places. It's so simple and delicious.
It makes a great soup too, just blend it with either veg or chicken stock and either some fresh parsley or thyme.
Another veg that does well with char is broccoli. Steam, blanch (heavily salt your blanching or steaming liquid) or microwave (if you must) the cut broccoli stalks until about half done, drain and dry. Toss in olive oil, salt, minced garlic and chili flakes and grill on very high heat or broil until slightly charred. You won't believe how good it is.
Some great books for veg dishes are:
Plenty by Yotam Ottolenghi
Tender by Nigel Slater (this one has a great chocolate beet cake)
The Art Of Simple Food II by Alice Waters (So many simple, classic veg preparations in this one.)
--
Regarding Mac & Cheese, here is page from Modernist Cuisine at Home:
http://i.imgur.com/E4dd4lQ.jpg
It involves using Sodium Citrate. Calm down! Don't be afraid. It's a type of salt derived from citrus fruits. If you like to cook with cheese this stuff will be your best friend. The only issue is you don't need very much of it, so you will need an accurate scale that can handle very small weights, but they're not that expensive and it'll pay for itself quickly in the amount you'll likely save in cheese costs, because.....
What it does is it helps emulsify the fats and solids of cheese when it melts and it can be used with just about every type of cheese that can melt, so that means you can use it to emulsify multiple types of cheeses at the same time. Why this matters for you? If you're trying to reduce calories you can mix your favorite cheeses with some lower calorie cheeses (like drained cottage cheese) and still end up with a really creamy sauce without having to add cream or butter. This stuff doesn't make Pasta & Cheese "healthy" but it does help you reduce the caloric value of a cheese dish without sacrificing texture... in fact it improves it.
Check it out: http://youtu.be/gOLgLi5ZJOY
Hi David! Huge fan of your show, btw.
​
If you want something simple, go with a Rancilio Silvia, which you can find here. https://www.seattlecoffeegear.com/rancilio-silvia-espresso-machine-version-m. It’s not as high tech as something that Saeco or La Marzocco would put out but when paired with a Rancilio Rocky grinder they are a great duo worth their price.
​
On the higher end of the price range, the Saeco Superautomatic Xelsis is literally all you will ever need. Anecdata here: a close friend of mine uses it, and it's great. It's fully digitized, it's smaller, it looks great, and the performance is second to none for home espresso IMO. https://www.amazon.com/Saeco-SM7684-04-Automatic-Espresso/dp/B07G3XYR3R. ($2,399)
​
My personal espresso machine I have used for the past 5 years is a Gaggia Classic Semi-auto espresso maker. I can't find it on amazon, however the Gaggia Anima is very similar and actually a bit better than mine. https://www.amazon.com/Gaggia-Automatic-Macchiato-Cappuccino-Programmable/dp/B016RYODRS/ref=sr_1_4?keywords=gaggia+classic&qid=1558640715&s=home-garden&sr=1-4 ($899)
​
As for grinders, I would definitely recommend getting an automated burr grinder. I personally hand grind my coffee just because I like the control it gives you, but it is time consuming. If you want a good hand grinder, start with the Hario Skerton. https://www.amazon.com/Hario-Skerton-Ceramic-Coffee-Mill/dp/B001802PIQ/ref=sr_1_2?keywords=hario+skerton&qid=1558640805&s=home-garden&sr=1-2 ($40)
​
For an automated grinder, I would start with the Baratza Virtuoso. It's roughly $250 USD and the quality is up there
I don't have time to make sure it's comprehensive and everything but I can throw some stuff together real quick:
Knives
You really only need 2, a chef's knife and serrated knife. A pairing knife is occasionally useful but rarely necessary. If you really like sharp knives, buy a whetstone and learn to sharpen, cheap knives can get just as sharp as expensive ones.
​
Pots and Pans
You need four or five things here. I'd say your mainly looking for a large saute pan, a stock pot, and a sauce pan. If you cook eggs you can grab a non-stick saute pan too. Don't use non stick pans for things that don't stick to pans. They wear out fast and they're garbage when they lose their coating. Oh and a sheet pan.
​
Other Shit
​
This is just suggestions if you don't have the stuff already, I think the real bottom line is that the stuff you already have is likely fine, and being a good cook is about knowledge and technique and putting effort into tasty food for people you care about, not gear.
TLDR; Calculate cost per meal. Eating out: $10-$15 per meal. Cooking at home: $1-$5 per meal
If you're serious about cutting back on food costs, my personal take on that is all about cost per meal. This includes eating out AND cooking at home.
When eating out, I try to make sure I save enough leftover for a proper meal portion to reheat the next day. Sometimes I can stretch it to 3 meals even, but that's not very common. So now instead of $20 for one meal, you're looking at $20 for two/three meals ($10/meal or less). That one step alone would at minimum halve your "eating out" costs. I know that might not be practical for every meal you buy, but you get the gist.
Now contrast that to cost per meal when cooking for yourself. Depending on how "fancy" of a meal I'm looking to do, my cost per meal, cooking for a family of 4, ranges anywhere from <$1 per serving (for a simple salad + protein) to ~$8 per meal for a nice steak dinner (grilled ribeye + fresh corn on the cob or any other veg + creamy mashed potatoes). The steak dinner is a bit of a splurge and definitely on the higher end of the cost scale, but you'd easily spend $25+ on something like that at a restaurant.
You don't have to be a wiz in the kitchen though to start learning some basic techniques/recipes and making tasty food that you'll enjoy. Get yourself an Instant Pot - $50 on Amazon! and make some chili. Here is a perfectly good Instant Pot chili recipe - skip the step about the fancy chicken stock mixture, just use straight up chicken stock.
I won't rehash the whole recipe, but here's what you would need at minimum for a decent chili:
So that comes out to about $12 for all ingredients to make a literal gallon of chili! Let's just assume an 8 oz bowl per serving, and this recipe makes at least 8 servings of chili, coming out to ~ $1.50 per serving! Even if you doubled your portion because you were hungry and ate 2 bowls each meal, that's still only $3 per serving! If the thought of eating a bowl of chili for 8 meals in a row bums you out, there's so many other things you can do with chili - chili dogs, chili burgers, chili over rice, chili mac & cheese. Or simply take a break from chili and eat something else you've prepared.
Point is, obviously eating at home is far cheaper. But the real question is just how much cheaper, and if you're serious about tracking your food costs, this is what I've found to be the most helpful for me. Yes, you should budget for weekly groceries, but it's also important to have a plan for how you're going to stretch that $50 (or w/e). It won't do you any good to focus on groceries and home cooking if you let some of that go to waste by not using it before it expires.
The cost per meal is simply too good to beat - unless you're only eating off the $1 menu at McDonald's, in which case you probably wouldn't be having this problem in the first place.
If you're interested in any more cheap meals or tips w/ Instant Pot etc... just let me know I'd be happy to share.