Best products from r/Workbenches
We found 24 comments on r/Workbenches discussing the most recommended products. We ran sentiment analysis on each of these comments to determine how redditors feel about different products. We found 77 products and ranked them based on the amount of positive reactions they received. Here are the top 20.
1. 48'' Universal T-Track with Hold Down Clamps
- T-Track Hold Down Clamps: This Rockler T track clamp kit includes a 48" length of our new anodized aluminum Universal T-track, plus 2 holddown clamps (each including one hold down, one 3" T-bolt, and one 5-star knob). This t track clamp hold down kit makes a great addition to our drill press table!
- Superior Working Performance: This T track clamps provides exceptional clamping action & accommodate material up to 2-1/2" thick. Our hold down clamps woodworking puts clamping pressure anywhere along the flush-mounted T-slot T-track.
- Rockler Quality & Wide Range of Use: The aluminum T tracks woodworking construction ensures maximum durability. Our universal hold down clamp set features a unique "stacked" T-slot that accepts both 5/16" T-bolts and 1/4" T-bolts, as well as 1/4" Hex-bolts, allowing you to attach a wide range of accessories.
- Aluminum, Cut to Length Frame: This clamp hold down has a sturdy aluminum frame that can be easily cut to length. This T Tracks woodworking 48 inch can also help you make a joint jig for your table saw.
- Blue T Track Kit Includes? Our Rockler T track kit includes (1) Length 48" Universal T-track, anodized aluminum, (2) Hold down clamps, (2) 5-Star Knobs, and (2) 3" T-Bolts.
Features:
 ▼ Read Reddit mentions
2. WallPeg Locking Pegboard Hooks - 100 pk. Flex-Lock J Style for Peg Board Tool Organizer - AM 114 B
- WallPeg Peg Hooks do not have split barbs that damage peg holes
- WallPeg Pegboard hooks have a smooth Flex-Lock system to protect pegboards
- Pegboard hooks have rounded safety tips and Patented Flex-Lock features
- Black Peg hooks fit 1/4" pegboard hole size, no barbs to damage board holes
- Easy to install, easy to move, stays in place…that’s the Flex-Lock way!
Features:
 ▼ Read Reddit mentions
3. LE Power Adapter, UL Listed, 3A, 120V AC to 12V DC Transformer, 36W Power Supply, US Plug Power Converter for LED Strip Light and More
- Input Voltage: 100-240 V AC. DC Port Diameter:Φ5.5*2.1*10mm.
- Output Voltage: 12 V DC. It works with Lighting EVER LED strip lights.
- Max Current: 3A. Length of AC Cord: 3.94ft/1.2m. Length of Output Cord: 3.94ft/1.2m.
- Application: Low voltage single color or RGB LED strip lights.
- US Plug: UL Listed. Pack of 1.
Features:
 ▼ Read Reddit mentions
4. Baby Night Lights, Kids Projector 360 Degree Rotation - 3 LED Bulbs 8 Color Changing Light, Romantic Night Lighting Lamp, Unique Gifts for Birthday Nursery Women Children Kids Baby (4 Sets of Film)
- Record Label: Universal
- Catalog #: 06024 9880034
- Country of release: NLD
- Year of Release: 2005
Features:
 ▼ Read Reddit mentions
5. BLACK+DECKER Workmate Portable Workbench, 350-Pound Capacity (WM125)
Durable steel frameNon skid feet prevent slidingMeasures 33.3 by 5 by 5 inches; Weighs 17.8 poundsWork bench holds upto 350 poundsIncluded components: WM125 project center, (4) swivel pegs
 ▼ Read Reddit mentions
6. Stanley 31610 SurgeMax Pro 9 Outlet Metal Surge Protector, Black
- Country of Origin: CHINA
- The Package Length of the product is 12.6 inches
- The Package Width of the product is 6.6 inches
- The Package Height of the product is 12.1 inches
Features:
 ▼ Read Reddit mentions
7. WoodOwl 09713 Tri-Cut 1-Inch by 7-1/2-Inch Ultra Smooth Auger Bit
Patented Tri-Cut triple edge spurred design for fast, smooth cutting without resistance.Ultra smooth cutting for perfectly finished holes with "blowout".Lighter weight carbon steel construction than standard augers for safety and reduced fatigue without sacrificing strength.Burr-free lead screw for ...
 ▼ Read Reddit mentions
8. SPACECARE 2.5 Inches Caster Wheels, Heavy Duty Locking Casters with Brake Set of 4,1000Lbs with 360 Degree No Noise Swivel Plate Castors
【1000 LBS Load-bearing】- The SPACECARE casters can move smoothly and easily support up to 1000 lbs per set. Our wheels are durable and stable because of solid steel and premium material.【Arbitrarily Rotating】- 360 degree rotating swivel urethane casters will help you move the object to direc...
 ▼ Read Reddit mentions
9. U-Bracket Levelers (Set of 4), Adjustable Leveling Feet with Mounting Bracket for Furniture, Tables, Workbenches, 500 lb. Load Capacity
Set of 4 - 3" Leg Levelers with U Brackets, Medium Duty, 3/8" - 16 thread, Engineering Details & Instructions IncludedHex Nut at the Base of the Leveler can be turned for Height Adjustment, Max Height from Floor Surface is 2 1/2", Minimum Height: 5/8"Weight Rating is 125 lbs per Leg, 500 lbs per set...
 ▼ Read Reddit mentions
10. MCS280100-4 Heavy Duty Adjustable Leg Leveler Set
2200 LB Capacity (550 LB Each Leg)3/8"-16 ThreadSwivel FootAdjustable with 3/16" Hex KeyIncludes 4 Levelers With Nylon Cover Cap and Screws
 ▼ Read Reddit mentions
11. Engineer PS-03 Miniature Needle Nose Pliers
high quality compact, fine needle nose pliers with half round, non-serrated jawsESD safe comfort grips, constructed from oil resistant thermoplastic elastomerspring loaded handles to aid repetitive work (helps avoid hand fatigue)ideal for forming, precision PCB/electronics work, lab/science work, cr...
 ▼ Read Reddit mentions
12. POWERTEC 17000 Workbench Caster Kit w/Polyurethane Wheels & 400 LB Total Weight Capacity-Pack of 4
- CONTENTS: Workbench caster kit includes (4) swivel casters with 2-3/8” polyurethane wheels, pedal brackets and easy install mounting hardware
- HEAVY DUTY: Casters flaunt an extra-thick housing and durable stainless steel construction that supports up to an impressive 400lb lifting weight capacity per set
- VERSATILE: Our universal workbench mobile base kit is perfect for at-home and automotive garages, professional workshops, and anywhere mobilized workstations are required
- STEPDOWN CASTERS: Features an innovative design with a non-slip foot activated pedal mechanism that allows you to elevate and move your workbench for fast and easy mobility
- FREE PIVOTING: Swivel casters flaunt 360 degree pivoting action - offering functional versatility for an assortment of projects that require maneuverability and workstation flexibility
Features:
 ▼ Read Reddit mentions
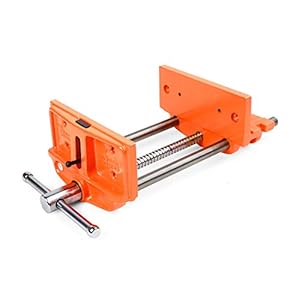
13. Pony 27091 8-Inch by 7-Inch Medium Duty Woodworker's Vise
8 inch opening capacity7 inch jaw widthDesigned to mount to the face of wood work benchesVise is for medium duty home, shop or professional useThe front jaw features a solid steel dog in the front jaw
 ▼ Read Reddit mentions
14. Safco Products Metro Extended Height Chair , Ergonomic, Pneumatic Height Adjustable, Heavily Padded
ERGONOMIC, PADDED DESIGN. Safco Metro Extended-Height Chair features a form-fitting contoured back and thickly cushioned seat for all-day comfort.HEIGHT ADJUSTABLE. Pneumatic lever under seat provides easy height adjustment from 23" to 33" for a personalized fit. Seat rotates 360 degrees for ease of...
 ▼ Read Reddit mentions
15. MLTOOLS Helping Third Hand Soldering Station Vise – Stable Hands Free Job Holder 3rd Hand Solder Fingers – Heavy Duty Steel Base – 8 Heat Shrink Tubes – Metal Goosenecks & Alligator Clips – VS339
- HANDS FREE SOLDERING STATION – Perform soldering tasks more efficiently & with less frustration using our soldering helping hand tool that holds your job RELIABLY, offers more FLEXIBILITY compared to a conventional soldering jig or soldering workbench, and brings more precision & accuracy in your work.
- STURDY BUILD – With heavy-duty 3 lb Stainless Steel base that stays firmly in position with the help of NON-SLIP feet, metallic gooseneck arms (2 long & 2 short) which offer necessary STABILITY for soldering, and 4 steel alligator clamps which can rotate 360º, this third hand soldering tool is an unbeatable choice.
- VERSATILE DESIGN – Whether you want to solder some microelectronics, circuit boards, craft, or jewellery, this workbench helping hands soldering station is an ingenious way to achieve finesse – equally suitable for hobbyists and professionals. Included HEAT SHRINK TUBES alleviate risk of damaging delicate jobs.
- DESIRABLE FLEXIBILITY – Gooseneck bendable arms of our 3rd hand soldering tool have optimal resistance such that they can be bent to required position easily but hold in place firmly to retain the set alignment, and the alligator clamps can be easily oriented & locked in position.
Features:
 ▼ Read Reddit mentions
17. Makita D-00810-25 5/32" x 6-1/4" Sds-Plus Bit, 25/Pk, Stainless Steel
- Engineered for reduced vibration and noise emissions
- Central guiding action for accurate holes
- Special impact grade Carbide
- 4" Usable length
- For drilling holes in a variety of masonry materials including concrete
- For use with rotary Hammers that accept bits with SDS-plus shanks
- Convenient contractor pack contains 25 bits
Features:
 ▼ Read Reddit mentions
18. Yonico 12249 Shaker 2 Bit Rail and Stile Router Bit Set 1/2-Inch Shank
- These bits cut shaker rail and stile cabinet door frames at a depth of 3/8" in stock up to 7/8". They feature 1/2" shanks and come in a wooden box.
- Create rail and stile cabinet door frames
- Premium C3 micro-grain tungsten carbide blades for a sharper & longer lasting edge
- For use on table mount router
- Silver induction brazing for maximum strength and durability
Features:
 ▼ Read Reddit mentions
19. STYLIO Office Desk Organizer. Pen & Pencil Holder. Markers, Stationery Caddies Essential for Office/Teacher Supplies. Translucent Black & White Caddy Organizer Racks (Set Of 4). Perfect for Desktops
- ✔ STAY ORGANIZED: Set of 4 stackable desk supplies organizer caddies (total of 16 compartments)
- ✔ VERSATILE DESIGN: Lay them horizontally or vertically. Minimizes space usage and even fits into pull-out drawers & desk trays
- ✔ CLEAN WORKSPACE: Caddy sorter box with slots to hold your pen, pencils, art brushes, crayons, color pencils, scissor, paper clips & office desktop accessories
- ✔ MINIMALIST: Helps keep your stationery, teaching & office supplies clutter free while exuding a clean, simplistic modern feel
- ✔ UNIVERSAL - Shelf tier caddy rack suitable for working adults, teachers, students, teens & children - perfect for school classrooms, corporate offices & art houses
Features:
 ▼ Read Reddit mentions
20. Rousseau 2745 PortaMax Table Saw Stand For Dewalt DW745, DWE7480 and Bosch GTS1031
Fits DeWalt Model DW745, DWE 7480 and Bosch GTS1031Increase rip capacity to 27"Includes T-Style locking fence for accuracySaw is held securely in place with the "J-Hook" Mounting SystemOptional accessories include Model 2720 Outfeed Table, Model 2710-XL Extension Table and Model 2715-XL Router Exten...
 ▼ Read Reddit mentions
Top comments mentioning products on r/Workbenches:
Summary
1. 48'' Universal T-Track with Hold Down Clamps
- T-Track Hold Down Clamps: This Rockler T track clamp kit includes a 48" length of our new anodized aluminum Universal T-track, plus 2 holddown clamps (each including one hold down, one 3" T-bolt, and one 5-star knob). This t track clamp hold down kit makes a great addition to our drill press table!
- Superior Working Performance: This T track clamps provides exceptional clamping action & accommodate material up to 2-1/2" thick. Our hold down clamps woodworking puts clamping pressure anywhere along the flush-mounted T-slot T-track.
- Rockler Quality & Wide Range of Use: The aluminum T tracks woodworking construction ensures maximum durability. Our universal hold down clamp set features a unique "stacked" T-slot that accepts both 5/16" T-bolts and 1/4" T-bolts, as well as 1/4" Hex-bolts, allowing you to attach a wide range of accessories.
- Aluminum, Cut to Length Frame: This clamp hold down has a sturdy aluminum frame that can be easily cut to length. This T Tracks woodworking 48 inch can also help you make a joint jig for your table saw.
- Blue T Track Kit Includes? Our Rockler T track kit includes (1) Length 48" Universal T-track, anodized aluminum, (2) Hold down clamps, (2) 5-Star Knobs, and (2) 3" T-Bolts.
Features:
▼ Read Reddit mentions2. WallPeg Locking Pegboard Hooks - 100 pk. Flex-Lock J Style for Peg Board Tool Organizer - AM 114 B
- WallPeg Peg Hooks do not have split barbs that damage peg holes
- WallPeg Pegboard hooks have a smooth Flex-Lock system to protect pegboards
- Pegboard hooks have rounded safety tips and Patented Flex-Lock features
- Black Peg hooks fit 1/4" pegboard hole size, no barbs to damage board holes
- Easy to install, easy to move, stays in place…that’s the Flex-Lock way!
Features:
▼ Read Reddit mentions3. LE Power Adapter, UL Listed, 3A, 120V AC to 12V DC Transformer, 36W Power Supply, US Plug Power Converter for LED Strip Light and More
- Input Voltage: 100-240 V AC. DC Port Diameter:Φ5.5*2.1*10mm.
- Output Voltage: 12 V DC. It works with Lighting EVER LED strip lights.
- Max Current: 3A. Length of AC Cord: 3.94ft/1.2m. Length of Output Cord: 3.94ft/1.2m.
- Application: Low voltage single color or RGB LED strip lights.
- US Plug: UL Listed. Pack of 1.
Features:
▼ Read Reddit mentions4. Baby Night Lights, Kids Projector 360 Degree Rotation - 3 LED Bulbs 8 Color Changing Light, Romantic Night Lighting Lamp, Unique Gifts for Birthday Nursery Women Children Kids Baby (4 Sets of Film)
- Record Label: Universal
- Catalog #: 06024 9880034
- Country of release: NLD
- Year of Release: 2005
Features:
▼ Read Reddit mentions5. BLACK+DECKER Workmate Portable Workbench, 350-Pound Capacity (WM125)
Durable steel frameNon skid feet prevent slidingMeasures 33.3 by 5 by 5 inches; Weighs 17.8 poundsWork bench holds upto 350 poundsIncluded components: WM125 project center, (4) swivel pegs
▼ Read Reddit mentions6. Stanley 31610 SurgeMax Pro 9 Outlet Metal Surge Protector, Black
- Country of Origin: CHINA
- The Package Length of the product is 12.6 inches
- The Package Width of the product is 6.6 inches
- The Package Height of the product is 12.1 inches
Features:
▼ Read Reddit mentions7. WoodOwl 09713 Tri-Cut 1-Inch by 7-1/2-Inch Ultra Smooth Auger Bit
Patented Tri-Cut triple edge spurred design for fast, smooth cutting without resistance.Ultra smooth cutting for perfectly finished holes with "blowout".Lighter weight carbon steel construction than standard augers for safety and reduced fatigue without sacrificing strength.Burr-free lead screw for ...
▼ Read Reddit mentions8. SPACECARE 2.5 Inches Caster Wheels, Heavy Duty Locking Casters with Brake Set of 4,1000Lbs with 360 Degree No Noise Swivel Plate Castors
【1000 LBS Load-bearing】- The SPACECARE casters can move smoothly and easily support up to 1000 lbs per set. Our wheels are durable and stable because of solid steel and premium material.【Arbitrarily Rotating】- 360 degree rotating swivel urethane casters will help you move the object to direc...
▼ Read Reddit mentions9. U-Bracket Levelers (Set of 4), Adjustable Leveling Feet with Mounting Bracket for Furniture, Tables, Workbenches, 500 lb. Load Capacity
Set of 4 - 3" Leg Levelers with U Brackets, Medium Duty, 3/8" - 16 thread, Engineering Details & Instructions IncludedHex Nut at the Base of the Leveler can be turned for Height Adjustment, Max Height from Floor Surface is 2 1/2", Minimum Height: 5/8"Weight Rating is 125 lbs per Leg, 500 lbs per set...
▼ Read Reddit mentions10. MCS280100-4 Heavy Duty Adjustable Leg Leveler Set
2200 LB Capacity (550 LB Each Leg)3/8"-16 ThreadSwivel FootAdjustable with 3/16" Hex KeyIncludes 4 Levelers With Nylon Cover Cap and Screws
▼ Read Reddit mentions11. Engineer PS-03 Miniature Needle Nose Pliers
high quality compact, fine needle nose pliers with half round, non-serrated jawsESD safe comfort grips, constructed from oil resistant thermoplastic elastomerspring loaded handles to aid repetitive work (helps avoid hand fatigue)ideal for forming, precision PCB/electronics work, lab/science work, cr...
▼ Read Reddit mentions12. POWERTEC 17000 Workbench Caster Kit w/Polyurethane Wheels & 400 LB Total Weight Capacity-Pack of 4
- CONTENTS: Workbench caster kit includes (4) swivel casters with 2-3/8” polyurethane wheels, pedal brackets and easy install mounting hardware
- HEAVY DUTY: Casters flaunt an extra-thick housing and durable stainless steel construction that supports up to an impressive 400lb lifting weight capacity per set
- VERSATILE: Our universal workbench mobile base kit is perfect for at-home and automotive garages, professional workshops, and anywhere mobilized workstations are required
- STEPDOWN CASTERS: Features an innovative design with a non-slip foot activated pedal mechanism that allows you to elevate and move your workbench for fast and easy mobility
- FREE PIVOTING: Swivel casters flaunt 360 degree pivoting action - offering functional versatility for an assortment of projects that require maneuverability and workstation flexibility
Features:
▼ Read Reddit mentions13. Pony 27091 8-Inch by 7-Inch Medium Duty Woodworker's Vise
8 inch opening capacity7 inch jaw widthDesigned to mount to the face of wood work benchesVise is for medium duty home, shop or professional useThe front jaw features a solid steel dog in the front jaw
▼ Read Reddit mentions14. Safco Products Metro Extended Height Chair , Ergonomic, Pneumatic Height Adjustable, Heavily Padded
ERGONOMIC, PADDED DESIGN. Safco Metro Extended-Height Chair features a form-fitting contoured back and thickly cushioned seat for all-day comfort.HEIGHT ADJUSTABLE. Pneumatic lever under seat provides easy height adjustment from 23" to 33" for a personalized fit. Seat rotates 360 degrees for ease of...
▼ Read Reddit mentions15. MLTOOLS Helping Third Hand Soldering Station Vise – Stable Hands Free Job Holder 3rd Hand Solder Fingers – Heavy Duty Steel Base – 8 Heat Shrink Tubes – Metal Goosenecks & Alligator Clips – VS339
- HANDS FREE SOLDERING STATION – Perform soldering tasks more efficiently & with less frustration using our soldering helping hand tool that holds your job RELIABLY, offers more FLEXIBILITY compared to a conventional soldering jig or soldering workbench, and brings more precision & accuracy in your work.
- STURDY BUILD – With heavy-duty 3 lb Stainless Steel base that stays firmly in position with the help of NON-SLIP feet, metallic gooseneck arms (2 long & 2 short) which offer necessary STABILITY for soldering, and 4 steel alligator clamps which can rotate 360º, this third hand soldering tool is an unbeatable choice.
- VERSATILE DESIGN – Whether you want to solder some microelectronics, circuit boards, craft, or jewellery, this workbench helping hands soldering station is an ingenious way to achieve finesse – equally suitable for hobbyists and professionals. Included HEAT SHRINK TUBES alleviate risk of damaging delicate jobs.
- DESIRABLE FLEXIBILITY – Gooseneck bendable arms of our 3rd hand soldering tool have optimal resistance such that they can be bent to required position easily but hold in place firmly to retain the set alignment, and the alligator clamps can be easily oriented & locked in position.
Features:
▼ Read Reddit mentions17. Makita D-00810-25 5/32" x 6-1/4" Sds-Plus Bit, 25/Pk, Stainless Steel
- Engineered for reduced vibration and noise emissions
- Central guiding action for accurate holes
- Special impact grade Carbide
- 4" Usable length
- For drilling holes in a variety of masonry materials including concrete
- For use with rotary Hammers that accept bits with SDS-plus shanks
- Convenient contractor pack contains 25 bits
Features:
▼ Read Reddit mentions18. Yonico 12249 Shaker 2 Bit Rail and Stile Router Bit Set 1/2-Inch Shank
- These bits cut shaker rail and stile cabinet door frames at a depth of 3/8" in stock up to 7/8". They feature 1/2" shanks and come in a wooden box.
- Create rail and stile cabinet door frames
- Premium C3 micro-grain tungsten carbide blades for a sharper & longer lasting edge
- For use on table mount router
- Silver induction brazing for maximum strength and durability
Features:
▼ Read Reddit mentions19. STYLIO Office Desk Organizer. Pen & Pencil Holder. Markers, Stationery Caddies Essential for Office/Teacher Supplies. Translucent Black & White Caddy Organizer Racks (Set Of 4). Perfect for Desktops
- ✔ STAY ORGANIZED: Set of 4 stackable desk supplies organizer caddies (total of 16 compartments)
- ✔ VERSATILE DESIGN: Lay them horizontally or vertically. Minimizes space usage and even fits into pull-out drawers & desk trays
- ✔ CLEAN WORKSPACE: Caddy sorter box with slots to hold your pen, pencils, art brushes, crayons, color pencils, scissor, paper clips & office desktop accessories
- ✔ MINIMALIST: Helps keep your stationery, teaching & office supplies clutter free while exuding a clean, simplistic modern feel
- ✔ UNIVERSAL - Shelf tier caddy rack suitable for working adults, teachers, students, teens & children - perfect for school classrooms, corporate offices & art houses
Features:
▼ Read Reddit mentions20. Rousseau 2745 PortaMax Table Saw Stand For Dewalt DW745, DWE7480 and Bosch GTS1031
Fits DeWalt Model DW745, DWE 7480 and Bosch GTS1031Increase rip capacity to 27"Includes T-Style locking fence for accuracySaw is held securely in place with the "J-Hook" Mounting SystemOptional accessories include Model 2720 Outfeed Table, Model 2710-XL Extension Table and Model 2715-XL Router Exten...
▼ Read Reddit mentions
> I noticed a pair of engineer cutters, how do you like them? I have the needle nose pliers (link here) that took 3 months to ship to me and I love them!
I have the needle nose pliers as well. I hadn't heard of the brand, but I was looking for decent snips on Amazon & there was a UK stockist/seller of Engineer so I figured I'd give them a go & ended up quite liking them.
>Those look like pelican cases but must be a different brand, what are they?
They're Pelican Storm (Pelican acquired the Storm brand a few years ago). I prefer their latches to the original Pelican ones.
>whats your favorite quad and whats your part list?
Probably my F1-6 (rotorbuilds page here) because it's the frame I wanted right back when I first got into the hobby but couldn't afford/justify, but 18 months later could finally do justice.
>I saw your taranis hiding in that room picture and wondered how you like it?
It's been a workhorse, but I would definitely like something smaller in the future because it just takes up so much space in the bag when travelling. The internal design of the QX7 is much better as everything is attached to the front plate (I think?) - the original has PCBs on both front & back so you have to open the two halves very carefully like a sandwich without tugging on ribbon cables.
>I really like your desk lamps, what are they?
They're from Taotronics & have been super good for me.
>What's your setup on that tripod control station?
It's an Aomway DIV006 with Menace RC antennas (one pagoda, one patch). I have older FatSharks (Attitude v2) that don't have diversity/DVR/module bay & it was easier to just grab an external diversity receiver/DVR than trying to frankenstein the goggles! I'm still not completely convinced by the diversity performance on the receiver, but I need to do some proper testing before I come to a proper opinion.
>I posted a workbench gallery in /r/electronics if you ever want to check it out.
Your organisation with the parts tubs & wire reels makes me very jealous, I really need to invest into some sort of drawers/organisers for the bench rather than having everything in tubs on the floor...
Gorilla Racks (or equivalent) can be assembled into a workbench; if you purchase a couple of them, you can even get some extra flexibility with assembly and layout. Be sure to the kind with multiple holes, so you can vary the shelving height. Also buy some nuts and bolts to attach units side-by-side. One other thing you'll want to buy is something better for the top surface; use the shelving wood pieces that come with the shelves for the "base" (to align it with the shelving edges), but drill some holes in it and drill/glue a slightly larger piece of 3/4" plywood or something on top. Then polyurethane it to finish it up (alternatively, put a piece of thin steel or aluminum over the top and bend the edges down and screw or glue in place).
Another option if space is tight, and your needs are fairly "light duty" - get one of these:
https://www.amazon.com/WM125-Workmate-350-Pound-Capacity-Portable/dp/B000077CQ0/
Then get a piece of 4' x 4' 3/4" plywood. Open the jaws of the bench up to their widest point and measure it; subtract a 1/2" or so. Cut a piece of plywood out to this width, then center and attach it to the remainder of the plywood with screws and glue. Once that is dry, clamp it into the workbench, then on each "jaw" draw a couple of the "circles" on each plywood side. Then find the center of those circles, and drill thru with a 1/4" drill to the other side. Then on the top side, use a spade bit (say 1" or slightly more) to "widen" up the hole, but only go thru about 1/3 to 1/2 of the way into the wood. Do this for all four holes. Polyurethane the top to finish it.
Get some bolts - flat hex head, or pan-head with phillips or similar - long enough to go thru the top you made, and thru the hole in the bench, plus a bit extra (about an inch); they should be about 1 3/4 to 2" long - 1/4 x 20 - get four of those, four washer to fit into the countersunk holes, four larger fender washers, and four 1/4 x 20 wingnuts.
Chuck the top into the workbench; tighten it up. Drop thru the holes a bolt with a washer, then on the other side, back each up with a fender washer and snug it down with a wingnut. And there you go.
This kind of bench is light duty (or you can get one of the "heavier duty" Workmates if your budget allows for it), but very versatile. For instance, you could make a variety of "tops" to mount tools on that can be chucked into place (or make a "universal" top for several smaller tools) - things like a miter saw, router table, small table saw, scroll saw, grinder, small drill press, etc. You could even potentially make an aluminum top for welding on (welding steel won't stick to the aluminum - or make a steel top if you want). Again, this is only light-duty stuff, but it's portable, lightweight, folds up, etc.
Be sure to pick up additional clamp dogs for the Workmate, and a "repair parts" assortment; these will be handy to keep the main workbench in shape. Also one other tip (kinda OT): If you ever needed to split a piece of transmission hose lengthwise, the Workmate bench has the answer! The jaws have a v-groove, so you can chuck a length of the hose in the groove, then use a box-cutter razor, guided along the edge of the jaw, to cut the tubing down the side in a very straight line. You can probably do this up to about 1" diameter tubing; anything larger would flex too much. I had to do this to custom make some u-bolt "padding" for use on a vehicle roof-rack to protect the cross bars.
If you needed something a bit more heavy duty than the Workmate, Harbor Freight sells a low-cost welding table, that you could make your own custom wood tops to bolt down onto the table (when you weren't welding on it, of course). The table folds up, but it doesn't have any vice-like jaw system, so keep that in mind. It's also much heavier than a Workmate, being made of heavier gauge steel.
Thanks very much. I'm pretty stoked to be able to put this together in the apartment. I realized early on, that despite being summer in Houston, I wasn't (totally) drenched in sweat while I worked. Pretty awesome being inside.
 
The drill guide is this one from Rockler. I ran into the same scattered reviews as you so was hesitant to pull the trigger. I've been mostly happy with this though. It took a little finagling to set it the right way, and to get used to the depth stop, but it's actually been pretty good for what it does. I haven't used it at any other angle than 90*, so I can't really speak to that.
I was disappointed to realize that I couldn't fit the 1" bit I used to drill the holes for the holdfasts. This guide has a 3/4" chuck, and the huge bit I was using needs a 1/2", but that's my fault for not checking.
The build quality is a little wobbly, but you can tighten most things up pretty easily. I will point out: Every bolt and nut on there has a purpose; if something seems wonkey, it is. Play with the tool without a drill attached, and see what everything does and how it works. You'll hopefully find that there's an adjustment that will do what you want.
 
Edit: Typo
For wider legs like that, I really like using hockey puck feet for a few reasons:
For cabinets, desks, etc, I'm happy to use whatever cheap leveling bracket I can find on Amazon. For workbenches and heavy duty shop equipment, hockey puck feet are a winner every time.
You must have been doing some cleaning. A little bit of work on a quad will make that look like a big mess. You have a collection of dandy tools there.
I noticed a pair of engineer cutters, how do you like them? I have the needle nose pliers (link here) that took 3 months to ship to me and I love them!
Those look like pelican cases but must be a different brand, what are they?
I used to build quads about 6 months ago when I had time but now I don't with my demanding job and still have all my stuff laying around, whats your favorite quad and whats your part list?
I saw your taranis hiding in that room picture and wondered how you like it? I have one but it crapped out on me. As a result, I bought the qx7 and if I ever pick up the hobby again will for sure get the new x-lite coming out.
I really like your desk lamps, what are they?
What's your setup on that tripod control station?
I posted a workbench gallery in /r/electronics if you ever want to check it out. (link)
Sorry all the questions, I just really like your setup.
Last month we moved into a new place that has a 500 sf basement and I am using about 40% of that space to build a workshop for leather craft and woodworking. The space is still a work in progress and a complete disaster, but it is coming along. The space will be shared with storage and a home gym (shoutout to /r/homegym!).
I just finished designing and building this workbench using a 4x8' plywood sheet top. The plywood top is 3/4" thick oak, the bottom shelf is 19/32" OSB (I originally planned on 1/2" but this was actually cheaper), the legs are 4x4s, and the rest of the frame is made of 2x4s. Cutting plus assembly by myself took about 3 hours, 2 beers (only after cutting was completed!), and only one small bruise (unrelated to the beer), though I spent much more time on top of that iterating on the design. My next step is to attach a few vises, tool mounts, some drop down casters, and possibly a thin MDF sacrificial top. If I forgo the sacrificial top I will likely route a bevel along the edges.
This thing is completely overkill for what I intend to use it for, but I like knowing that I could rebuild an engine on it if I wanted (/knew how) to. I can work on a few projects at once and really spread out, which was my ultimate goal for this build. I'll likely build a few more smaller, dedicated benches along the wall for things like a drill press, miter saw, etc. in the next few weeks.
I love Woodgears, so don't think I'm ragging on him. That said...
His workbench is more of a power tool platform rather than a workbench where hand (powered like a router or un-powered, like chisels). The biggest problem, which you have just found, is a lack of workholding. His design seems to completely ignore it. Which is fine for the kind of work Mathias does. For guitar building, I'd argue it's a hot mess.
The super heavy-handed approach would be to make a new bench. That's probably overkill if you're not super into this hobby.
In your situation, the most minimal approach, I think, is to reassess the leg situation. And then you can go down the path of of adding a vise or two.
For an end vise or tail vise or wagon vise...that's personal preference. Retro fitting can be difficult or expensive.
You can use a standard metal woodworkers vise with or without a dog. I've built two benches (one for my dad, one for my daughter) and that works fine. Something like: https://www.amazon.com/Pony-27091-9-Inch-7-Inch-Woodworkers/dp/B005HPU3DM/ref=sr_1_3?
Put it on the right, front corner as you are looking at your bench, getting as close to the front as possible. Strike a line inline with the dog on your vise. Drill dog holes. Since you're doing 3/4" for your hold downs, use the same here. Space the holes every 2.5-3" or so. You want them spaced, at minimum, less than 1/2 the travel of your vise. If you don't, you'll be cranking the vise from between the extreme ends of travel and that sucks.
Example install, on my daughter's bench: (sorry, old pictures) https://imgur.com/a/uVbbD
And if you're working on thin boards, it works better to keep the vise as closed as possible, else your thin stock pinched between dogs will be unsupported in your vise gap with planing or sanding.
If you have more cash to spend on your end vise, some pricer retro fit options include:
Finally, plan ahead for a thicker top someday. 3/4" ply, even two laters, has a surprising amount of flex and give to it. Not enough for most operations, but if you're doing a lot of heavy mortising with chisels, that flex will start to annoy you. And you'll be wasting energy to the bounce.
Which is why you might want a thicker top, something in the 2-3 inch range, someday. SO, while you've got the bench flipped over to futz with the apron, consider chopping an inch or two off the legs and putting spacers on it. THEN, when you maybe someday make the bench top thicker by remaking it out of solid 2x4s (for example) just remove the spacers and you're at the same height you're at today. If that's important to you.
I'm excited to see other folks making these and having a positive experience. I had a blast with making the top.. The legs were a bit harder for me to knock out.. Took me a couple of weeks, but I use my table almost every day, now.. I just routed a slot in mine and installed a rockler t track and LOVE IT
https://www.amazon.com/Universal-T-Track-Hold-Down-Clamps/dp/B0025THAAW/ref=sr_1_7?keywords=rockler&qid=1557243314&s=gateway&sr=8-7
I still need to find a cost effective way to add a couple of wood vices on the sides like the classic style.. I got a lot of use out of rex kruger's video on an affordable bench.. He just did a video on low cost clamping options.
https://www.youtube.com/watch?v=tdnmQ22lUow&disable_polymer=true
SWEEEET!
Ok, I'm going to give you a 30 minute task. Look at your pegboard. Think about which tools you reach for most often. Take all the tools down and rearrange based on how order of priority. No way Mr. Hacksaw needs to be front and center.
Also, that's a LOT of your pegboard used for wrenches. They look good so maybe they stay for aesthetics. But it's worth the question: how often do you use a wrench at a bench? Not often. Usually you're working on that Harley or the car. Wrenches may go better in a rolling drawer. Bench work is just different tools. You'll spend countless hours at that bench making blades in 2017, and never reach for a wrench once.
Also, THIS will change your life. A tall task chair is the best thing in my garage. I can go all day in that bad boy, and it's tall enough to sit at my workbench.
Boy I love your setup. Music. Drinks. Lighting. And it's clean. I want to hang out here.
Some people sell them for soldering use.
I got one like this https://amzn.com/B01961086E
but the one OP has is probably better because it's easier to rotate the clamps.
oh wow, just saw the test tubes. Wonder what's in them?
Nice job. As a suggestion the next time you're at a big box store check out the "oops" paint . It's cheap and a fresh coat of paint on the 2x4's (not work surface) will extend life and make it look nice.
​
Also, I used those pegboard hooks and they drove me nuts. I bought these and they don't come out with the tool and are a lot stronger. https://www.amazon.com/WallPeg-Pegboard-Hooks-Flex-Lock-Organizer/dp/B00GSZ0ZT2/
​
I'd love to see a "6-months later" post as to how the workbench gets used. Oh - and don't forget a vise.
Awesome! I felt like I was looking at the back of my own head in frame 8. I have a
1025-pack of SDS masonry bits due to come tomorrow for the on-going DIY electrical embiggening of my garage work area, which is currently focused on additional lighting and outlets.Edit: Dang. I thought it was a 10 pack. Bonus!
The little angled desk organizers are on amazon here, but I think you can get them at a similar price in all white now. Wish they were available when I found them, lets more light through so its easier to see whats in them.
Those, like so much of this setup, have lots of zipties keeping them stable and in their place. I drilled holes in their back corners to tie them down to the wire shelf. All the hooks and mounts on the pegboard have at least two zipties behind them each as well. I’d bet there are over 100 in the whole setup, I don’t abide wiggling.
Nice! I need this in my life... my shop isn't much more than a glorified walk in closet, so this would definitely save serious space.
Previously, I was considering buying this, but I like your project better.
They provide enough light but aren't super bright, I do have the option of putting another strip across (I only used half) to make it brighter but 1 should be enough. You can't beat the price: LEDs and Power Source . I originally was going to hold them up by zip ties, but the backing is sticky enough to stay on the wire shelf. I'm not sure how well it will stand up in the future but for now it's great.
I mounted these above my workbench, they're super brightL
http://www.amazon.com/Flexible-Lights-Daylight-Lumens-Non-waterproof/dp/B00JQV6Q4I
and then you just need a power adapter:
http://www.amazon.com/Power-Adapter-Transformers-Supply-Strip/dp/B00DKSI0S8
I mounted them facing down, behind a piece of wood so i see the lights directly.
I have a power strip like this mounted to the back of the table top which I find very useful, but our needs may vary.
Yeah, sorry, I bought mine at a local small hardware store so I don't remember the brand. It looks almost exactly like this Stanley model though.