Reddit mentions: The best wall painting supplies
We found 3,520 Reddit comments discussing the best wall painting supplies. We ran sentiment analysis on each of these comments to determine how redditors feel about different products. We found 1,670 products and ranked them based on the amount of positive reactions they received. Here are the top 20.
1. Testors Spray Lacquer 3oz, Clear Coat
- For use on many surfaces
- Finely ground pigments give superb flow and coverage
- lead free, fast-drying, and easy to apply
- Contains one aerosol can with 3oz (85g) of enamel paint
- Available in a variety of colors
Features:

Specs:
| Color | Clear |
| Height | 9.444 Inches |
| Length | 4.4446 Inches |
| Number of items | 1 |
| Size | 3 Ounce (Pack of 1) |
| Weight | 0.31 Pounds |
| Width | 0.4448 Inches |
2. Krylon K01303A07 Crystal Clear Acrylic Coating Aerosol Spray, 6 Ounce
Crystal clear acrylic coating spray provides a permanent protective gloss coating that will not yellow with ageMoisture resistant and smudge proofUse for photography, watercolor, charcoa pencil, painted surfaces, wood crafts and much moreComes in 6-ounces aerosol can

Specs:
| Color | Gloss Small Can |
| Height | 6.9 Inches |
| Length | 2.2 Inches |
| Number of items | 1 |
| Size | 6 Ounce (Pack of 1) |
| Weight | 0.5 Pounds |
| Width | 2.2 Inches |
3. Krylon K01306 Workable Fixatif Spray Clear, 11-Ounce Aerosol,Matte
Workable fixatif spray protects computer prints, pencil, pastel and chalk drawingsPrevents smudging, wrinkling and allows for easy reworking of the artworkAcid free and archival safeClear, durable finishErase through coating to rework artwork.Non-wrinkling; non-yellowing. Dry to the touch in 30 minu...

Specs:
| Color | Matte |
| Height | 1 Inches |
| Length | 1 Inches |
| Number of items | 1 |
| Size | 11 Ounce (Pack of 1) |
| Weight | 0.6875 Pounds |
| Width | 1 Inches |
4. Mr. Super Clear Flat Spray
Sealant that provides protection for your paint job and also alters sheen of bare plasticGreat for use with Mr. Color/Hobby paintsFlat coat finish

Specs:
| Color | Gray |
| Height | 5.75 Inches |
| Length | 2 Inches |
| Number of items | 1 |
| Release date | August 2020 |
| Size | 2.26 Fl Oz (Pack of 1) |
| Weight | 0.00881849048 pounds |
| Width | 2 Inches |
5. Mr. Top Coat Flat Spray
Sealant that provides protection for your paint job and also alters sheen of bare plasticGreat for use with Mr. Color/Hobby paintsFlat coat finish

Specs:
| Color | clear |
| Height | 4 Inches |
| Length | 2 Inches |
| Number of items | 1 |
| Release date | June 2020 |
| Size | 1 Count (Pack of 1) |
| Width | 2 Inches |
6. 3M 11872-00000-20 Safety Glasses, Virtua CCS Protective Eyewear 11872, Removable Foam Gasket, Clear Anti-Fog Lenses, Corded Ear Plug Control System
- DUST DEFENSE: Foam gasket helps limit eye exposure to nuisance dust and other particles while providing additional cushioning.
- WRAP AROUND DESIGN provides extended eye protection and unobstructed viewing.
- ANTI-FOG LENS COATING and removable foam-lined gasket with airflow vents make this protective eyewear ideal for humid environments.
- CORDED EAR PLUG CONTROL SYSTEM: Unique temple design can keep eyewear and ear plugs attached, untangled, and ready to use. Corded ear plugs can double as a lanyard (ear plugs sold separately).
- ANSI Z87: Meets the High Impact Requirements of CSA Z94.3-2007 and the High Impact Requirements of ANSI Z87.1-2020.
- POLYCARBONATE LENSES absorb 99.9% UV rays.
- For industrial/occupational use only. Not for consumer sale or use.
Features:

Specs:
| Color | Clear Lens, Blue Frame With Foam Gasket |
| Height | 2 Inches |
| Length | 6 Inches |
| Number of items | 1 |
| Size | Single |
| Weight | 0.05 Pounds |
| Width | 2 Inches |
7. Tamiya Gray Fine Surface Primer L, 180ml Spray Can
- Light Gray Fine Surface Primer (L)
- 180ml Spray Can
- Ideal for preparing ABS and Styrene plastic for paint
- May also be used on Metal Parts
- Part Number 87064
Features:

Specs:
| Color | Gray |
| Height | 2.13 Inches |
| Length | 2.13 Inches |
| Size | 6.09 Fl Oz (Pack of 1) |
| Weight | 0.13 Pounds |
| Width | 5.63 Inches |
8. Krylon K01303007 Acrylic Spray Paint Crystal Clear in 11-Ounce Aerosol
- Moisture-resistant and smudge-proof.
- Improves artwork and photo contrast.
- Dries to the touch in 10 to 15 minutes. Dry to handle in 2 hours.
- For use on paper, wood, metal, glass, plaster, ceramic, paper Mache, dried silk flowers and plastic.
Features:

Specs:
| Color | Gloss Large Can |
| Height | 8 Inches |
| Length | 2.5 Inches |
| Number of items | 1 |
| Size | 11 Ounce (Pack of 1) |
| Weight | 1 Pounds |
| Width | 2.45 Inches |
9. Krylon K05353007 ColorMaster Acrylic Crystal Clear, Flat, Clear, 11 oz.
- For use on plastic, metal, wood and more
- Perfect for indoor and outdoor projects
- Dries in 10 minutes or less
- Durable Covermax technology for premium coverage and brilliant color.
Features:

Specs:
| Color | Clear |
| Height | 8 Inches |
| Length | 3 Inches |
| Number of items | 1 |
| Release date | January 2013 |
| Size | 12 Ounce (Pack of 1) |
| Weight | 0.98 Pounds |
| Width | 3 Inches |
10. Rust-Oleum, Gray, GrayRust-Oleum 249279 Automotive Filler Primer Spray Paint, 11 oz, 11-Ounce
- Filler primer is suitable for use on wood, metal and fiberglass surfaces
- Oil based paint with Stops Rust formula provides rust resistant base coat for cars, trucks and other vehicles
- Covers up to 12 sq ft and dries to the touch (and can be recoated) in 10 minutes
- Filler spray paint fills minor surface imperfections with excellent rust resistance
- Flat finish can be covered with any topcoat with superior adhesion
- For use on metal, wood and fiberglass surfaces
- Any-angle spray technology allows the can to be sprayed in any direction, even upside down
- Stops Rust Formula prevents corrosion and rust
- Fills in minor scratches and surface nicks to leave a smooth, paintable surface
- This item is not for sale in Catalina Island
Features:

Specs:
| Color | Gray |
| Height | 8 Inches |
| Length | 3 Inches |
| Number of items | 1 |
| Size | 11 Ounce (Pack of 1) |
| Weight | 0.68784225744 Pounds |
| Width | 3 Inches |
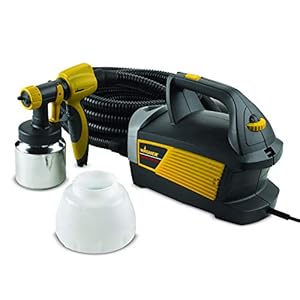
11. Wagner Spraytech 0518080 Control Spray Max HVLP Paint or Stain Sprayer, Complete Adjustability for Decks, Cabinets, Furniture and Woodworking, Extra Container included
- HVLP PAINT SPRAYER: The Control Spray Max paint sprayer uses high volume, low pressure technology to atomize materials into fine particles and provide a smooth finish on door trim, decks, furniture, more
- USE WITH A WIDE VARIETY OF MATERIALS: Powerful two-stage turbine makes it easy to paint walls and surfaces with thinned latex paints and thinner materials like stains and poly
- ADJUSTABLE SETTINGS: Customize your paint flow by using the pressure control dial and material flow adjuster to receive the perfect finish every time. Turn the air cap to spray round, horizontal, or vertical
- GREAT DESIGN: The stationary base is connected to the spray gun with a 20 ft. hose to easily reach your painting project and reduce hand fatigue. Also includes a 1 ½ qt. cup and professional grade metal 1 qt. cup
Features:
Specs:
| Color | Yellow/Black |
| Height | 11.99999998776 Inches |
| Length | 18.49999998113 Inches |
| Number of items | 1 |
| Size | Control Spray Max |
| Weight | 11.1994829096 Pounds |
| Width | 11.99999998776 Inches |
12. ISC Racerstape Surface Protection Tape / Helicopter Tape 2 Inch x 12 Feet
- Core: 3 inch diameter
- Backing/carrier: polyurethane film
- Adhesive: acrylic
- Release liner: 92 lb. Polycoated white paper
- Thickness: 12.7 mils (carrier, adhesive, liner) 8 mils (carrier, adhesive) 4.7 mils (liner)
Features:

Specs:
| Color | black |
| Height | 1 Inches |
| Length | 1 Inches |
| Number of items | 1 |
| Size | 2 in. x 12 ft. retail package |
| Weight | 0.25 Pounds |
| Width | 1 Inches |
13. Art3d Textures 3D Wall Panels White Diamond Design Pack of 12 Tiles 32 Sq Ft (PVC)
- Premium quality PVC 3d wall panels, light weight and fire resistant, easy DIY
- Come in box of 12 panels, cover 32 square feet
- Size: 19.7" x 19.7" (500mm*500mm); Color: Matt White
- Made from PVC, light weight and fire resistant
- Recommended Use: Living room / bedroom / kitchen room / TV background / feature walls / ceiling etc
Features:

Specs:
| Color | Matt White |
| Height | 0.99999999898 Inches |
| Length | 19.68503935 Inches |
| Size | 19.7" x 19.7 Pack of 12 |
| Weight | 4 Kilograms |
| Width | 19.68503935 Inches |
14. Perfect Plastic Putty, 40ml
- Made by Delux Materials; Delux Materials is a United States based company; parts are sourced from Global producers
- Delux Materials part number DLMBD44
Features:

Specs:
| Height | 2 Inches |
| Length | 5 Inches |
| Number of items | 1 |
| Width | 2 Inches |
15. Rust-Oleum 280715 American Accents Ultra Cover Spray Paint
Ideal for interior/exterior use on virtually any surface including wood, plastic, metal, wicker, plaster, unglazed ceramic and moreProvides long lasting protection with any-angle spray comfort tip that reduces finger fatigue and makes it easy to reach hard to paint placesDries to the touch in 20 min...

Specs:
| Color | White Primer |
| Height | 7.88 Inches |
| Length | 2.62 Inches |
| Number of items | 1 |
| Size | 12 Ounce (Pack of 1) |
| Weight | 1 Pounds |
| Width | 2.62 Inches |
16. Rust-Oleum 249117 Painter's Touch 2X Ultra Cover, 12 oz, Clear
Ideal for use on interior/exterior surfaces including wood, , plaster, metal, masonry and unglazed ceramicOil-based formula is low odor, resist chips and provides long-lasting protectionDries to touch in 20 minutes and covers up to 12 sq. ft. per canDurable formula provides excellent hide and goes o...

Specs:
| Color | Gloss Clear |
| Height | 7.88 Inches |
| Length | 2.63 Inches |
| Number of items | 1 |
| Size | 12 Ounce (Pack of 1) |
| Weight | 0.7495716908 Pounds |
| Width | 2.63 Inches |
17. Pour-On Epoxy Finish Is Equal To 60 Coats Of Varnish And Provides A Gorgeous High Gloss Appearance
- Indoor/outdoor
- Rich, semi-gloss sheen
- Superior color and sheen retention after repeated heating
- Do not use in areas directly exposed to flames (e.g., inside of grills or fireplaces)
- 12 oz. Spray
Features:
 ▼ Read Reddit mentions
18. Krylon K01305 Gallery Series Artist and Clear Coatings Aerosol, 11-Ounce, UV-Resistant Clear Gloss
- The item is not returnable
- Protects against harmful UV light rays
- Non-yellowing, permanent coating
- Moisture resistant
- Dries in minutes
Features:

Specs:
| Color | Gloss |
| Height | 1 Inches |
| Length | 1 Inches |
| Number of items | 1 |
| Size | 11 Ounce (Pack of 1) |
| Weight | 0.93 Pounds |
| Width | 1 Inches |
19. RoomMates RMK2259SCS Adventure Time Peel and Stick Wall Decals
- Comes with 27 decals; Decals range size 3"wide x 1.3"high to 16.5"wide x 9"high
- Easy to apply - just peel and stick
- Applies to any smooth, clean, flat surface; product may not adhere to unclean, textured, recently painted, or nonstick surfaces
- Wall Decals are removable with no sticky residue
- Wall Decals made in the USA
Features:

Specs:
| Color | Adventure Time |
| Height | 0 Inches |
| Length | 18 Inches |
| Number of items | 1 |
| Weight | 0.31 Pounds |
| Width | 10 Inches |
20. Tamiya America, Inc Primer White 180ml, TAM87044
Tamiya Surface Primer White 180ml … 87044

Specs:
| Color | White |
| Height | 2.08 Inches |
| Length | 5.8 Inches |
| Number of items | 1 |
| Size | 6.1 Fl Oz (Pack of 1) |
| Weight | 0.02 Pounds |
| Width | 2.08 Inches |
🎓 Reddit experts on wall painting supplies
The comments and opinions expressed on this page are written exclusively by redditors. To provide you with the most relevant data, we sourced opinions from the most knowledgeable Reddit users based the total number of upvotes and downvotes received across comments on subreddits where wall painting supplies are discussed. For your reference and for the sake of transparency, here are the specialists whose opinions mattered the most in our ranking.
Subcategories:
Interested in what Redditors like? Check out our Shuffle feature
Shuffle: random products popular on RedditTop Reddit comments about Paint, Wall Treatments & Supplies:
Summary
1. Testors Spray Lacquer 3oz, Clear Coat
- For use on many surfaces
- Finely ground pigments give superb flow and coverage
- lead free, fast-drying, and easy to apply
- Contains one aerosol can with 3oz (85g) of enamel paint
- Available in a variety of colors
Features:
Specs:
| Color | Clear |
| Height | 9.444 Inches |
| Length | 4.4446 Inches |
| Number of items | 1 |
| Size | 3 Ounce (Pack of 1) |
| Weight | 0.31 Pounds |
| Width | 0.4448 Inches |
2. Krylon K01303A07 Crystal Clear Acrylic Coating Aerosol Spray, 6 Ounce
Crystal clear acrylic coating spray provides a permanent protective gloss coating that will not yellow with ageMoisture resistant and smudge proofUse for photography, watercolor, charcoa pencil, painted surfaces, wood crafts and much moreComes in 6-ounces aerosol can
Specs:
| Color | Gloss Small Can |
| Height | 6.9 Inches |
| Length | 2.2 Inches |
| Number of items | 1 |
| Size | 6 Ounce (Pack of 1) |
| Weight | 0.5 Pounds |
| Width | 2.2 Inches |
3. Krylon K01306 Workable Fixatif Spray Clear, 11-Ounce Aerosol,Matte
Workable fixatif spray protects computer prints, pencil, pastel and chalk drawingsPrevents smudging, wrinkling and allows for easy reworking of the artworkAcid free and archival safeClear, durable finishErase through coating to rework artwork.Non-wrinkling; non-yellowing. Dry to the touch in 30 minu...
Specs:
| Color | Matte |
| Height | 1 Inches |
| Length | 1 Inches |
| Number of items | 1 |
| Size | 11 Ounce (Pack of 1) |
| Weight | 0.6875 Pounds |
| Width | 1 Inches |
4. Mr. Super Clear Flat Spray
Sealant that provides protection for your paint job and also alters sheen of bare plasticGreat for use with Mr. Color/Hobby paintsFlat coat finish
Specs:
| Color | Gray |
| Height | 5.75 Inches |
| Length | 2 Inches |
| Number of items | 1 |
| Release date | August 2020 |
| Size | 2.26 Fl Oz (Pack of 1) |
| Weight | 0.00881849048 pounds |
| Width | 2 Inches |
5. Mr. Top Coat Flat Spray
Sealant that provides protection for your paint job and also alters sheen of bare plasticGreat for use with Mr. Color/Hobby paintsFlat coat finish
Specs:
| Color | clear |
| Height | 4 Inches |
| Length | 2 Inches |
| Number of items | 1 |
| Release date | June 2020 |
| Size | 1 Count (Pack of 1) |
| Width | 2 Inches |
6. 3M 11872-00000-20 Safety Glasses, Virtua CCS Protective Eyewear 11872, Removable Foam Gasket, Clear Anti-Fog Lenses, Corded Ear Plug Control System
- DUST DEFENSE: Foam gasket helps limit eye exposure to nuisance dust and other particles while providing additional cushioning.
- WRAP AROUND DESIGN provides extended eye protection and unobstructed viewing.
- ANTI-FOG LENS COATING and removable foam-lined gasket with airflow vents make this protective eyewear ideal for humid environments.
- CORDED EAR PLUG CONTROL SYSTEM: Unique temple design can keep eyewear and ear plugs attached, untangled, and ready to use. Corded ear plugs can double as a lanyard (ear plugs sold separately).
- ANSI Z87: Meets the High Impact Requirements of CSA Z94.3-2007 and the High Impact Requirements of ANSI Z87.1-2020.
- POLYCARBONATE LENSES absorb 99.9% UV rays.
- For industrial/occupational use only. Not for consumer sale or use.
Features:
Specs:
| Color | Clear Lens, Blue Frame With Foam Gasket |
| Height | 2 Inches |
| Length | 6 Inches |
| Number of items | 1 |
| Size | Single |
| Weight | 0.05 Pounds |
| Width | 2 Inches |
7. Tamiya Gray Fine Surface Primer L, 180ml Spray Can
- Light Gray Fine Surface Primer (L)
- 180ml Spray Can
- Ideal for preparing ABS and Styrene plastic for paint
- May also be used on Metal Parts
- Part Number 87064
Features:
Specs:
| Color | Gray |
| Height | 2.13 Inches |
| Length | 2.13 Inches |
| Size | 6.09 Fl Oz (Pack of 1) |
| Weight | 0.13 Pounds |
| Width | 5.63 Inches |
8. Krylon K01303007 Acrylic Spray Paint Crystal Clear in 11-Ounce Aerosol
- Moisture-resistant and smudge-proof.
- Improves artwork and photo contrast.
- Dries to the touch in 10 to 15 minutes. Dry to handle in 2 hours.
- For use on paper, wood, metal, glass, plaster, ceramic, paper Mache, dried silk flowers and plastic.
Features:
Specs:
| Color | Gloss Large Can |
| Height | 8 Inches |
| Length | 2.5 Inches |
| Number of items | 1 |
| Size | 11 Ounce (Pack of 1) |
| Weight | 1 Pounds |
| Width | 2.45 Inches |
9. Krylon K05353007 ColorMaster Acrylic Crystal Clear, Flat, Clear, 11 oz.
- For use on plastic, metal, wood and more
- Perfect for indoor and outdoor projects
- Dries in 10 minutes or less
- Durable Covermax technology for premium coverage and brilliant color.
Features:
Specs:
| Color | Clear |
| Height | 8 Inches |
| Length | 3 Inches |
| Number of items | 1 |
| Release date | January 2013 |
| Size | 12 Ounce (Pack of 1) |
| Weight | 0.98 Pounds |
| Width | 3 Inches |
10. Rust-Oleum, Gray, GrayRust-Oleum 249279 Automotive Filler Primer Spray Paint, 11 oz, 11-Ounce
- Filler primer is suitable for use on wood, metal and fiberglass surfaces
- Oil based paint with Stops Rust formula provides rust resistant base coat for cars, trucks and other vehicles
- Covers up to 12 sq ft and dries to the touch (and can be recoated) in 10 minutes
- Filler spray paint fills minor surface imperfections with excellent rust resistance
- Flat finish can be covered with any topcoat with superior adhesion
- For use on metal, wood and fiberglass surfaces
- Any-angle spray technology allows the can to be sprayed in any direction, even upside down
- Stops Rust Formula prevents corrosion and rust
- Fills in minor scratches and surface nicks to leave a smooth, paintable surface
- This item is not for sale in Catalina Island
Features:
Specs:
| Color | Gray |
| Height | 8 Inches |
| Length | 3 Inches |
| Number of items | 1 |
| Size | 11 Ounce (Pack of 1) |
| Weight | 0.68784225744 Pounds |
| Width | 3 Inches |
11. Wagner Spraytech 0518080 Control Spray Max HVLP Paint or Stain Sprayer, Complete Adjustability for Decks, Cabinets, Furniture and Woodworking, Extra Container included
- HVLP PAINT SPRAYER: The Control Spray Max paint sprayer uses high volume, low pressure technology to atomize materials into fine particles and provide a smooth finish on door trim, decks, furniture, more
- USE WITH A WIDE VARIETY OF MATERIALS: Powerful two-stage turbine makes it easy to paint walls and surfaces with thinned latex paints and thinner materials like stains and poly
- ADJUSTABLE SETTINGS: Customize your paint flow by using the pressure control dial and material flow adjuster to receive the perfect finish every time. Turn the air cap to spray round, horizontal, or vertical
- GREAT DESIGN: The stationary base is connected to the spray gun with a 20 ft. hose to easily reach your painting project and reduce hand fatigue. Also includes a 1 ½ qt. cup and professional grade metal 1 qt. cup
Features:
Specs:
| Color | Yellow/Black |
| Height | 11.99999998776 Inches |
| Length | 18.49999998113 Inches |
| Number of items | 1 |
| Size | Control Spray Max |
| Weight | 11.1994829096 Pounds |
| Width | 11.99999998776 Inches |
12. ISC Racerstape Surface Protection Tape / Helicopter Tape 2 Inch x 12 Feet
- Core: 3 inch diameter
- Backing/carrier: polyurethane film
- Adhesive: acrylic
- Release liner: 92 lb. Polycoated white paper
- Thickness: 12.7 mils (carrier, adhesive, liner) 8 mils (carrier, adhesive) 4.7 mils (liner)
Features:
Specs:
| Color | black |
| Height | 1 Inches |
| Length | 1 Inches |
| Number of items | 1 |
| Size | 2 in. x 12 ft. retail package |
| Weight | 0.25 Pounds |
| Width | 1 Inches |
13. Art3d Textures 3D Wall Panels White Diamond Design Pack of 12 Tiles 32 Sq Ft (PVC)
- Premium quality PVC 3d wall panels, light weight and fire resistant, easy DIY
- Come in box of 12 panels, cover 32 square feet
- Size: 19.7" x 19.7" (500mm*500mm); Color: Matt White
- Made from PVC, light weight and fire resistant
- Recommended Use: Living room / bedroom / kitchen room / TV background / feature walls / ceiling etc
Features:
Specs:
| Color | Matt White |
| Height | 0.99999999898 Inches |
| Length | 19.68503935 Inches |
| Size | 19.7" x 19.7 Pack of 12 |
| Weight | 4 Kilograms |
| Width | 19.68503935 Inches |
14. Perfect Plastic Putty, 40ml
- Made by Delux Materials; Delux Materials is a United States based company; parts are sourced from Global producers
- Delux Materials part number DLMBD44
Features:
Specs:
| Height | 2 Inches |
| Length | 5 Inches |
| Number of items | 1 |
| Width | 2 Inches |
15. Rust-Oleum 280715 American Accents Ultra Cover Spray Paint
Ideal for interior/exterior use on virtually any surface including wood, plastic, metal, wicker, plaster, unglazed ceramic and moreProvides long lasting protection with any-angle spray comfort tip that reduces finger fatigue and makes it easy to reach hard to paint placesDries to the touch in 20 min...
Specs:
| Color | White Primer |
| Height | 7.88 Inches |
| Length | 2.62 Inches |
| Number of items | 1 |
| Size | 12 Ounce (Pack of 1) |
| Weight | 1 Pounds |
| Width | 2.62 Inches |
16. Rust-Oleum 249117 Painter's Touch 2X Ultra Cover, 12 oz, Clear
Ideal for use on interior/exterior surfaces including wood, , plaster, metal, masonry and unglazed ceramicOil-based formula is low odor, resist chips and provides long-lasting protectionDries to touch in 20 minutes and covers up to 12 sq. ft. per canDurable formula provides excellent hide and goes o...
Specs:
| Color | Gloss Clear |
| Height | 7.88 Inches |
| Length | 2.63 Inches |
| Number of items | 1 |
| Size | 12 Ounce (Pack of 1) |
| Weight | 0.7495716908 Pounds |
| Width | 2.63 Inches |
17. Pour-On Epoxy Finish Is Equal To 60 Coats Of Varnish And Provides A Gorgeous High Gloss Appearance
- Indoor/outdoor
- Rich, semi-gloss sheen
- Superior color and sheen retention after repeated heating
- Do not use in areas directly exposed to flames (e.g., inside of grills or fireplaces)
- 12 oz. Spray
Features:
▼ Read Reddit mentions18. Krylon K01305 Gallery Series Artist and Clear Coatings Aerosol, 11-Ounce, UV-Resistant Clear Gloss
- The item is not returnable
- Protects against harmful UV light rays
- Non-yellowing, permanent coating
- Moisture resistant
- Dries in minutes
Features:
Specs:
| Color | Gloss |
| Height | 1 Inches |
| Length | 1 Inches |
| Number of items | 1 |
| Size | 11 Ounce (Pack of 1) |
| Weight | 0.93 Pounds |
| Width | 1 Inches |
19. RoomMates RMK2259SCS Adventure Time Peel and Stick Wall Decals
- Comes with 27 decals; Decals range size 3"wide x 1.3"high to 16.5"wide x 9"high
- Easy to apply - just peel and stick
- Applies to any smooth, clean, flat surface; product may not adhere to unclean, textured, recently painted, or nonstick surfaces
- Wall Decals are removable with no sticky residue
- Wall Decals made in the USA
Features:
Specs:
| Color | Adventure Time |
| Height | 0 Inches |
| Length | 18 Inches |
| Number of items | 1 |
| Weight | 0.31 Pounds |
| Width | 10 Inches |
20. Tamiya America, Inc Primer White 180ml, TAM87044
Tamiya Surface Primer White 180ml … 87044
Specs:
| Color | White |
| Height | 2.08 Inches |
| Length | 5.8 Inches |
| Number of items | 1 |
| Size | 6.1 Fl Oz (Pack of 1) |
| Weight | 0.02 Pounds |
| Width | 2.08 Inches |
I love charcoal but it takes a bit to understand how to utilize it correctly. In my opinion though, it goes so much faster than full pencil drawings and it gets much more impressive and dramatic results.
One of the easiest techniques is to actually work 'backwards' from a traditional graphite drawing. You may want to pick up some 'Vine' / 'Willow' Charcoal sticks These are very soft but lightly toned pieces of charcoal. You'll scrub one over the entire piece of paper and use a tissue to smooth it resulting in a gray toned background. Here you won't be starting with a pure white sheet of paper.
From there you'll make a gesture drawing of what you'd like to draw with a lighter charcoal pencil (2H or the gray pencil farthest to the right in your drawing tin). After, you'll go in with an eraser and erase out the light areas to almost bring back the white of your paper (those pink rectangle erasers you use/used in school are great for this). After that, you can actually dive in and start shading. You'll start by shading with your lightest charcoal pencils and work your way up to the darkest shades (in your tin work right to left with the gray pencils) Your lightest highlights you can achieve by using a piece of chalk or a white charcoal pencil These will be the absolute lightest parts of the image, so don't go overboard.
From there, just darken and lighten areas until you're satisfied with it.
Some stuff you might want to pick up =
Workable Fixatif - This will help keep the mess to a minimum. You'd spray this after every day that you work on the drawing. (But don't spray it until you've erased out all of the highlight areas!) As the name suggests, it is workable so you can still erase out some of it, but it won't be as forgiving.
Final Fixative
This is the stuff you spray on the final drawing. You're done and you don't want to change anything anymore. You can also use really cheap aerosol hairspray if you want to save money or you don't need a UV-safe protective coating. I've used this in the past - Horrible Hairspray-Great cheap Fixative
Those brown colored pencils and sticks are Conte crayon. They're very similar to charcoal but are made from clay usually. (These are awesome for doing gesture drawings or faces!) I work with these more similar to a graphite pencil rather than charcoal. You can also buy brown toned paper/newsprint to use with them.
Also, I want to add, be careful when you sharpen any of these pencils. Go slowly and be soft with them or you can crack the charcoal inside and it'll just fall out. I've found these work better than other pencil sharpeners when it comes to charcoal. You can also simply scrape the pencil end with an Exacto blade - I've never broken a pencil doing it this way.
Fixative info & Tutorial
Very Basic Charcoal Tutorial - this gives a visual of what I was talking about. The guy does everything in a different order than I usually do, but whatever you find works easiest, just go with that.
More Tutorials Several other tutorials to help you get started.
Sorry for the wall of text, but I hope you enjoy the new media! Give your mom a big hug! Charcoal is great!
Yes, you should. It looks like bare plastic without them.
For future builds, use a hobby knife (x-acto is fine, I assume you're probably American given the reference to comic-con) to scrape off the stubs to the part where they came off the parts tree. I can see several areas where the fit of the kit could've been improved by cleaning those parts up so they sit flush as they are supposed to.
For paint, I'd probably avoid Humbrol Acrylics (if you're in the US, they're not particularly easy to get) and they're' not great as paint. Tamiya is okay, but it's not great for brushpainting which you seem to want to do. If you have to, you can use this tutorial to see how to do it more effectively: https://zerobxu.wordpress.com/2008/03/10/hand-painting-with-tamiya-acrylics/
If you are just getting started, you might not want to buy an airbrush. In that case, there are two alternatives I can recommend:
If you are only brush painting, see this guide: http://www.finescale.com/how-to/articles/2007/02/basics-of-brush-painting
As for paint, Tamiya is...."okay." It's not great paint to brush and most people don't do very well with it. It's much more suited for airbrushing, but you can do it via the tutorial I referenced above.
An alternative would be to brush paint with Model Master Acrylics, which have very good self leveling properties that make brush strokes a bit less likely (also, for wide areas, use a wide brush, like around 1/4inch or so; if you want brushes, go to an art store like Dick Blick or whatever, and you can find some good ones there for a fairly low price. Look for Golden Talkon (orange/gold bristles) brushes, as they work quite well and are also cheap. They're a synthetic material. But frankly, watercolor and acrylic paint brushes will probably work fine.
If you use Model Master acrylic, be aware, you will need to purchase a can of sprayable primer, because otherwise, that paint will lift off the model as soon as you try to use masking tape to paint straight lines (like those red/gray panels on the snowspeeder.) I recommend a primer like this one: https://www.amazon.com/Surface-Primer-180ml-Spray-Tamiya/dp/B000BMXRUM. Primer helps give your final paint colors more grip on the final surface.
Then, use Model Master Acrylic, which is brushable, can be thinned with water, and has water cleanup. Enamels require special thinners/mineral spirit and smell bad, but some people like them.
Once you're done painting, you can use stickers, or use the waterslide decals that are included. If you use the waterslide decals, apply/spray/brush a coat of gloss over it.
Here's an example of something I brush painted (on a lark, but again, USE PRIMER) with model master acrylic about two years ago to show what results you can get.
A further description of the steps I went through to get that result with Model Master Acrylic is described in the two threads:
https://www.reddit.com/r/modelmakers/comments/2esizj/fa18e_1144_painted_entirely_with_hairy_sticks/
https://www.reddit.com/r/modelmakers/comments/2yzzms/brush_painted_1144_f18e_old_project_not_complete/
Additionally, please read the FAQ along the sidebar regarding basic tools, airbrush reviews, and other tips and tricks. Also, lots of tutorials on how to build models can be found on youtube. In your case, I'd be there's probably at least one or two if you just google "bandai 1/48 snowspeeder step by step" or something similar and it'll teach you more than you ever wanted to necessarily know about how to get better at this.
Congrats on your first build, and best of luck. And yes, pick up more models.
Thank you so much!
I've only been at it for just over a month now, so I'm no expert by any means, but here's what I found works best for me:
this paper
UV spray
For Cutting
[I use this printer] (https://www.amazon.com/dp/B0798D6XBM/ref=cm_sw_r_cp_taa_.neCDbCF0XZKP)
I started out using regular sticker paper with a cold-press laminate(it was the cheapest route), and they looked and felt really nice...at first. they didn't hold up against weather and water for very long. The laminated part was water proof, but it would get wet under the sticker, and eventually break the sticker apart. They were also hard to make without them getting all scratched up before you even cut them.
I like that vinyl paper a lot. There are a lot of options for it, but that is the most cost effective, and so far, it's been really fantastic. The paper is water resistant, so water doesn't get underneath the sticker and break it apart like the other ones. After I print a page, I spray it with that UV spray. It just gives a nice texture that I like, and keeps them from fading in the sun. I ran a sticker through the dishwasher before I sprayed it. The sticker part held on phenominally well, the ink ran tho. I haven't tried it with the coat, but I don't see myself washing many stickers.
After the spray dries (a couple of minutes), a run it through the Cameo 3. I started out with a Cricut. I actually like the Cricut machine better. It's designed to just work. However, the software is garbage. It's web based, and even worse, it automaticaly arranges your artwork on the page to be printed and cut. That sounds nice, but 99% of the time, it wasted more than half the page. I was throwing out so much paper. There are some workarounds I found online, but they were tedious, innacurate, and not worth the effort. I do not reccommend the cricut until they get their software in line. The Cameo takes a little more fiddling with, but it's more custumizable, and I arrange stickers on the page how I want.
My printer is just that low-end Epson. It works great actually. The only thing I would suggest is getting a printer that you can side-load. I feel like the the paper getting bent through the printer isn't good for the paper, and makes the printing inconsistent (also, it probably has to do with being a cheap printer too). I plan on upgrading, but I already bought a bunch of ink, and I want to get through that first.
MOST IMPORTANTLY, have fun!
Sorry about the novel!
Things I've learned starting out:
Wash the miniatures. I found the easiest way was those little ziploc plastic containers. Warm dishsoapy water in them, throw a few minis in, scrub them with an old toothbrush, rinse them off and toss them into a second ziploc container filled with plain water. Then drain and refill that a few times to get all the soap out. Be careful you don't dump them down a drain.
Take them out of the warm fresh water and put em onto a plate with a paper towel or something to dry. I like to organize them into which model belongs to what at this point.
I invested on a sprue cutter and it has been WONDERFUL for me to remove pesky mold lines and the bigger tags sticking out of models. Also an xacto knife helps.
I got some cheap needle files from Harbor Freight and they've helped get the flash lines flush without any weirdness.
After your stuffs all pretty and moldline free I tend to toss it into a sonic cleaner because I work at a lab. It might be placebo but the industrial strength badass one at work seems to get clean and I mean... why not? But you can do the water and rinse again. Or even just do it once, after the mold line removal. (Side note: sonic cleaners are PRETTY RADICAL for removing paint from miniatures with some simple green. I love it. Saves me a lot of scrubbing.)
Anyway once its dry I personally use this glue and some stuff called green stuff to fill in gaps. Heres a tut showing the basic idea
Once they're assembled I use some good ol elmer's white glue on the bases and dip em in sand and shake them off. Tutorial that shows that
Then prime your stuff. Tons of tutorials about it and tons of everyone saying which is their favorite primer, spray or brush on, different types of primer, different brands. Some stand by Army Painter or Citadel. I've had good results with Rustoleum Ultra Cover 2x White primer. I've recently picked up some TAMIYA WHITE which I hear good things about. Trying them on some Morats tomorrow.
Lots of other good info has been posted too! I also just started probably, shit, 6 months ago, so this is stuff I've had to pick up and learn as I go.
I personally swear by Mr Super Clear
Having tried Tamiya, Mr Hobby and Krylon, Mr Super Clear is very forgiving in terms of topcoating. My general experience is that Krylon's particles feels somewhat larger than Mr Super Clear, which will result in a rougher matte finish. While Krylon is easily value for money, it's also meant for larger objects, such as handicraft or table showpieces.
Mr Hobby feels the same as My Super Clear but the small can finishes up quickly. Note that different paint bases may "eat" another layer. For non-painted kits, it's fine but for painted, it's one of the important considerations
Tamiya is also a decent brand but I felt that I needed more coats to achieve the same result as Mr Super Clear.
When I have issues with frosting, a quick layer of Mr Super Clear Gloss will clear the frosting, and I'll matte topcoat it on another day, and the previous frosting will not be noticeable.
An example of my OOB Marasai that was topcoated with Mr Super Clear
The O with the matte coat, doing a decent job hiding the decal edges as well after Mr Mark setter and softer
Don't mind the titanium finish Sinanju, that's uncoated. The Sazabi was matte coated
RG stickers after being topcoated
However, if you're asking for topcoat using an airbrush, I do not have an airbrush set, so am unable to provide any opinion.
Its an endearing model because every modeler has one like it. Pretty good job for being a first kit!
As for airbrushes... I started with the super cheap Master brand airbrush. Later on I got a Japanese made Iwata. I can say that buying the Master airbrush + compressor is the perfect starter. This is a good example: https://www.amazon.com/Master-Performance-Airbrushing-Dual-Action-Airbrush/dp/B0017640RK/ref=sr_1_7?ie=UTF8&qid=1482902837&sr=8-7&keywords=airbrush+compressor+tank
You get an airbrush that will be a perfect starter and a good compressor that will last you into your next step up airbrush.
I recommend staying with acrylic paints-- just easier to work with.
For putty, to fill seams with, I also recommend Perfect Putty. It's water based so it's easy to clean up and work with. You put some on a tray and use a toothpick to apply to a gap or seam, then wipe excess off with brush or finger. After it dries you can use sandpaper or a wet cottonswab to remove excess.
https://www.amazon.com/DELUXE-MATERIALS-DLXBD044-Perfect-Plastic/dp/B0076LAVFK/ref=sr_1_2?ie=UTF8&qid=1482902965&sr=8-2&keywords=hobby+putty
What is your next kit?
Plan out your color and drawing first of all. If its something super simple like white, black, red, blue, or yellow, there could just be a primer spray in that color.
So you would just wash the shells with warm water, soap, and one of those yellow/green sponges. as the green scour pad is almost rough enough to remove the top layer of material. Which is about as rough as you want it.
Once theyre clean and dry, hit it with the primer. one good coat from about 12 to 16 inches away should be fine. If you want it really thin, then two single passes (ensuring to cover all of the outside) should suffice.
If the primer is the color you want, then skip this. but if you want a different color, i would suggest Krylon matte spray paints. REALLY THIN COATS, letting it dry in between each one. Until your desired level of color is achieved.
If at any point they begin to "feel" different, you can hit them with a super fine sand paper until they feel nice again.
once your color is down, do your drawing or painting.
Then use a Crystal clear acrylic finish. Similar fashion as to how you applied your primer and paints.
If it goes on too thick, then hit it with a second coat. Let that dry, then hit it with the sand paper.
Clean that off and you can polish it with water and a super fine grit sandpaper.
So, I'm planning to fully paint my next kit (HG Barbatos) and I'm wondering what paint product to use. Is this Tamiya TS-27 Matte White the typical white gundam color, like on the barbatos? Does it matter if it's matte or not, or is there a regular white color for the spray paint?
Also, I plan to use this white primer. Is this okay? It says "fine", but the gray tamiya primer doesn't say that so is this different in an important way? I hand paint in acrylics if that information is important.
Also, bonus question, should you use white or gray primer before hand painting/spraying on red? I assume white?
Thank you for the help friends, sorry for yet another barrage of questions, but it is much appreciated!!!
If you live in the US, you can get Krylon Matte Finish at walmart for pretty cheap. Art supply stores like Michaels carry them, but is usually more expensive. This is the CHEAP option.
 
Otherwise, your other options for hobby-grade top coat are Tamiya, Mr. Color (like this Flat topcoat), Model Masters, and Testors are brands I have tried and work well. I usually can get 2-3 cans of the krylon for the price of 1 of the hobby-grade top coat. HOWEVER, the hobby-grade ones produce a much better finish, especially if you want semi-gloss or gloss.
 
If you panel it now, you can return to paint it later without too much hassle. You can use isopropyl alcohol 91% with a toothpick to remove the ink in the panel line. If you topcoat it, and depends on the topcoat you use, you will have to soak the parts in the appropriate solution to strip it (I was able to strip the Krylon using Isopropyl alcohol 91%, and Model Masters / Testors with this stuff. Haven't tried the Tamiya or Mr. Color yet, although I think it can also be stripped by the Super Clean stuff).
 
Sorry for the wall of text, and best of luck!
Thanks dude! And, yeah that's an awesome design, I think it'd make a cool deck too.
I'll let you in on a secret that took me forever to figure out: the best way to make masking / stencils is to get yourself some transparency sheets, like the kind used for overhead projectors in school, and then take a marker and draw what you want to spray through (best way to make stencils). Then take a 'wood burning kit' (which is just a low-heat soldering gun pretty much) and use it to "trace" your lines on the transparancy sheet, do it light and quick and it'll cut the parts out that you want - afterwards you'll be left with a mask or stencil that's much stronger than paper, easy to clean, and the wood engraver allows you to make more detailed and smoother cuts than if you were masking with tape, or cutting out of cardboard or card stock.
When you finish your painting, you'll want to give it a light coat of clear spray finish, and when that dries hit it with a coact of actual clear coat - I use minwax - that''s 'satin' (which is their way of saying 'matte') listed there but I prefer mine to be gloss. It's important that you hit it with the spray finish first, because it'll seal the paint, and the minwax may cause it to run if you don't. I use a lot of markers in my paintings and minwax will absolutely make them bleed and run if I don't seal them first.
You also want to seal it because the acrylic will easily chip off the deck
Like I said, also be aware that painting on a deck is A LOT different than painting on canvas, the deck will cause the acrylic to paint much faster than canvas so you lose that 'wet period' you normally have to blend paint.
Good luck, post a picture when you finish it! And feel free to drop me a line if you have any other questions.
A few questions, followed by some suggestions:
Do you use your Citadel paint right out of the bottle? You might lose some of that gloss if you dilute your paint, which is something nearly all good painters recommend. I used the Citadel paints right out of the bottle for years, without knowing that. Thin the paint to the consistency of milk, more or less.
Yes, you should use a sealer, absolutely. Yes it does protect the final finish, but judicious use of it can help in other ways. But a matte sealer is critical. You can spray the entire finished piece with matte sealer, but that can ruin some of your metallic finishes. What I sometimes do is finish the piece, spray the entire thing with one or two LIGHT coats (always) of matte sealer. Then if you have any pieces of armor, or glass, or anything that should be shiny, you can then apply gloss or satin sealer with a brush to those areas to those areas only to bring the shine back. But truly, the matte brush on sealer, (or matte paints) really adds to the "realism" of the piece.
Also get some "flow-aid" and add a drop to your shades and washes. It helps break up the surface tension and helps the paint move around into the crevices. Try
https://www.amazon.com/gp/product/B0009H0HWK/ref=oh_aui_detailpage_o00_s00?ie=UTF8&psc=1
For an excellent spray matte sealer try this one. Been around for years and still one of the best flat finishes out there:
https://www.amazon.com/gp/product/B009FF6DN4/ref=ox_sc_sfl_title_6?ie=UTF8&psc=1&smid=ATVPDKIKX0DER
Finally, go to CMON and download this painting guide if you've got an extra 10 bucks laying around. Very good guide, even for the pro.
https://www.coolminiornot.com/shop/ultimate-painting-guide-link.html
And don't forget to visit https://brokenpaintbrush.com/. Sign up for his newsletter, he sends out free tutorials every week. Also check out his Youtube channel.
Keep it up, nice work!
I haven't used it for makeup, but I've been using this stuff for a few years for art-related projects. One quick coat works like a charm and keeps most of my projects from smearing and transferring. On things that have a lot of pigment, I sometimes use a second coat just to be sure.
Krylon K01306 Workable Fixatif Spray Clear, 11-Ounce Aerosol https://www.amazon.com/dp/B00023JE7U/ref=cm_sw_r_cp_api_i_1Aj.AbWR9QH7B
I've also used AquaNet hairspray in the past and gotten similar results.
If I were to use tape, I'd think just a clear packing tape of sorts could work? Hmm. Now I'm curious. Haha. Regardless, good luck with it all!
Hope you find something you like. :)
I just realized I forgot a couple of things, and Amazon is working again, yay!
Krylon setting spray - it's the only setting spray I've ever used, but it sets well, as long as you don't try to change it - quite easy to edit imo (you can look at my recent post, Greyscale portrait, to see that it didn't stop me from editing at all -- and that picture was months old.
Also, I got this lapdesk when I had surgery but still been pretty useful when I want to go outside or color in bed.
My top recs would BV electric eraser and the blending pencils, but I've included everything I consider worth having. :)
I believe I have finally decided on my first Gunpla, the HG Age II Magnum and want to make sure the items I have added to my Amazon cart are ideal or not for a beginner/future use for HG and MG kits. The list is as follows:
I know that this sub has a list of tools and tutorials, but because I'm trying to budget, I was thinking no more than $100 would be ideal for me to start with. Since I'm beginning with HG models, I don't think I need a full set of Gundam markers, but if it's needed/required/highly suggested, I might pick them up as well.
So I have read and seen that top coating and panel lining are essential for MG models to make them pop. Are they just as essential for HG model kits? Looking at pictures of the Age II Magnum I'm planning on getting from Amazon, it doesn't seem to have a lot of indents for panel lining. Of course, I could be wrong and be blind as a bat. If I don't do any sort of panel lining, is it still a good idea to add a top coat regardless?
Also, how soon can one get into MG kits? I was originally going to jump straight into either the MG GM Sniper II or the RX-78-2 Ver 3.0 but after doing some research over the past few days, I've decided I'll be doing a few HG's to begin with as I haven't built model kits since I was like 7 or 8 with my dad. I'm thinking after the Age II Magnum, I was thinking about getting either the HG Double O Diver or the HG 00 Shia Qan[T]. Maybe after I complete the 3 HG's I've listed, is it possible to jump to the the GM Sniper II?
TL;DR:
First, foremost and most important: read the survival guide. Don't read it casually. Read it like your life depends on it. http://survival.burningman.com/
All our welcome. Not everyone is 20 and beautiful and drunk. Some are. I frankly like the fatter, older, wrinklier crowd more.
And here is what I sent today to the newbies in my camp. A shopping list of sorts:
for the newbies. Here are some things I can't live without at Burning man. You will find there are many different versions/opinions/etc. But this is what I use.
Camelbak:
You MUST carry water and several other items. Combing these into a backpack makes sense to me. We'll tag it with the camp locale when we get it so if it gets lost it has a chance of returning. Cheap ones tend to leak, so I recommend name brand on this: http://www.amazon.com/s/ref=nb_sb_ss_sc_1_8?url=search-alias%3Daps&field-keywords=camelbak+hydration+pack&sprefix=camelbac%2Caps%2C310
Eye protection:
I hate goggles. Other people like them. I have tried many types. They all fog. So last time I started using very close fitting sunglasses type deal and it was awesome. For sure not as sealed, but I will trade that for eye sweat and fog. Whatever you pick, bring multiple pairs. Do not leave camp without these. Dust storms are real. I like something that's clear for night and shaded for day
http://www.amazon.com/3M-Virtua-Protective-Eyewear-11872-00000-20/dp/B00AEXKR4C/ref=sr_1_6?ie=UTF8&qid=1404329889&sr=8-6&keywords=protective+glasses
Ooh a 6 pack: http://www.amazon.com/Eyewear-SR111AR-Reclus-Glasses-Reflective/dp/B002R9DBEE/ref=sr_1_16?ie=UTF8&qid=1404329916&sr=8-16&keywords=protective+glasses
Dust Mask:
You can use a bandana. You can use a keffiyeh (middle eastern scarf thing- the old school choice for desert protection) or you can use some form of mask- be it a disposable painters mask to a high tech respirator. This is another item you do not leave camp without and you bring multiple of (or multiple changes of filters)
I have one of these: playalung.com and like it.
Skin stuff:
Your skin will be pissed. You are walking in seriously alkaline powder. For sure we will buy the costco sized bucket of baby wipes and lotion (do your feet and naughty bits a MINIMUM of twice a day). If you have a favorite lotion etc, bring it. Group sunscreen and aloe will also be purchased. If you need chafe cream, bring it.
A cup:
People want to give you booze, or soup, or flavored water or something. They are not going to give you a cup, or silverware, or a plate. If you want those things. carry them. I usually can get away with just a cup.
I have something like this: http://www.amazon.com/Stainless-Coffee-Cup-Camping-Travel-3-5-diameter/dp/B005FJE5HA/ref=sr_1_5?ie=UTF8&qid=1404332088&sr=8-5&keywords=metal+camping+cup
carbabiner to outside of backpack and VOILA.
Ziplock bags:
You are responsible for your trash. If you have gross trash, you are still responsible for carrying back to camp with you. Have a ziplock in your backpack for this purpose. Putting tampons, poopy wipes etc in the porta-potties is ABSOLUTELY NOT OKAY. They go in your ziplock along with candy wrappers and grilled cheese smeared napkins.
Other stuff to carry/always have:
Hand sanitizer. There is often none at the portapotties. same goes for toliet paper.
Blinky stuff/lights. Half the fun of burning man is to get lost. Sometimes you wander for so long it's dark. If you are walking in the dark without lights on you you run a very good risk of getting hit by an art car. We call these people Darkwads and they are not looked on favorably. I often carry a bunch of glow bracelets for the express purpose of tagging darkwads for their own safety. Light your front and back at a minimum. Feel free to go crazy. More is better.
*Your bike lock. If you don't lock your bike, you will lose your bike. Then your ass is walking. And its far.
Medication: I bring a costco sized bottle of ibuprofen, benadryl and immodium to camp, as well as bandage stuff, some burn cream and blister treatments.
Ear Plugs: It's loud. Depending on where you camp maybe really loud. You probably want to sleep at some point. Bring some ear plugs.
Ok so I havent try this on my Tamas but seeing how the shell is plastic it might work and be a better solution than nail polish. My other hobby is building plastic models and I use a clear plastic top coat to protect them. Needless to say protect the screen with masking tape before doing that, a few light coats should do the trick. Here is what I use:
Mr. Top Coat Flat Spray https://www.amazon.com/dp/B0000WS12C/ref=cm_sw_r_cp_api_i_gkCzCb36VG8ZJ
Also your local hobby store like Michael and Hobby Lobby should have other options. Just make sure they are Flat or Matte not glossy.
Like everyone here said, the easy and save way would to be to get some vinyl decals. However, if you are dead set on painting, then it's not too hard to do. you're going to have to disassemble the controller. From there sand the controller, this gives the primer something to bite on to. once everything is nice and sanded take your primer (I recommend this.) and spray in light, even coats and let cure for the time on the can, and maybe a few hours longer. Once you're happy with the primer, take your spraypaint and apply in light, thin coats. Remember to let the paint dry fully between coats.
Once you are happy with the color and it has dried for the recommended time on the can, go ahead and choose your choice of clear coat (gloss, semi-gloss, or matte. also krylon works best for this) and apply in thin layers like you did the primer and paint. after it has sat for the directions on the can. you can now put the controller back together and test everything out. Assuming that you didnt mess up putting the controller back together, you now have a painted controller.
Like aura_enchanted said, you won't need to mix it with anything. If you already have the Agathrax Earth, then that's fine, but if you're going to order it, actually order this instead. It's much closer to the old Devlan Mud than the new Agathrax Earth is. Edit to Add: Here's a great review/tutorial on using Secret Weapon Washes, look at the example given of the Skaven Clanrat -- that's what I want you to do to this model. You'll be amazed at the results.
And yes, the stuff you linked to is the stuff. You can also use Army Painter's Matte Anti-Shine. If you want the paint to last a long time, spray with a gloss sealer first. But the last step when you finish a model, especially if you wash it, is to spray a light coating of anti-shine. It's amazing how much it improves miniatures and makes them look more realistic.
My recommended buying list for a new painter is:
Tools
Sprays
○ Grey is standard, white if you're painting a majority of light colors, and black if the majority is dark.
Brushes
○ Round 0
○ Round 1
○ Round 2
All in all it should be around $60 USD for the tools and about $40 USD for the brushes. However, this list gives you every tool you will need to get started and to continue with the hobby. Nt all of this is required, but it is nice to have.
This is just what I like to have on hand, this does not reflect the "perfect list". I hope it helps :)
Take your time to clean nub marks, it really does make a massive difference at the end, and is totally worth the time it takes.
as for other stuff that really makes a difference, get a panel line marker, they are dirt cheap and make so much difference to a kit.
the final thing is to get some matte clear coat, this gets rid of the "plastic" look to a kit, you will need to get a specialist one for plastic tho, so it get a little more expensive, a can like the one linked would last for 6-7 hg kits easily. if you have a games workshop near you as well, they also sell clear coat, though i would only reccomend this if you cant get mr. super clear or tamita stuff shipped to you, as its more expensive in my experience.
Good luck building your kit and welcome to the hobby!
These are really excellent for first minis, there's a ton you did right:
It looks like you used some sort of gloss varnish on them, and if I were to offer one piece of advice, it would be to ditch the gloss and use a matte finish like Testor's Dullcote. You can even spray these guys with a matte varnish to tone down their current glossiness.
I hear you, I've still got some furniture ideas that I'm sure I'll get back to eventually but for now, I just love turning so much that it's all I want to do when I go to the shop.
I thought of a serious answer to your question though and that is - I never look in the trash can while throwing stuff away now and I always leave my safety glasses on until after clean up is all done. (Got some dust lodged in my eye one time during clean up). I also upgraded all my safety glasses to these that have a rubber gasket around the outside
I agree they're definitely too glossy. I've been using Mod Podge Clear Acrylic Matte Sealer, but it doesn't seem to go on matte at all. Maybe I need a few more passes? I also ordered a can of Testor's Spray Lacquer because that's what I saw Sorastro using in some of his guides. Any other recommendations for products that would give me a better matte finish?
Funny you pointed out the black and red, those were the only colors I used straight from the bottle and didn't mix with anything. I'll definitely try to thin them out next time.
Thanks for the critique!
IDK if Citadel makes one specifically, I'm sure they do, but like a lot of their products, you're often better off getting a different brand that's just as good quality (and frequently better) as well as being cheaper.
​
What I personally use is Testors clear: https://www.amazon.com/Testors-Spray-Lacquer-Clear-Coat/dp/B009FF6DN4
​
You don't have to use a lot, just enough to get an even coat over the whole miniature. Be sure to spray this outside or in a well-ventilated area. Also, don't forget that when you're done coating your models, to hold the spray can upside down and spray the excess for a couple seconds until it's just spraying the medium -- that way it clears out the spray mechanism. If you don't, it'll be clogged up next time you go to use it. This is true for all kinds of spray cans, including primers -- it's a common rookie mistake, so just mentioning it in case you haven't worked with this stuff yet.
First I'll answer your last question, no, there is nothing wrong with not painting or going all out on a model. Like you said, you have only been at this for a few months and it is always best to start small. If you keep at it, who knows, months down the road you may be making your own custom models. That being said, lets see what I can suggest for getting the best out of your model without putting a ton of time (or money) into it. The first few things I would pick up are:
http://www.amazon.com/Elmers-XZ3601-X-ACTO-Knife-Cap/dp/B005KRSWM6/ref=sr_1_4?ie=UTF8&qid=1451350392&sr=8-4&keywords=hobby+knife
http://www.amazon.com/Squadron-Products-Value-Sanding-Stick/dp/B000CDR5K8/ref=sr_1_2?ie=UTF8&qid=1451350756&sr=8-2&keywords=squadron+tri+grit
http://www.amazon.com/Uni-Pin-Fineliner-0-05mm-Black/dp/B00A7BSEKK/ref=sr_1_fkmr2_2?ie=UTF8&qid=1451351047&sr=8-2-fkmr2&keywords=uni+pin+.5+fine+liner
http://www.amazon.com/Krylon-53530-Acrylic-Interior-Exterior/dp/B001C42OXY/ref=sr_1_1?ie=UTF8&qid=1451351086&sr=8-1&keywords=flat+top+coat
The most important part is have fun with it, and do what you like.
This was recommended to me a little while ago, Perfect Plastic putty.
Best filler I've ever used, it goes on, however you want it, then you just let it dry for a few minutes to an hour or so, then you can use a damp cloth or a damp cotton swab and wipe down the excess since it cleans up with water. It's very similar to milliput, but it seems finer to be and its easier to use since it's just a paste, not two solids you have to mix.
I find this type of putty is the absolute best kind, because it requires no sanding at all to clean up, meaning you won't destroy panel lines or any raised details.
There is a name for the specific ype of spray just to protect "smudgeable" work - "Fixatif"
Here's one from Krylon.
https://www.amazon.com/Krylon-K01306-Workable-Fixatif-11-Ounce/dp/B00023JE7U
People use it when they "finish" a section and want to protect it as they move onto another - but are still able to go back and add additions on top if desired. Its basically invisible.
I imagine once your are totally finished, a flat clear laquer would seal everything and prevent it from ever being changed again.
Keep up the great art!
First off, Welcome to /r/Gunpla and the plastic crack hobby
A few simple things that I think can help make a kit pop for cheap are
1.) Panel lining- basically just drawing in those recessed grooves that are all over. It gives depth and brings out details. The ones i use are like this. Brown for reddish colors, grey for light, and black for darker plastic. Usually $2-4 per marker depending on how you buy em
2.) Nub removal- there are tons of resources for how to do this "properly" and everyone finds their own way. The general consensus is first cut about halfway between the runner (the rounded pipe like stuff that all the parts come in) and the gate (where the runner narrows down and connect to the piece you are actually using).
Then using an exacto knife cut that remaining little bit off and buff the rest with high grit sandpaper 500 or higher works well. Its ok to be a little bit sloppy here because...
3.) Top coat- This stuff will coat the model and make all those sand marks go away. It also makes the model look less "plasticy" and more like the "real" thing. There are primarily 3 types: Matte/flat which is not shiny at all like a military vehicle would be, gloss which is very shiny like a sports car, and satin which is somewhere in between. I prefer matte lke this. Just pop the arms and legs off and spray.
From there you can get into the deeper stuff if you are so inclined such as painting, modding and scratch building. There are plenty of great resources here such as the sidebar guide or falldog's guide which is how I learned.
Sorry for the long post but,
Happy Building!
I'd skip all the brushes and rollers and get a simple HVLP sprayer. I used the Wagner HVLP MAX with excellent results. Used it for both primer and finish coats. I highly recommend a Waterbourne Alkyd paint, such as BM Advanced.
A cheap solution to the paint pyramids are some 2x4s with a few finish nails sticking out.. you prob already have this stuff laying around.
I see you already ordered new hinges, but pending what year your cabinets are, going to a Euro hinges, really helps modernize the look.. tho it can be a matter of opinion. Good luck!
This is really awesome. I still have parts of this helmet printed but never finished it (its on the list). I'm a prop maker by trade and I just wanted to give you some tips for further smoothing if you're ever so inclined to do more :D
Several layers of filler primer gets rid of the minor print lines on all surfaces. 3-4 layers with sanding in between gets rid of all of them and they come out crazy smooth. Bondo Spot putty is also amazing for anything else the filler primer may have missed.
Another material I've seen used for smooth is wall spackle! Its a bit easier to manage than Bondo/filler primer and a bit easier to sand. note: It does not like to be wet sanded lol.
For example, here's a mask I finished. printed & finished
here's a mask in different phases of finishing
If any one else is interested, I have a full tutorial on this process here
I have a Wagner that’s very similar to the one you’re looking at and actually really like it a lot. I’m just a weekend warrior, so it works very well for me. If you plan on using this thing daily, then you can’t go cheap. Get a better sprayer. But for quick, smooth, and easy painting at a good price, you can’t beat these sprayers.
As far as clean up, I use hot water immediately after I’m done and have never had issues. You’ll need to take it apart and use a toothbrush too. You may need to clean it with diluted paint thinner every now and then, so keep some handy. And learn how to thin paints. It makes a world of a difference once you start using the correct viscosity for the paint/stain/finish you’re using.
Maybe something like this could help. At least that's what I would buy. All of the wood varnish I would know needs to be applied with a brush, I don't know if yours is the same way. A spray coating like this will make it super easy to not have drips and get a perfect even coating.
I have been using mod podge, so that part is good. I haven't been watering it down, though--does that really have any effect on anything?
And as for clear coat, you all mean this, right?
https://www.amazon.com/Krylon-K01303A-Crystal-Acrylic-Coating/dp/B001K65K26/ref=sr_1_10?ie=UTF8&qid=1488255466&sr=8-10&keywords=clear+coat
basically, anyway. I am stupid not to just have figured that out earlier, lol. >_<;. This stuff won't eat my foam, since it has been primed, right?
And I have another question, pertaining to Plasti-Dip:
Can I use regular acrylics on it, and can I apply it OVER mod podge? I have been mod podging everything right now, but I would like to try Plasti-Dip for my elbow armor/over elbow armor, shoe armor, and 'corset' (the armor looks like a corset), so they don't break. Those are the foam pieces I am the most concerned about, because they look like they'd be the most fragile. I have also already put news paper over the elbow piece (there were some areas I needed to fix, so I fixed them, and am using the paper to hide it), and will that work, with the plasti-dip? That is also mod podged, too. Also, does the clear plasti-dip work as well as the other colors? Every video I see uses black, so I thought I'd ask, before buying it.
Also, from what I understand, plasti-dip needs a respirator to be used. I get that. But if I go outside with my work, even if I have one, will the smell get into the house? My mom has respiratory issues, and I am kind of afraid of the smell seeping through the walls because of that.
The charcoal contrast looks great. I found this video which is very relevant to your drawing. It's a mixed graphite/charcoal drawing of the beautiful Audrey Hepburn. She has jet black hair like Alita in the reference photo.
Yes, use graphite first and then charcoal last. You can prevent smudging by using a piece of paper to rest your drawing hand. When you're finished with your art, you can spray it with a fixative like this which has a matte finish.
Here's a secret weapon to use for values: a value chart. Our eyes deceive us. When dark values are next to semi-dark values, the semi-dark value can appear much lighter than it is. Print out the chart and place it on the reference picture and all areas where the value changes on Alita's face. You'll get a sense of how dark or light the values are in the reference. Then use that value chart on different areas of your drawing and you'll know where you need to darken or lighten.
Here's another secret weapon: the proportional divider. You don't need to use grid lines. Actually you can use none or only a few lines. Some people claim it's cheating, but that's nonsense. You still have to draw the picture and it will improve your sense of proportion. Here's the dirty secret: many portrait artists will use it to check their drawing. They will draw it freehand, but will check the proportions with the divider or compass or pencil. Here's the quick video and here's the longer video by an art teacher.
I don't see many comments on actual technique, but I believe sharing ideas is very important.
My favorite prime is expensive but it is literally the best I've ever used, by miles.
Tamiya gray primer. They make a white and black I think. They are far and away better than anything you can buy at lowes. Comes at a premium price point though. You can pick up a can for like 6 bucks at a hobby lobby with their 40% coupon though.
best markers I've found are POSCA paint markers.
I would do a light sanding with 800 grade sand paper on them, prime them with the backing color you want, and let it dry. Then you can draw on them and clear coat.
I recommend doing it this way, as sometimes if you don't prep the plate first the clear coat can have weird effects.
The items I've used:
https://www.amazon.com/280715-American-Accents-Primer-12-Ounce/dp/B00KZ6LLZW/ref=sr_1_2?ie=UTF8&amp;qid=1491242783&amp;sr=8-2&amp;keywords=Rustoleum+Primer
https://www.amazon.com/Uni-posca-Paint-Marker-Pen-PC-5M15C/dp/B001ANVDMU
The primer you can use black/white/any color for backing, and I use the same brand in a clear matte finish for the clear coat.
All prints are straight off the print bed. I hate sanding so I've worked really hard to get the printer dialed in. And when the printer isn't as dialed in as I'd like, I have found a wonderful putty that will fill gaps, holes and even join two parts of a print together ... it's Perfect Plastic Putty ( https://www.amazon.com/DELUXE-MATERIALS-BD44-Perfect-Plastic/dp/B0076LAVFK/ref=sr_1_2?crid=1DRCN7LC5IRMS&keywords=perfect+putty&qid=1573437609&sprefix=perfect+putty%2Caps%2C169&sr=8-2 ). It's great stuff! Unfortunately I don't get a share of the profits but I'm impressed with it enough to recommend it anyway!
For acrylic you can use water as a thinner, or windex if you really want (some people use it to thin paint for airbrushing). For enamel you need turpenoid or paint thinner. Odorless turpenoid from an art store is good because it's not stinky, but you could use turpentine or whatever.
I'm not sure basic enamel will work as a primer-- is it a fairly matte finish? I like Tamiya's spraycan primer-- it's very fine-grained matte paint and sticks to all kinds of stuff.
Have you bought any paint yet at all? If not, get a spraycan of Tamiya primer, and use all acrylic for everything else. It's easy to clean up and won't give you headaches if you don't have good ventilation, and you'll know nothing's going to eat anything else and you can mix everything with everything else... Thin with water, clean your brushes and stuff with water, keep it simple.
This is the primer:
http://www.amazon.com/Gray-Surface-Primer-180ml-Spray/dp/B000BMXRUM
One can will last for 4 or 5 1/35 tanks.
Yeah I patched the big voids with mortar. You can see a slight difference in color but it's not bad at all. My sink is ground/polished down to the point that there is a lot of exposed aggregate (and the surface had a shine before the epoxy, I guess from the polished silicon in the sand?), so there's a lot going on anyway.
If you are leaving any voids (which is fine, just make sure they can drain so that water doesn't sit in them), make sure to thoroughly vacuum them so there's no cement dust that could come loose.
I (think I) used this one: http://www.amazon.com/Finish-Varnish-Provides-Gorgeous-Appearance/dp/B000PEGLBS
Here's a pic of the sink; it looks better in person :) http://imgur.com/a/k1lwZ#9
For me high speed (Dremel/finishing sander) sanding on PLA only made things worse.
The plastic started to melt into the sandpaper, ruining the sandpaper quickly without accomplishing much.
If the details of the print can survive it, the best way to finish PLA is to hide everything under primer paint.
Hit the PLA with 120 and 220 sandpaper by hand. Light and slow are the operative words here--plus patience. 120 may not be needed or may even be counter-productive on 0.1/0.05mm parts.
Do a second pass with 400 grit. The part should be relatively smooth to the touch.
Then I apply filler primer (smaller details, not going to sand, don't want to smother) or sandable filler primer (flat surfaces, larger details, both details and surfaces can be sanded by hand).
Filler primer of either sort works best in many light coats rather than a few heavy applications.
Sand filler primer with 400 (or 220 if there's somehow too much of it). You can even step up to 800, 1000, 1500, and 2000 (I did this to ONE part). Again, light and slow or the sandpaper will quickly pick up paint that is now mashed in, ruining it. Don't bother hitting the PLA with anything above 400 grit--it doesn't work well and eats through sandpaper. You're better off using higher grits on the paint rather than the part.
Finally apply whatever paint or other colors you want on top of the primer.
I highly recommend a competent "shop-vac" to contain dust and lengthen the lifetime of your sandpaper. If you don't sand too "hard" most of the plastic/paint will vacuum right out, greatly extending the lifetime of each piece.
You can put a matte varnish on if you'd like. I don't usually because the paint holds up pretty good if you treat it well. If you do a varnish for the whole model definitely go matte to maintain the look. Only use a rattle can version. I've used the tester's one a lot:
https://www.amazon.com/Testors-Aerosol-Spray-Lacquer-Paint/dp/B009FF6DN4
I'm based out of the US so I don't know what brands are available to you. I've used two brands:
Krylon: I bought a big can like this from a local hardware store for about 3 USD. It does an okay job. It's a sort of flat finish but there's still a touch of shine to it. For bulk spraying it seems like a good deal but it's not the most beautiful finish. I assume most of the clear flat/matte sprays will be roughly this quality. One of these has lasted me through like 4 or 5 HG kits so far.
Testors: I bought some of this from a local hobby shop for about 5 USD per can. It's a lot less spray for a bit more money but the finish on this was great. One of these seems to do one or two HG kits.
Materials you need
Duck Brand Silver Mirror tape
Matte finish spray paint. I had left over Dullcote. I would suggest lacquer based spray paint as it has high durability and enamel being next best option.
Not really required. Adhesion promoter from automotive retailer (Autozone/ O'reilly's, NAPA, etc)
****
I'd suggest applying adhesion promoter primer + lacquer/enamel based clear coat for the best results. I kind of regret skipping the primer as my top coat has already been scraped.
I sprayed the entire* case. I didn't like the gloss finish.
Spray multiple light coats and be patient. Don't let anything pool and/or run.
As for the tape, just cut to size and stick it on the bottom. I covered like 90%. You can probably be meticulous and cover more than I did. Now that I write this, maybe sticking some on the bottom of the PCB will help as well. Just make sure not to cover the RGB lights, of course.
The biggest downfall to pencil is it's not permanent, it can so easily be smudged or potentially worn down and you won't be able to read it anymore. However, you could use something like Krylon Spray Fixatif to help preserve it. I mean, there are notebooks and files from decades ago that'd been written in pencil and they're still legible, so if you take care of it, it should be fine.
Don't wait for a particular day or time, start right now!
As for privacy, I'm gonna repeat the advice I gave to someone else. I don't know how old you are, but if you're old enough to make purchases on your own, the company Vaultz makes locking boxes in a bunch of different sizes and they're pretty affordable. You can search on Amazon for "Vaultz lock box." Depending on how many journals you have and the dimensions of the book(s), another option would be a locking bag, the kind companies use for night deposits. Also something you can find on Amazon, I think "locking money bag" should bring up different options. The bag would be easier to hide, you can put it inside your pillow or under your mattress.
>gave a cast iron texture to it.
in other words you oversprayed
I highly recommend Krylon Acrylic Flat topcoat. Its not the best you can buy but its the best bang for your buck. It goes on sale from time to time, I got 4 large cans for $4 each a couple months ago, its back up to $7 shipped free on Amazon
http://www.amazon.com/Krylon-53530-Acrylic-Interior-Exterior/dp/B001C42OXY
There are many ways to do this. If you print with ABS, acetone vapor smoothing is a pretty good option. You can also try a clear coat paint, or simply sand the object with sandpaper. There are also more novel coatings such as xtc-3d, but those tend to be pretty expensive. The method you proposed with gorilla glue might work, though you might want to thin it down with a solvent such as denatured alcohol to make it easier to apply and not have visible brush marks.
The major impact is due to the Matte top coat:
Mr. Top Coat Flat Spray https://www.amazon.com/dp/B0000WS12C/ref=cm_sw_r_cp_api_i_DdWuDbQHS4ZJE
They are VERY cheap in Japan but good luck importing them at a good price.
It would depend on how large an area of painting you’re doing. If you’re doing let’s say a model car body, you’d have to it in coats. So you’ll have to research how to paint brush coats with Tamiya paints since I’m sure you’ll have to thin the paint to some degree. And for priming, Tamiya sells them in spray cans. . As well as other other colors .
You don’t have to buy the sprays on amazon of course. Check with your local hobby stores and see if they’ve got them. I know my local Hobby Lobby carries the primer cans.
Hope this helps, bud. Good luck.
I'm planning on top coating some HGs. I'm also using gundam markers for small details and the pour type markers for panel lines. Which top coat would be better: tamiya, mr. hobby top coat, mr. premium top coat spray, or mr. super clear, or maybe anyone have other recommendations?
Art major here, fixative is a really good idea!
That fixative you linked is resin based, and the shadow would still be a little workable/moveable under that fixative. An acrylic-based fixative spray would work better as a final sealant as it would create an almost plastic-like protective finish on the page: https://www.amazon.com/Krylon-K01303A-Crystal-Acrylic-Coating/dp/B001K65K26 is one example.
No matter what fixative you're using, it's important to do a patch test first because fixatives can darken/alter the color of certain mediums. It's also important to work in light layers in a very well ventilated area!
I use this stuff. A bit pricey, but can be found at lower prices than Amazon if you look around. Works great. Nice flat finish. (If you want certain parts to be shiny you will need to go over them afterward with 'Ard Coat or some other gloss medium.)
https://www.amazon.com/Mr-Top-Coat-Flat-Spray/dp/B0000WS12C
There isn't a way to do it without having seam lines, and you, being the one that made it, will always see them. Some people may not notice them for a while, but upon close inspection they will become obvious.
All props that I have made have peen printed, assembled, finished, in that order. If you want to keep the stainless steel pla visible, there isn't really anything I can think to do. In terms of part assembly I trust nothing but Krazy Glue. It dries in about 10 seconds, and another 30 seconds or so and the bond is stronger than the later bonds of PETG, which is known for its layer strength. Absolute nightmare if you mess up. If you do mess up, or are not confident on the seam, separate immediately.
If you're looking to go the painting route then I would assemble it, fill the gaps with some Bondo. Wait for it to dry, sand it flush, use some Filler Primer, then spray paint it. Once painted, cover in a Clear Coat so the paint doesn't rub off.
If you have any more questions feel free to ask and I'll get back to you.
I've done a ton of sanding, but get a nice quality flat file. They will save you a ton of time. More than a dremel.
And get this to fill in gaps:
https://www.amazon.com/DELUXE-MATERIALS-DLXBD044-Perfect-Plastic/dp/B0076LAVFK
I like that one more than Bondo because you don't need a mask.
For Testors, is this the product you use? It’s what comes up when I search Dullcote
Testors Spray Lacquer 3oz, Clear Coat https://www.amazon.com/dp/B009FF6DN4/ref=cm_sw_r_cp_api_0y4HAbRN050CW
2. From your description it sounds like you paint the Quickshade on with old brushes as opposed to full on “dipping” the model in the Quickshade which is what is is shown in the guide. This is just for control/reduces amount I’m assuming? Is dipping the mini straight in there too much?
3. I havent had too many issues with mold lines (fingers crossed) thus far, what bothers me is slight gaps, like on the breast/collar bones of my hexwraiths mounts. Would you recommend a sliver of green stuff (haven’t touched it yet) or something for this? I could just be a sloppy gluer but in my experience sometimes these gaps seem unavoidable. Thoughts?
4. It’s funny you mention the palette, I lurked for awhile before jumping in with models and paints and so a wet palette was one of the first this i tried and didn’t use the right materials and it was too thin and so had to do more work/coats than necessary and ended up with not great results anyway :( it’s more correct now. Not perfect but better.
5. I’m pretty well through beating up my first set of brush so I think I’m ready to re-up. I think I’ll go for a few nice detail brushes and a cheaper utility set elsewhere, so if you have any recommendations, lemme know!
6. If I want bases for certain models or to kitbash some graveyard markers, where should I pick those up? eBay is full of knock offs that look untrustworthy or wouldn’t look right. Do you just get them straight from GW?
7. On that same subject, I want a dark if not black resident evil/silent hill style moonlight graveyard basing for my models, Any leads where I could find materials for this? I don’t want the typical tufts of grass or snow or rubble I see elsewhere.
Thanks again!
Edit: bad at words
So I'm trying Mr. Super Clear Matte for the first time and got a couple questions. If Im doing "light" coats how many coats should I do? How much drying time should I allow between each coat? Thanks!
Drop some PVA on a base, spread it around with a bush you don't care much about (stiff bristle works best).
I set the mini down inside a sandwich tupperware, pull some "washed dirt" or "driveway magic" as some call it, and cover the base in the stuff entirely, the more the merrier. Wiggle it a bit to fill in gaps, and leave to dry overnight.
After that night, I usually take a stiff bristle brush (or toothbrush, which I prefer), and scrape out any loose rocks and dust from the bases.
After the removal of stuff-that-didn't-stick-well, you're good to prime your miniatures as usual! GW stuff works awesome, but I like: https://www.amazon.com/gp/product/B000BMXRUM/ref=oh_aui_detailpage_o00_s00?ie=UTF8&amp;psc=1
Gray is easy to work UP from into brights, and DOWN from into darks. If you want to take it a step further and "pre-highlight" your models, prime white on top, grey in mid, and a splash of black around the feet (or any combination, if your color scheme is too light for black around feed, two-tone works well).
TLDR: Answer to your question, Glue -> Sand/Dirty -> Brushie Brushie -> Prime.
Spray on primer is pretty ideal, though with those humidity levels idk how the final outcome will be affected. My guess is it'll be fine, just longer drying times.
Of all the primers I've tried, this has been the best.
You can use a clear acrylic spray. I have used such things on top of paint and on bare wood before. They work pretty well. Something like this (although I haven't used this particular one)
https://www.amazon.com/Krylon-K01303007-Acrylic-Crystal-11-Ounce/dp/B00023JE7K/ref=sr_1_2?crid=30K139CPKTBES&keywords=clear+acrylic+spray&qid=1556910026&s=gateway&sprefix=clear+acrylic%2Caps%2C399&sr=8-2
I just got a new bike and felt the same way for a while. After some research I found this: ISC Racers Tape/Helicopter Tape. A number of people online seem to like it.
After getting used to the fact that I will probably bang up my bike a good bit more and I might as well get over it, I decided to buy a little anyway. I'm going to put it on a few spots I worry about i.e. to prevent chainslap and where the bike touches my bike rack. Might as well make a small effort to help the resale value if I ever want to sell it.
latex paint works best with an airless sprayer, but those will run you $300+.
I picked up a wagner https://www.amazon.com/Wagner-0518080-Control-Spray-Sprayer/dp/B003PGQI48/ref=sr_1_3?ie=UTF8&amp;qid=1469559938&amp;sr=8-3&amp;keywords=paint+sprayer
works ok for such things. it cant quite vaporize the paint, even after thinning with some floetrol and water. But it works better than a brush.
Its certainly faster, but it does waste a fair amount of paint.
Still, I hate painting, Ive gotten my money's worth IMO. Though with the amount Ive used it, I wish i had gotten an airless sprayer.
If you're painting a model kit, try your best to acquire paints and topcoats specifically for plastic/plastic models. If you're in the US, Testors, Tamiya, and even Krylon can work as good flat coats and each brand has a respective gloss and semigloss spray.
If she makes it a semi hobby you may want to test a few products as it probably depends on the disc and plastic used.
Of the several I looked up, something like this may be a good bet
http://www.amazon.com/Krylon-6-Ounce-Crystal-Acrylic-Coating/dp/B001K65K26
It's relatively cheap and acrylic is great as it should prevent nearly everything minus perhaps sun bleaching. It also should be hair thin also making these discs tournament legal.
It's just usually called "green putty". There are several different brands. GW carries a two part putty, but it's the same as other brands, but way more expensive.
This is a two part that's really good. You can also use it to mold and sculpt parts, like purity seals and the like.
This plastic putty has a nozzle so you can control the bead.
Tamiya and Squadron both make white/green putty that's good for filling small gaps and cracks.
haha. Yea, I thought it was a cool element, anyway. :)
Yes, I did! I sprayed it in two coats with Krylon Workable Fixatif. from about 12 inches back.
edit: added link.
So for a frame like the PG strike freedom, if I wanted to paint the inner frame so that it isn't crap gold, I'd prime that and then spray it with gold paint? Can I do it with inner frame assembled or would that run the risk of the joints getting too stiff?
And does it matter what color the primer color is, be it gray or white? I assume the tamiya primer is ideal (as linked below):
https://www.amazon.com/Tamiya-Surface-Primer-White-180ml/dp/B0000WS01E/ref=sr_1_4?ie=UTF8&amp;qid=1487211789&amp;sr=8-4&amp;keywords=tamiya+primer
And a side question, someone told me acrylic paint is ideal for beginners as its less of a pain to work with. However I assume this is regarding brush painting. I notice stuff like the tamiya gold spray is lacquer. Does it matter? And is it bad if you primer, lacquer gold, and then paint some sort of acrylic on top of the gold?
Sorry for all the questions, but thanks for taking the time to answer!
FYI helicopter tape is pretty useful for covering up areas where paint can chip from rocks, debris, and chain-slap. It’s the same stuff used to protect phone screens from wear and tear, and apparently helicopter blades. This roll is way cheaper than the made-for stuff.
Special thanks to u/jack2game for the waterslide decal inspiration and tips.
Decal paper (Clear backing, for inkjet printers)
Krylon Topcoat Spray, Clear (Not currently pictured, as these are still drying. I did a test run though and it REALLY takes down the shiny “sticker” look, as well as smooths out all the edges so you don’t feel it beneath your fingers. It also adds a slightly rougher finish, that feels more similar to PBT than smooth ABS.)
Depends if you want a glossier or dull finish, but something like this should be fine. Read reviews & directions. Shake well. Ventilate. Start spraying away from figure, then sweep over figure. Light coats and let dry THOROUGHLY before thinking about another layer. Mess this part up and it’s hard to go back.
Hope this helps!
I would bet you used latex paint. That can interact with the amiibo paint and make it permanently tacky from what I have read.
Use acrylic and something like this to seal it. You could potentially use that spray to get rid of the tacky feeling that's there now. I chose this in Matte rather than gloss.
Best case scenario, use very thin layers, but like three of them. Like dab your paint brush in water first, then layer the paint on.
>3D prints aren't typically water-tight
I didn't know what.
Wouldn't clear coat work as well? Something like https://www.amazon.com/Krylon-K01303A07-Crystal-Acrylic-Coating/dp/B001K65K26
I kinda want to make it easy to deal with since I would like to sell some. Part of the reason why I'm making a bunch of models now is because I'm looking at having a $800 printer. I would like to offset that cost and the cost of materials even if it takes a while
This community has been great with answering so many questions but this is the first time I can’t find the question I’m asking
I’m hoping to step up my building with adding paints. So my questions are
1.For now I just want to paint the Master Grades inner frame. From what I’ve gathered, this would be a neat inner frame color but do I need to prime the inner frame ?
2. Assuming the inner frame is spray painted with question 1’s spray can and I go about my regular building process, when I matte topcoat finish with this, will it react it some weird way with the inner frame color ?
listen. after you sand and polish. Get this clear coat -- make sure you get GLOSS and makes sure its UV resistant + sticks to plastic. UV is what we're fighting. 3 LIGHT wet coats 2 minutes a part.
This is a before
This is an after with Rustoleum clear coat -- I did this about a month ago and they look exactly the same today. Car washes, rain, hot heat. perfect
full shot
Definitely need new primer then. This or this is pretty good, can't really go wrong with it.
2 Questions:
- Mr. Hobby Clear Flat Spray
- Mr. Hobby Clear UV Cut Flat Spray
Art3d Textures 3D Wall Panels White Diamond Design Pack of 12 Tiles 32 Sq Ft (PVC) https://www.amazon.com/dp/B073NZ67LK/ref=cm_sw_r_cp_apa_i_axUFDbQVY4430
Cutting them up to inlay the nanoleafs was a bit of a pain in the ass, bit otherwise it was super easy to attach them. Amazon recommended some kind of plaster to adhere them to the walls - DO NOT BUY IT. It would require you to hold each panel in place for a number of minutes until it's hopefully strong enough to hold. Also it's messy... Instead, just get some 3M double sided tape and call it a day.
conviviality
Working Fixitive
I really would like this because I am super paranoid about smearing artwork. I've been using hairspray, but it can warp and discolor over time. Would love to 'set' my work from session to session.
Thanks for the input. Is Crystal Clear some sort of varnish/paint/lacquer? Something like this: Krylon Crystal Clear spray, amazon.com
absolutely, it is impressive..i use this putty, i find it very good.
https://www.amazon.co.uk/gp/product/B0076LAVFK/ref=ppx_yo_dt_b_asin_title_o06_s00?ie=UTF8&amp;psc=1
glad you took my comment the right way :O)
Since no one has actually answered your question, I used grey Rust-Oleum primer for my Gloomhaven minis (Amazon link).
Now, I'm not 100% sure if this is the exact same one that I use, but it looks awfully similar. All I know is that it goes on smooth, doesn't obscure tiny details (as long as you don't heavily spray a single area), and dries nicely. I also have a white can of Rust-Oleum primer, but I'm not too impressed with that one. I'm thinking about giving the white Tamiya primer a try. Maybe that'll be better.
I tape the bottom of my figures to a paint stirring stick and then spray the primer on to them in quick, short bursts, spraying about 6 inches away from them and moving in a lateral sweep. Turn and rotate the stirring stick so that you hit all angles on the mini. Once finished, set aside in a dry room for at least 24 hours before you begin painting.
try using a glossy artist fixative, coat the entire glass so it won't chip away, and use two layers of coat minimum. I've used a matte finish before and that lasted three months, if you aren't using the glass then it should last forever.
Hopefully this will work just fine
Artist fixatives help avoid fading from sunlight, and since I see that's a valid concern in this thread I'd be excited to suggest this product. Us drawing types use this to protect pretty much any type of work and it's held up on my own pictures. The glass I mentioned lated for three months, but I think the fault was that I used a workable matte finish rather than and acrylic glossy. It should coat your glass in a thin film that will protect the signature just fine, if you put it in a display case or a trophy stand it ought to last forever! Hope I helped!
Another posted pointed these out as super comfy and light. Hopefully they'll get me into the habit easier.
https://www.amazon.com/dp/B00AEXKR4C
the crystals will be covering a 36x40" flat surface. i'm def not using nail polish on all of that. it'd take an eternity. alright, well thank you!
edit: I think this will work: https://www.amazon.com/Krylon-6-Ounce-Crystal-Acrylic-Coating/dp/B001K65K26 and I already have a bunch that i use to preserve paintings, so should be good! let me know if you've heard otherwise about acrylic coating.
Testor's dull coat, after you're done painting and before you put any flock/grass/ w/e down (as it will weight it down and can look bad), just spray them like you would with priming them (short bursts from a distance). Let that set overnight and make sure to do this outside and/or in a well ventilated area as it has a strong odor that will linger. If you have to do it outside, leave them outside for at least half an hour and you'll be good to bring them in with minimal odor to finish curing.
&#x200B;
After that you can put down any grass/flock on the base.
&#x200B;
One caveat, if you have a lot of metallics on your guys this will be dulling them (this is matte after all), so gotta weigh durability with shinyness for if you want to varnish them. I usually still do for miniature games like this, as things bump a lot over time and are handled a bunch. The metallics are still metallics and show, just not as nicely as they did before varnish.
I have a bunch of F21 jewelry I like. If you're worried about it tarnishing you can use a clear spray, which helps protect the finish. I also love the earrings I got at Gap Outlet, though I'm not sure they have them online.
YES. I know that I'm going to get downvoted to hell because everyone on here says not to do it. And I don't have any experience using a professional sprayer.
BUT, I do have this Wagner sprayer with it's own mini-compressor (not attached to the gun, this is important) and it's awesome! I've used it to paint my whole house (interior). I've had very minimal (if any) overspray. I just tape off the molding and lay some paper down where the wall meets the floor and go to town. I actually bought one of those trim tools someone else suggested and add some Floetrol or water to make it easier to spray.
For 100 bucks, it's been a worthwhile investment. Taping off takes the most time...I find that I can paint a room in about 30min. It really makes up time in the cutting in, rolling, rolling, rolling, dipping the roller back in the pan, rolling some more. You just move your arm and spray until the container is empty.
Edit: All of you guys are pussies. There are a bunch of stay at home mommy bloggers who use paint sprayers and do just fine.
You did a watercolor on canvas? Interesting choice, how'd that work out for you? Normally I'd say what you're looking for is a [spray fixative] (https://www.amazon.com/Krylon-1306-Workable-Fixatif-11-Ounce/dp/B00023JE7U) (they sell these at art stores), but I have no idea how they work with canvas. I normally ship larger pieces in bubble mailers, and those clear plastic sleeve bag things work wonders, but I have no idea how thick your canvas is.
[This shipping method] (http://reddotblog.com/how-to-ship-paintings-a-step-by-step-guide-for-artists-and-galleries/) is the approach I would take in your shoes, and if it were me personally I would skip the fixative. Good luck!
I love Mr. Super Clear.
That's super cool. With your blessing, I might do something similar for a friend's upcoming wedding.
In case you haven't seen it, filler primer is amazing for priming 3d prints for paint. Give it a few coats, hit it with sand paper/files, and you get an amazing, smooth surface, but that doesn't obscure details.
I would print at the highest resolution possible. Then use a spray paint enamel protective coating. Apply multiple layers until you get a thick, glossy, smooth coat. I just tried this this past weekend and the results were pretty neat! You can still kind of see the layers, but the surface is very smooth and shiny to the tough. Plus it kept the original color of the PLA.
This is exactly what I got:
Rust-Oleum 249117 Painter's Touch Multi Purpose Spray Paint, 12-Ounce, Clear https://www.amazon.com/dp/B002BWOS5I/ref=cm_sw_r_cp_api_ifBJxbFZ63HHJ
Oooo what a cool room! How about an Adventure Time Wall Decals?
Pirates of the Caribbean!
Adventure Time
Thanks for the contest!
http://www.amazon.com/gp/product/B003PGQI48/ref=oh_details_o07_s00_i01?ie=UTF8&amp;psc=1
here is my HLVP...the reviews are probably better than I can do. I like it.
whether or not its worth it???? YES.....spraying the corners and fronts was sooooo much easier than using a brush....in fact, I cant imagine using brushes for this
CPU | Intel - Pentium G4560 3.5GHz Dual-Core Processor | $79.44 @ OutletPC
Motherboard | MSI - B250M PRO-VD Micro ATX LGA1151 Motherboard | $54.89 @ OutletPC
Memory | G.Skill - Ripjaws V Series 8GB (1 x 8GB) DDR4-2800 Memory | $65.99 @ Newegg
Storage | Crucial - MX300 275GB 2.5" Solid State Drive | $97.88 @ OutletPC
Video Card | Gigabyte - GeForce GTX 1060 3GB 3GB Windforce OC Video Card | $216.89 @ SuperBiiz
Case | Fractal Design - Focus G (White) ATX Mid Tower Case | $44.99 @ Newegg
Power Supply | EVGA - 450W 80+ Bronze Certified ATX Power Supply | $34.97 @ Amazon
| Prices include shipping, taxes, rebates, and discounts |
| Total (before mail-in rebates) | $605.05
| Mail-in rebates | -$10.00
| Total | $595.05
| Generated by PCPartPicker 2017-08-07 00:58 EDT-0400 |
If you want 4k 60fps high settings, you're going to have to significantly increase your budget:
PCPartPicker part list / Price breakdown by merchant
Type|Item|Price
CPU | AMD - Ryzen 5 1600 3.2GHz 6-Core Processor | $197.88 @ OutletPC
Motherboard | ASRock - AB350M Micro ATX AM4 Motherboard | $59.99 @ Newegg
Memory | G.Skill - Ripjaws V Series 16GB (2 x 8GB) DDR4-3000 Memory | $124.99 @ Newegg
Storage | Crucial - MX300 275GB 2.5" Solid State Drive | $97.88 @ OutletPC
Video Card | Gigabyte - GeForce GTX 1080 8GB WINDFORCE OC 8G Video Card | $514.98 @ Newegg
Case | Fractal Design - Define Mini C with Window MicroATX Mid Tower Case | $69.99 @ Newegg
Power Supply | EVGA - SuperNOVA G2 550W 80+ Gold Certified Fully-Modular ATX Power Supply | $72.98 @ Newegg
| Prices include shipping, taxes, rebates, and discounts |
| Total (before mail-in rebates) | $1148.69
| Mail-in rebates | -$10.00
| Total | $1138.69
| Generated by PCPartPicker 2017-08-07 01:01 EDT-0400 |
Edit: Here is the stuff you'll need to paint your case orange:
https://www.amazon.com/Sandpaper-Assortment-Automotive-Furniture-Finishing/dp/B01MZALAD9/ref=sr_1_5?ie=UTF8&amp;qid=1502082191&amp;sr=8-5&amp;keywords=sandpaper
https://www.amazon.com/Rust-Oleum-280715-Primer-American-Accents/dp/B00KZ6LLZW/ref=sr_1_1?s=hi&amp;ie=UTF8&amp;qid=1502082223&amp;sr=1-1&amp;keywords=white+primer+spray+paint
https://www.amazon.com/280698-American-Accents-Orange-12-Ounce/dp/B00KZ6LVUW/ref=sr_1_2?s=hi&amp;ie=UTF8&amp;qid=1502082246&amp;sr=1-2&amp;keywords=orange+spray+paint
https://www.amazon.com/Oleum-280702-American-Accents-12-Ounce/dp/B00KZ6LYMM/ref=sr_1_1?s=hi&amp;ie=UTF8&amp;qid=1502082271&amp;sr=1-1&amp;keywords=spray+paint+gloss+finish
I LOVE wall decals so I'd naturally go crazy all over the walls with them.
Adventure Time :)
TY for the work and documentation. Not the form factor I was planning on, but might be one I use.
https://www.amazon.com/Krylon-1303-Acrylic-Crystal-11-Ounce/dp/B00023JE7K/ was great to find as your coating, as it's one I own but have, but have never used.
Do you have a link to the linen paper?
Pour some epoxy over the top. It looks great and will totally protect the surface.
http://www.amazon.com/Pour-On-Varnish-Provides-Gorgeous-Appearance/dp/B000PEGLBS
Give me minute to look up the video I saw but it is not that hard and the acid is very dilute. It takes less money than powdercoating and the finish is amazing. Plus it can be used to do multicolor effects. The bar top finish is an epoxy based finish. Ill look for a link brb.
Ok here it is the bartop finish
http://www.amazon.com/gp/aw/d/B000PEGLBS?pc_redir=1396668298&amp;robot_redir=1
And here is anodizing.
This guy is monotone but he is very clear.
http://youtu.be/sI-oiBKAyOY
http://youtu.be/m802YwZCj04
Multicolor mask technique
http://youtu.be/8OpewWuDJJE
I already etch boards this is not much more difficult
Plus you can do photoemulsion resist and do really crazy graphics.
I will be doing some of this in the next few months and will post my results.
Rustoleum "Clear Coat" is what I use if I've sharpied art onto things, but usually they don't have a glossy finish like a guitar.
It looks like there is a gloss version but I don't know exactly how glossy it is; you'd want to test it on a similar surface before trying it on your project.
Second-ing everything that has been said so far. Primer first, paint it, matte varnish to protect. Personally have been using Testor's Dullcote for years with great success.
If you didn't prime first, I would suggest taking the paint off (stripping) and repainting. If you put the varnish on top with no primer underneath, your paint will still chip off in chunks (got greedy, tried it, didn't end well).
What time is it?
Adventure Time!!!!!!
This, this and this are lumping awesome!
This isn't adventure time, but your baby could make his own adventures!
Is this stuff pretty good to use if I want a matte coat? Also, if there are parts I want shiny and parts I want matte, do I just have to break out the painter's tape?
Hey, just saying, if you take off the backplate and coat the face with this artist's spray then it will protect the signatures. I use this stuff all the time and it shouldn't take much to seal a sharpie mark on plastic. You should be able to keep a generally matte finish, while also letting you use it normally.
I would do this whether you want to showcase it or not, since it's also UV resistant and will keep it from discoloring/fading. Just make sure you mask the grills/vents and coat the kickstand separately. You should only need 1 or 2 very light coats. We're talking 30 minutes tops with an overnight dry.
Don't call it Frisco.
So, I think these are pretty awesome.
Alright ty any cool any stuff you know of that I should pick up/rgb and also I’m getting this to put behind the monitor Art3d Textures 3D Wall Panels White Diamond Design Pack of 12 Tiles 32 Sq Ft (PVC) https://www.amazon.com/dp/B073NZ67LK/ref=cm_sw_r_sms_c_api_M4UIBbJRWNTA1
so far i brush, i tend to use different varnish depending on where im using it, gloss on lenses semi gloss on armor flat on dirt ect. I do hope to get an airbrugh before christmas comes though, have a drop pod i need to paint and im just not happy with how brushing the base color is looking, no matter how thin or how many coats i cant get a nice even tone to work from
try this for primer, ive absolutely love using it, goes on super thing but nice and solid, doesnt fill in details
Huge improvement! Did you give the whole thing several coats of clear lacquer finish? If not, you should. Make sure you take the panel back off first, of course.
This stuff is the best. Goes on smooth is cheap and easy to use.
Testors Aerosol Spray Lacquer Paint, 3oz https://www.amazon.com/dp/B009FF6DN4/ref=cm_sw_r_cp_apa_qYubzbB3QAGQT
Howdy all,
I'm fairly new to the hobby and been experimenting with painting up an army of salamanders. I tried using black then grey primer but that always made my greens too dark for my taste when using the GW formula or Waagh flesh, Warpstone Hlow, Moot green, they looked more like Dark Angels. I can get the shade I want with white primer, but the base coat is always going on very spotty and uneven. I've tried thinning my paints with more water but that made it worse. I tried only thinning it with the water in my brush and that made it better but it still collected in spots. You can see that in the first picture above marked “1 thin coat”. Another thin coat helps fix this but the paint job is still very uneven. I then have to do another thin coat in spots that are really white to try and bring it out, that is the second picture marked 2.5 thin coats. When I then do the Warpstone Glow and Moot it still runs and puddles in large blotches and doesn't look very even.
Could this be a problem with the primer? I'm using white Rust-oleum 2X ultra cover primer.
https://www.amazon.com/Rust-Oleum-American-Accents-Ultra-Cover/dp/B00KZ6LLZW
I've used the same brand in grey and never run into this issue. Is this just an issue when painting on white surfaces? I know it can be a real pain sometimes. I'm also thinning my paints with clean distilled water and tried various amounts of thinning.
Tamyia makes a good primer in rattlecan and handbrush; while you're there, pick up some ultra thin cement - it's awesome for seam fusing.
I've started using spray-on acrylic coating like this on my boxes. It's easier to apply and creates a more even finish than Mod Podge. :)
Uh, I just used some acrylic paint my wife had in her craft supplies. Didn't seem like anything fancy. And I did clear coat it!
Edit: The bottles looked like this!
Edit2: Missed the part where you asked about clear coating, but this is what I used to clear coat.
I'll copy paste it then:
Some info...
Right Build:
Case: NZXT h510 Elite
Monitor: LG 32GK650G-B 32" QHD Gaming Monitor (144hz)
Keyboard: Razer Blackwidow X (mercury white)
Mouse: Razer Basilisk (mercury white)
Mousepad: Steelseries QcK Prism Gaming Surface (XL)
Headset: Steelseries Arctis Pro Wireless
Speakers: Logitech Z207 2.0 Multi Device Stereo Speaker
MBU: Asus ROG Strix X570-E Gaming ATX Motherboard
CPU: AMD Ryzen 9 3900X
CPU Cooler: NZXT Kraken X62
RAM: Corsair Vengeance RGB 32GB
GPU: EVGA GeForce Nvidia 2080 Super FTW3 Ultra
PSU EVGA Supernova 1000 P2 80+ Platinum
Tablet: Microsoft Surface Pro 5
Tablet Stand: https://www.amazon.com/gp/product/B07S73HVW5/ref=ppx_yo_dt_b_asin_title_o09_s00?ie=UTF8&amp;psc=1
Left Build:
Case: Corsair Obsidian Series 750D Performance Full Tower Case (airflow edition)
Monitor: LG 34UC80-B 34-Inch Curved UltraWide QHD IPS Monitor (60hz)
Keyboard: Razer Blackwidow
Mouse: Razer Deathadder
MBU: ASUS TUF Gaming X570-Plus ATX Motherboard
CPU: AMD Ryzen 9 3800X (with stock cooler)
RAM: Corsair 16GB
GPU: EVGA GeForce Nvidia 1080ti FTW3 Ultra
PSU: EVGA Supernova 750 G2 80+ Gold
TV/Consoles:
TV: Samsung UN49RU8000FXZA Flat 49" 4K UHD 8 Series Smart TV (2019)
TV Wall Mount: https://www.amazon.com/gp/product/B00VMH7PQM/ref=ppx_yo_dt_b_asin_title_o06_s00?ie=UTF8&amp;psc=1
Console 1: PS4 Pro
Console 2: Nintendo Switch
Furniture:
Left Desk: IKEA Malm with 2 IKEA Malm Cabinets on Casters
Right Desk: IKEA Malm with Pullout Panel
Left Shelf: IKEA Lack 43 1/4" Wall Shelf
Right Shelf: IKEA Lack 74 3/4" Wall Shelf
Console Storage: IKEA Kallax with IKEA DRÖNA Storage Boxes
Chair: Steelcase Think
Decor/Lighting:
Under Shelf/Behind Desk LED Strips: https://www.amazon.com/gp/product/B07PLNDJ2N/ref=ppx_yo_dt_b_asin_title_o06_s02?ie=UTF8&amp;psc=1
LED Diffuser Channels (2 packs needed): https://www.amazon.com/Muzata-Aluminum-Channel-Diffuser-Mounting/dp/B01NGWIGXJ/ref=sr_1_5?keywords=Muzata+Aluminum+Channel+for+Led+Strip+Light&amp;qid=1570330250&amp;s=hi&amp;sr=1-5
TV LED Strip: https://www.amazon.com/gp/product/B072QWJRBS/ref=ppx_yo_dt_b_asin_title_o06_s00?ie=UTF8&amp;psc=1
Cord Concealer: https://www.amazon.com/gp/product/B07GPBJV6K/ref=ppx_yo_dt_b_asin_title_o03_s00?ie=UTF8&amp;psc=1
Decorative Wall Tiles: https://www.amazon.com/gp/product/B073NZ67LK/ref=ppx_yo_dt_b_asin_title_o07_s00?ie=UTF8&amp;psc=1
Mounting Tape for Tiles/LEDs (2 rolls needed): https://www.amazon.com/gp/product/B07D2LWV7P/ref=ppx_yo_dt_b_asin_title_o06_s00?ie=UTF8&amp;psc=1
Here's a few close ups of the lighting to get a better understanding how it works: https://imgur.com/a/196iXOy
They sell plastic design panels for your wall pretty inexpensive on amazon - heres a link
seen people use them before and they look good imo, especially with ambient lights or LEDs. Look at pictures in the reviews
Got a pair of these and love them. Then again I wear mine to protect from blood and spit mostly.
http://www.amazon.com/Rust-Oleum-249117-Painters-Multi-Purpose-12-Ounce/dp/B002BWOS5I/ref=sr_1_3?ie=UTF8&amp;qid=1375559214&amp;sr=8-3&amp;keywords=clear+coat
Is this correct? I want a flat coat? This says gloss but I'm not sure if its different from super gloss?
probably just an assload of crystal clear acrylic paint. I have this and it works great.
While this can't fix the existing scratches, if you are serious about protecting your frame then consider applying some helicopter/racer tape to the most vulnerable areas.
It's basically a thick version of protective films they use on electronic screens. UV stable and can take a beating. Bonus is that it peels off without hassle or marks. A lot of the guys in my area use it to protect their carbon frames. Just clean the application area well with alcohol before putting the tape on.
http://www.amazon.com/ISC-Racerstape-com-Paint-surface-guard/dp/B000TPC7HU
Hey guys, I'm looking to build my first serious Gunpla here soon (built a bunch when I was a kid) and I want to finish it with a top coat. I've found this item from Mr. Topcoat, which seems good, but I was wondering if there are similar options in larger quantities or for better prices?
Why not just spray coat the parts with some type of clear coating to keep the look of everything? Would something like this work to keep the 'look' including the sticker in place as well as the shellac chips as they are? I'm not too knowledgeable on the paint finishing side of life.
http://www.amazon.com/Krylon-6-Ounce-Crystal-Acrylic-Coating/dp/B001K65K26
Well I can't really help you but you can go to the official Cartoon Network shop cartoonnetworkshop.com and shop for decoration such as bedding, pillows, plushies etc
How about some Adventure Time themed wall decal like this Adventure Time
Brush on or spray?
Always use spray.
My preference is Tamiya grey fine primer.
https://www.amazon.com/dp/B000BMXRUM/ref=cm_sw_r_cp_awdb_t1_16BBDb3Z3AVA1
I've never had an issue with it. One thin coat will do it. You're just putting in on there to help the paint have something to adhere to smoothly. That's all unless you really care about what color your base cost goes over.
That's why I go with grey personally.
Also dont spray when it's raining or high humidity. It screws with the paint.
After I paint any mini, I varnish it with gloss varnish, and then, most importantly spray the entire thing with Testor's Dulcote. It makes everything beautifully matte.
https://www.amazon.com/Testors-Spray-Lacquer-Clear-Coat/dp/B009FF6DN4
I was just turned on to Perfect Plastic Putty https://www.amazon.com/gp/product/B0076LAVFK/ref=ox_sc_act_title_3?ie=UTF8&amp;psc=1&amp;smid=A1BKVSJG1RNAQO
Sounds like exactly what you need.
Thanks! I printed him with PLA filament and then did a couple of coats of this filler primer
https://www.amazon.com/gp/product/B003CT4AM0/ref=oh_aui_search_detailpage?ie=UTF8&amp;psc=1
Did a lot of sanding with different level grit sandpaper to smooth him out and then once it was all done I started painting him with acrylic paints :)
Sounds like you want to use the kind of finish that is used on bar tops and bar tables. There are many different brands, such as this one:
http://www.homedepot.com/p/Rust-Oleum-Parks-1-qt-Gloss-Super-Glaze-Finish-and-Preservative-241352/202056337
Or this:
http://www.amazon.com/Pour-On-Varnish-Provides-Gorgeous-Appearance/dp/B000PEGLBS
So Axon, just to be sure. I want to paint a certain part a flat Matte color. So I'll use a Flat/Matte Coat. If I paint other parts gloss/metallic I'll coat it with a gloss coat, correct?
Would this be a good brand for a flat/matte coat? https://www.amazon.com/Mr-Super-Clear-Flat-Spray/dp/B000W30PIW/ref=sr_1_2?ie=UTF8&amp;qid=1495418826&amp;sr=8-2&amp;keywords=gundam+matte+spray
And this for a gloss/metallic? https://www.amazon.com/Mr-Super-Clear-Gloss-Spray/dp/B000W2YLGA/ref=sr_1_3?ie=UTF8&amp;qid=1495418918&amp;sr=8-3&amp;keywords=to+coat+gloss+gundam
I apologize for all the questions and ignorance. I'm about to paint for my first time on an RG Aile Strike. :)
I've been using a clear coat from Testors.
Seems to do the job just fine. I'll use a gloss medium on things like canopies after the clear coat is full cured.
Sorry, I wandered off. That link is more glossy, I like the gloss finish personally, but for a flat coat you want something more like this: http://www.amazon.com/gp/aw/d/B001C42OXY
Nail polish won't hold up in the microwave. It pops/explodes.
I found these two sealants options used for diy painted dishes: Mod Podge Dishwasher Safe and Krylon Crystal Clear. They are both supposed to be dishwasher safe, but I don't think they are microwave safe.
If you wanted to stick with pencil/not have to go over that in pen, you can always try [this.] (http://www.amazon.com/gp/aw/d/B00023JE7U/ref=pd_aw_sbs_201_1?ie=UTF8&amp;dpID=41xJ1LuWmgL&amp;dpSrc=sims&amp;preST=_AC_UL100_SR100%2C100_&amp;refRID=08WE7KV5614XDKSG03XR) It's basically sealant to help prevent smudging.
Just thought I'd throw that out there. :)
I would definitely give these a shot. Modifying your breathing is easier said than done in my experience. Just ordered these:
3M Virtua CCS Protective Eyewear 11872-00000-20, Foam Gasket, Anti Fog Lens, Clear https://www.amazon.com/dp/B00AEXKR4C/ref=cm_sw_r_awd_xpFAub16NMKJQ
Acacia us beautiful stuff.
I've used this liquid epoxy before for an outdoor sign I made, held up OK but in direct UV, it will need recoating every so often.
do a small test batch on scrap to get process down
For inside, should be fine
https://www.amazon.com/Finish-Varnish-Provides-Gorgeous-Appearance/dp/B000PEGLBS
Capillary issue hadn't occurred to me before, but it makes sense. But if you are going to acylic matte prime it anyway, I guess trying to fill those layer gaps first is a step worth taking.
Something like a filler-primer: https://www.amazon.com/dp/B003CT4AM0/ref=nav_timeline_asin?_encoding=UTF8&amp;psc=1
I'm using this tape to cover the back for now, and it is a lot grippier than the bare aluminum, the back glass, or even my plastic screen protector. If they use a similar material it should have some grip. "Self-Healing, flexible, tough, military-grade thermoplastic urethane, designed to absorb impact" sounds grippy. Good point about peeling. Maybe clear adhesive film for the back plus a bumper case would be a good combo.
I have Thule Atmos X3 case on my old phone, and it's awesome. It's thin and unobtrusive (adds maybe 2-3mm thickness), but it protected that phone every time I dropped it. It's made of high quality co-molded materials with a subtle design and variety of textures. Too bad they seem to have given up on Android phones.
unfortunately i live in somewhat of a countryside and need everything shipped...
https://www.amazon.ca/Testors-Spray-Lacquer-Clear-Coat/dp/B009FF6DN4/ref=sr_1_1?ie=UTF8&amp;qid=1525997806&amp;sr=8-1&amp;keywords=testor%27s+dullcote+spray
this looks a lot more reasonable but I've seen some people saying it melts your gunpla or something...? have you had any experience with this one?
edit:
nevermind, this looks like a very good alternative
https://www.amazon.ca/85080-Spray-TS80-Clear-100ml/dp/B000ZVO3YS/ref=sr_1_1?ie=UTF8&amp;qid=1525998118&amp;sr=8-1&amp;keywords=tamiya+flat+clear
Tamiya fine surface primer is a really thin primer that I'm using for my resin minis, does a good job of not filling in all the fine details.
https://www.amazon.com/dp/B0000WS01E/ref=cm_sw_r_em_apa_i_Ef6TDbK9HYY3F
Its all about putting on a coat or 2 of clear acrylic spray paint after painting (like this kind). Another good thing to do is to sand it down with 400 grit or higher sandpaper before painting if you're painting the entire body.
Pretty sure it’s these: https://www.amazon.com/dp/B073NZ67LK/ref=cm_sw_r_cp_api_i_0fmKDbNDK42Q8
Walls
Room
Desk (Left)
Desk (Center)
Desk (Right)
Computer
This is the exact thing I got.
Kind of pricey but it seems like the roll will last for every bike I ever own.
It looks similar to what I’ve used before. Just be sure it’s an acrylic paint and not urethane-not good to put certain chemicals in your ears :)
Here’s a link to one I’ve used:
Krylon K01303A07 Crystal Clear Acrylic Coating Aerosol Spray, 6 Ounce https://www.amazon.com/dp/B001K65K26/ref=cm_sw_r_cp_api_i_9cyyCb575YMXY
I’m not sure why, but when I did the spray acrylic, sometimes in about a month it would “glaze” or something - like it seemed like it was separating from the IEM. It might work temporarily, or it might work forever. Hard to say. Low risk to try though!
you will want to use an epoxy finish, wood itself is obviously not water tight, and any typical finish like polyurethane are not permanently water tight. So you basicly need to coat the wood in clear plastic, atleast on the inside.
this would work https://www.amazon.com/Finish-Varnish-Provides-Gorgeous-Appearance/dp/B000PEGLBS
This video uses Army Painter's Quickshade, which also gives the muddy look you're after. While different from a wash, the method is the same if you're treating the entire mini with nuln oil. Keep the shadow areas dark and whisk away shade on the highlighted areas. Or simply darken the areas selectively with the wash.
I'd recommend Testor's Dullcote for a good spray matte varnish. You can find it at most big box and craft stores also.
3M Safety Glasses, Virtua CCS Protective Eyewear 11872, Removable Foam Gasket, Clear Anti-Fog Lenses, Corded Ear Plug Control System https://www.amazon.com/dp/B00AEXKR4C/ref=cm_sw_r_cp_apa_i_-zy0Db7ABYENF
I use ISC Racers Tape.
https://smile.amazon.com/dp/B000TPC7HU/ref=cm_sw_r_cp_apa_i_595SCbRDHK3ZP
Not just water, but slightly soapy water. It breaks the surface tension on the water allowing it to completely cover the adhesive so you can easily position it on the frame. Lots of soapy water. You can't use too much. Be careful not to get water on the backing paper before peeling off the tape. It has a tendency to pull apart and stick to the tape if you get it wet. If your hands are wet with soapy water you can handle the adhesive side without leaving fingerprints. I use a dish towel to squeegee and dry around the edges. It won't start to stick well until it squeegees out and dries. If it slips when your squeegeeing splash more soapy water on it and have another go at it.
I just wrapped a new steel hardtail in 1", 2", and 4" tape because it's gonna take a thrashing.
For me, I have found this one works the best:
https://www.amazon.com/gp/product/B003CT4AM0/ref=oh_aui_detailpage_o00_s00?ie=UTF8&amp;psc=1
I print PLA. I haven't tested this with ABS, but it probably works just as well.
This is Topcoat (cost less than this like 10USD) it makes the plastic less glossy ( makes it look way better without having to paint) also protects the plastic and panel linings
Best part is that these glasses can be found for under eight dollars.
Love the tiles on the ceiling are they these? https://www.amazon.com/dp/B073NZ67LK/
How often does she unlock you? If it's not real frequent, you can use a clear spray (clear coat paint) like this and reapply periodically
https://www.amazon.com/dp/B00397STRW/ref=cm_sw_r_other_apa_jwPzzb0RN67RK
https://www.amazon.com/gp/product/B003PGQI48/ref=oh_aui_detailpage_o08_s00?ie=UTF8&amp;psc=1
Buy that. I have one and it's awesome. Use that with lacquer from Sherwin Williams. It was a total game changer for me. I may never brush on a finish again.
This would be a great addition to your bag, I got mine to go with the n95s.
wall decals are awesome Adventure Time
you can choose lol
Yeah, especially to protect the (I'm assuming) non-oil-based, less-durable coats of paint underneath. http://www.amazon.com/Finish-Varnish-Provides-Gorgeous-Appearance/dp/B000PEGLBS/ref=sr_1_2?ie=UTF8&amp;s=arts-crafts&amp;qid=1301373510&amp;sr=1-2
Thanks, so something like this would be fine for the primer?
https://www.amazon.com/280715-American-Accents-Primer-12-Ounce/dp/B00KZ6LLZW/ref=sr_1_1?ie=UTF8&amp;qid=1487959986&amp;sr=8-1&amp;keywords=primer+spray+paint