(Part 3) Best products from r/DIY
We found 90 comments on r/DIY discussing the most recommended products. We ran sentiment analysis on each of these comments to determine how redditors feel about different products. We found 7,518 products and ranked them based on the amount of positive reactions they received. Here are the products ranked 41-60. You can also go back to the previous section.
41. Steel Ring Mandrel: Size 1-15 US
- 12" Professional Quality Ring Mandrel
- Measures ring sizes from 1 to 15 US
- Length: 12"
- Manufactured from hardened steel
- Knurled, non-slip grip handle
Features:
 ▼ Read Reddit mentions
42. Build Your Own Earth Oven: A Low-Cost Wood-Fired Mud Oven, Simple Sourdough Bread, Perfect Loaves, 3rd Edition
Detailed instructions including photos and diagrams make this a complete how-to book on building and baking with a traditional earth ovenTips on baking real sourdough bread, tooDenzer10" x 7"114 pages
 ▼ Read Reddit mentions
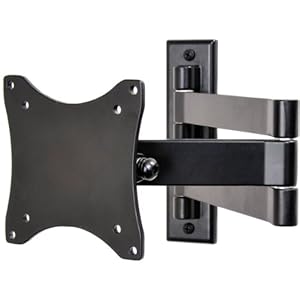
43. VideoSecu TV Wall Mount Articulating Arm Monitor Bracket for Most 19"-39" LCD LED Plasma Flat Panel Screen TV with VESA 100/75mm ML10B 1E9
- TV Wall mount, compatible with VESA 75x75(3"x3") or 100x100(4"x4")
- Fits most 19", 20", 22", 23", 24", 26", 27",30",39" TV with VESA 100 mounting hole patterns(check VESA and weight)
- Loading capacity up to 44lbs; Tilt, swivel and extend for maximum viewing flexibility
- Retracts to 2.4" to save space ; Extends up to 15" from the wall
- Common hardware and user manual included in the package
Features:
 ▼ Read Reddit mentions
44. Carl's Blackout Cloth, DIY Projector Screen, Raw Material/Fabric, 66x110-inch, Matte White, 16:9/1.0
Blackout Cloth is our top-selling Projector Screen Material making it a budget-friendly, do-it-yourself screen building favorite!This front projection blackout fabric surface is the standard to which all other screen surfaces are compared. Blackout Cloth's matte white surface and gain of 1.0 diffuse...
 ▼ Read Reddit mentions
45. CHINLY WS2812B LED Strip Light 16.4ft/5M Individually Addressable 5050 RGB Flexible Dream Color 30LEDs/m Waterproof IP67 PCB Black DC5V
Length: 16.4ft/5M, LED Quantity: 30 LEDs of RGB SMD5050 per meter, IP67 Waterproof, Black PCB, DC5VDream full color programmable LED Strip, WS2811 IC Built in 5050 SMD, 256 brightness display and 24-bit color display. Each pixel has own color and brightness. Control them individually and set any col...
 ▼ Read Reddit mentions
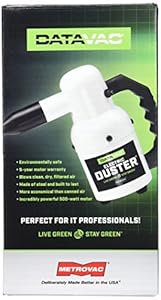
46. Metro ED500 DataVac 500-Watt 120 volt 0.75-HP Electric Blower Duster
- Sturdy all-steel construction. Please note: This item is a blower, NOT a vaccuum.
- Includes air pin-pointer, air concentrator nozzle, air -flare nozzle, micro-cleaning tool kit
- More effective than canned air and safer than canned air
- 500 watt motor, .75 HP, 4.5 amps, 70 CFM air flow
- 120 volt (not for use in 220 or 230-volt current).
Features:
 ▼ Read Reddit mentions
47. InstaMorph - Moldable Plastic - 12oz (White)
- LIGHTWEIGHT & STRONG: InstaMorph is a lightweight polyester thermoplastic which acts like clay when warm, but when it cools, it’s a strong plastic. Mold it with your hands, tools, or press around an object to make a mold. It can be painted, machined, carved or attached to other materials.
- REUSABLE PLASTIC: About 1 ounce of InstaMorph will form a one-inch cube of moldable plastic. It can be remolded again and again simply by reheating it. Make a mistake? Just reheat it!
- GET CREATIVE: InstaMorph is ideal for makers, hobbyists, artists, fixers, cosplayers, tinkers, or anyone else that needs a custom part made out of plastic. You can create everything from masks, costume pieces, brackets, molds, toys, handles, grips or replacement parts.
- EASY TO USE: Simply heat InstaMorph thermoplastic in hot water (150°F), in the oven, or using a heat gun and mold it with your hands, tools, or shape it around an object to create a plastic mold within minutes. Once the beads are clear, let the fun begin.
- INSTAMORPH PIGMENT PACK: You can dye classic InstaMorph into any color you desire by by purchasing our color pack. They come in blue, red, yellow, and black.
Features:
 ▼ Read Reddit mentions
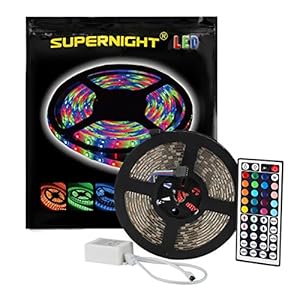
48. SUPERNIGHT (TM) 16.4FT SMD 5050 Waterproof 300LEDs RGB Flexible LED Strip Light Lamp Kit + 44Key IR Remote Controller(Power supply is not included)
- 300LED Diodes per Reel, Double side adhesive on back for pasting
- 12V Super Bright SMD 5050 than 3528 Single Chip
- Length: 5M or 16ft. Thickness: 0.1inch. Width: 0.4inch. IP65 Waterproof
- RGB Color, 12V DC Input Voltage, Cuttable Every 3 LEDs
- Easy and Flexible installation. Ideal for home and business light decoration. AC adapter sold separately.
Features:
 ▼ Read Reddit mentions
49. Epifanes Clear Varnish
World famous, highest quality traditional tung oil marine spar varnish.Formulated with tung oil, phenolic and alkyd resins resulting in a finish that has superior flow, gloss, durability, and exceptional longevity.UV filters for superior protection with an ultra high gloss finishUsed in many applica...
 ▼ Read Reddit mentions
50. Armour Etch Cream, 10-Ounce
- Package length :2.47"
- Package width :2.47"
- Package height :4.82"
- Made in United States
Features:
 ▼ Read Reddit mentions
51. Illustrated Cabinetmaking: How to Design and Construct Furniture That Works (Fox Chapel Publishing) Over 1300 Drawings & Diagrams for Drawers, Tables, Beds, Bookcases, Cabinets, Joints & Subassemblies
- Fox Chapel Publishing
Features:
 ▼ Read Reddit mentions
52. New Complete Do-It-Yourself Manual
- 24k Gold Plated H59-1 Brass Construction Material
- .75" Tip to Tip Spacing (Industry Standard)
- No Soldering & No Crimping
- High Impact Durable Housing
- Use wire as large as 12 gauge
Features:
 ▼ Read Reddit mentions
53. 3M Headlight Lens Restoration System, 39008
- KIT INCLUDES: 1 - Disc Pad Holder, 3.25 in (8,2 cm) 6 - 3M Gold Sanding Discs 500 Grit, 3 in (7,6 cm) each 4 - 3M White Finishing Discs 800 Grit, 3 in (7,6 cm) each 1 - 3M Trizact Refining Disc, 3 in (7,6 cm) 1 - 3M Rubbing Compound, 1 US fl oz (29 m
- LIKE NEW HEADLIGHTS: Easy heavy duty kit solution help your headlights look like new
- REMOVE HARSHEST YELLOWING: Kit is powered by drill-activated sanding to provide maximum clarity
- RESTORE CLEARNESS: Improve the appearance of your vehicle
- SEE BETTER AT NIGHT: Enhances visibility and safety for night driving
- Features 3M abrasive technology and a polishing compound to restore hazy and dull headlight lenses, as well as other plastic lens surfaces on your vehicle
- System is intended to restore two headlight lenses
- Utilizes the muscle power of a common household (1200-1600 rpm) drill to do all the necessary sanding and buffing
- This item is not for sale in Catalina Island
Features:
 ▼ Read Reddit mentions
54. Power Gear 3 Wire Receptacle Tester, Outlet Tester, 6 Visual Indications, Light Indicator, UL Listed, Gray, 50542
- Receptacle Tester – Detect probable improper wiring conditions in standard 110-125 VAC outlets.
- Easy to Use – Simply plug the 3-wire receptacle tester into the outlet and note the light pattern.
- Indicator Lights – Lights indicate if wiring is correct, and indicator light chart is included.
- Chart Provided – Provides 6 probable wiring conditions that are quick and easy to read for ultimate efficiency.
- Safety – ETL Listed for added peace of mind your product is backed by the highest standards of safety and performance.
Features:
 ▼ Read Reddit mentions
55. GTP | Green Tree Products | Balloon Dog - Large - Dog Sculpture | 10"H x 9.5"L x 3"W inches (Gold)
- Material: Resin
- Color: Gold Metallic
- Medium Size: 10 inch x 4 inch x 9.6 inch
- Perfect for home and office decor
- Made in China
Features:
 ▼ Read Reddit mentions
56. LaptopTraveller HP Pavilion DV6413ej Battery Replacement Ultra High Capacity
HP Pavilion DV6413ej Battery Replacement Ultra High Capacity11.1V 8800 mAh Li-ion Battery100% OEM compatible w/ 1 Year Warranty30 Day Money Back GuaranteeSafe with overvoltage, shortcircuit and overcurrent protection
 ▼ Read Reddit mentions
57. Kreg MKJKIT Mini Kreg Jig Kit
Makes pocket Hole joinery work easierNo-fence design makes for easy positioningOne-hole Jig is great for furniture repairs or flooring workIncludes 3/8-inch step drill bit, depth Collar, and Allen wrenchHandy for repair applications and space constricted areas
 ▼ Read Reddit mentions
58. Hydraulic Vehicle Automotive Moving Jack Dolly - HYDRAULIC Car Dolly
- Professional positioning hydraulic jack help to move your car or engine easily
- Features with heavy duty all steel constructions and a quick release foot pump
- Maximum capacity rated at 1,500 lbs, rolls easily in any direction
- Package includes one dolly as shown, purchase 4 to lift and move entire vehicle
Features:
 ▼ Read Reddit mentions
59. PWM Dimming Controller For LED Lights or Ribbon, 12 Volt 8 Amp, 3301
- Knob monotoner is a controller which can realize stepless dimming.
- Using the knob control mode, it is a kind of dimmer which can realize 0-100% pole-free dimming. The user can adjust the light to the appropriate brightness according to the actual needs.
- Used to control all kinds of LED lights, such as LED strip, LED module, LED string, etc.
- Operating temperature: -20-60℃. Output: single channel. Net weight: 51g. Static power consumption: <1W.
- Output power: 12V<96W, 24<192W. Power supply voltage: 12v-24v. Product size: L89*W59*H35 mm.
Features:
 ▼ Read Reddit mentions
60. Blue Sea Systems Mini-BUSBAR 2X10-32 100A W/COVR, with Cover
- 100A Mini BusBar with 5 screws and a cover (part number 2314)
- Max voltage: 300V AC/ 48V DC, Continuous Rating: 100A AC/DC
- Terminal Screws: 5 x #8-32, Terminal Studs: 2 x #10-32
- Reinforced polycarbonate base with tin plated pure electrical copper for maximum conductivity and corrision resistance, cover made with clear polycarbonate
- 2 mounting holes accept #10 (M5) screws
Features:
 ▼ Read Reddit mentions
Top comments mentioning products on r/DIY:
Summary
41. Steel Ring Mandrel: Size 1-15 US
- 12" Professional Quality Ring Mandrel
- Measures ring sizes from 1 to 15 US
- Length: 12"
- Manufactured from hardened steel
- Knurled, non-slip grip handle
Features:
▼ Read Reddit mentions42. Build Your Own Earth Oven: A Low-Cost Wood-Fired Mud Oven, Simple Sourdough Bread, Perfect Loaves, 3rd Edition
Detailed instructions including photos and diagrams make this a complete how-to book on building and baking with a traditional earth ovenTips on baking real sourdough bread, tooDenzer10" x 7"114 pages
▼ Read Reddit mentions43. VideoSecu TV Wall Mount Articulating Arm Monitor Bracket for Most 19"-39" LCD LED Plasma Flat Panel Screen TV with VESA 100/75mm ML10B 1E9
- TV Wall mount, compatible with VESA 75x75(3"x3") or 100x100(4"x4")
- Fits most 19", 20", 22", 23", 24", 26", 27",30",39" TV with VESA 100 mounting hole patterns(check VESA and weight)
- Loading capacity up to 44lbs; Tilt, swivel and extend for maximum viewing flexibility
- Retracts to 2.4" to save space ; Extends up to 15" from the wall
- Common hardware and user manual included in the package
Features:
▼ Read Reddit mentions44. Carl's Blackout Cloth, DIY Projector Screen, Raw Material/Fabric, 66x110-inch, Matte White, 16:9/1.0
Blackout Cloth is our top-selling Projector Screen Material making it a budget-friendly, do-it-yourself screen building favorite!This front projection blackout fabric surface is the standard to which all other screen surfaces are compared. Blackout Cloth's matte white surface and gain of 1.0 diffuse...
▼ Read Reddit mentions45. CHINLY WS2812B LED Strip Light 16.4ft/5M Individually Addressable 5050 RGB Flexible Dream Color 30LEDs/m Waterproof IP67 PCB Black DC5V
Length: 16.4ft/5M, LED Quantity: 30 LEDs of RGB SMD5050 per meter, IP67 Waterproof, Black PCB, DC5VDream full color programmable LED Strip, WS2811 IC Built in 5050 SMD, 256 brightness display and 24-bit color display. Each pixel has own color and brightness. Control them individually and set any col...
▼ Read Reddit mentions46. Metro ED500 DataVac 500-Watt 120 volt 0.75-HP Electric Blower Duster
- Sturdy all-steel construction. Please note: This item is a blower, NOT a vaccuum.
- Includes air pin-pointer, air concentrator nozzle, air -flare nozzle, micro-cleaning tool kit
- More effective than canned air and safer than canned air
- 500 watt motor, .75 HP, 4.5 amps, 70 CFM air flow
- 120 volt (not for use in 220 or 230-volt current).
Features:
▼ Read Reddit mentions47. InstaMorph - Moldable Plastic - 12oz (White)
- LIGHTWEIGHT & STRONG: InstaMorph is a lightweight polyester thermoplastic which acts like clay when warm, but when it cools, it’s a strong plastic. Mold it with your hands, tools, or press around an object to make a mold. It can be painted, machined, carved or attached to other materials.
- REUSABLE PLASTIC: About 1 ounce of InstaMorph will form a one-inch cube of moldable plastic. It can be remolded again and again simply by reheating it. Make a mistake? Just reheat it!
- GET CREATIVE: InstaMorph is ideal for makers, hobbyists, artists, fixers, cosplayers, tinkers, or anyone else that needs a custom part made out of plastic. You can create everything from masks, costume pieces, brackets, molds, toys, handles, grips or replacement parts.
- EASY TO USE: Simply heat InstaMorph thermoplastic in hot water (150°F), in the oven, or using a heat gun and mold it with your hands, tools, or shape it around an object to create a plastic mold within minutes. Once the beads are clear, let the fun begin.
- INSTAMORPH PIGMENT PACK: You can dye classic InstaMorph into any color you desire by by purchasing our color pack. They come in blue, red, yellow, and black.
Features:
▼ Read Reddit mentions48. SUPERNIGHT (TM) 16.4FT SMD 5050 Waterproof 300LEDs RGB Flexible LED Strip Light Lamp Kit + 44Key IR Remote Controller(Power supply is not included)
- 300LED Diodes per Reel, Double side adhesive on back for pasting
- 12V Super Bright SMD 5050 than 3528 Single Chip
- Length: 5M or 16ft. Thickness: 0.1inch. Width: 0.4inch. IP65 Waterproof
- RGB Color, 12V DC Input Voltage, Cuttable Every 3 LEDs
- Easy and Flexible installation. Ideal for home and business light decoration. AC adapter sold separately.
Features:
▼ Read Reddit mentions49. Epifanes Clear Varnish
World famous, highest quality traditional tung oil marine spar varnish.Formulated with tung oil, phenolic and alkyd resins resulting in a finish that has superior flow, gloss, durability, and exceptional longevity.UV filters for superior protection with an ultra high gloss finishUsed in many applica...
▼ Read Reddit mentions50. Armour Etch Cream, 10-Ounce
- Package length :2.47"
- Package width :2.47"
- Package height :4.82"
- Made in United States
Features:
▼ Read Reddit mentions51. Illustrated Cabinetmaking: How to Design and Construct Furniture That Works (Fox Chapel Publishing) Over 1300 Drawings & Diagrams for Drawers, Tables, Beds, Bookcases, Cabinets, Joints & Subassemblies
- Fox Chapel Publishing
Features:
▼ Read Reddit mentions52. New Complete Do-It-Yourself Manual
- 24k Gold Plated H59-1 Brass Construction Material
- .75" Tip to Tip Spacing (Industry Standard)
- No Soldering & No Crimping
- High Impact Durable Housing
- Use wire as large as 12 gauge
Features:
▼ Read Reddit mentions53. 3M Headlight Lens Restoration System, 39008
- KIT INCLUDES: 1 - Disc Pad Holder, 3.25 in (8,2 cm) 6 - 3M Gold Sanding Discs 500 Grit, 3 in (7,6 cm) each 4 - 3M White Finishing Discs 800 Grit, 3 in (7,6 cm) each 1 - 3M Trizact Refining Disc, 3 in (7,6 cm) 1 - 3M Rubbing Compound, 1 US fl oz (29 m
- LIKE NEW HEADLIGHTS: Easy heavy duty kit solution help your headlights look like new
- REMOVE HARSHEST YELLOWING: Kit is powered by drill-activated sanding to provide maximum clarity
- RESTORE CLEARNESS: Improve the appearance of your vehicle
- SEE BETTER AT NIGHT: Enhances visibility and safety for night driving
- Features 3M abrasive technology and a polishing compound to restore hazy and dull headlight lenses, as well as other plastic lens surfaces on your vehicle
- System is intended to restore two headlight lenses
- Utilizes the muscle power of a common household (1200-1600 rpm) drill to do all the necessary sanding and buffing
- This item is not for sale in Catalina Island
Features:
▼ Read Reddit mentions54. Power Gear 3 Wire Receptacle Tester, Outlet Tester, 6 Visual Indications, Light Indicator, UL Listed, Gray, 50542
- Receptacle Tester – Detect probable improper wiring conditions in standard 110-125 VAC outlets.
- Easy to Use – Simply plug the 3-wire receptacle tester into the outlet and note the light pattern.
- Indicator Lights – Lights indicate if wiring is correct, and indicator light chart is included.
- Chart Provided – Provides 6 probable wiring conditions that are quick and easy to read for ultimate efficiency.
- Safety – ETL Listed for added peace of mind your product is backed by the highest standards of safety and performance.
Features:
▼ Read Reddit mentions55. GTP | Green Tree Products | Balloon Dog - Large - Dog Sculpture | 10"H x 9.5"L x 3"W inches (Gold)
- Material: Resin
- Color: Gold Metallic
- Medium Size: 10 inch x 4 inch x 9.6 inch
- Perfect for home and office decor
- Made in China
Features:
▼ Read Reddit mentions56. LaptopTraveller HP Pavilion DV6413ej Battery Replacement Ultra High Capacity
HP Pavilion DV6413ej Battery Replacement Ultra High Capacity11.1V 8800 mAh Li-ion Battery100% OEM compatible w/ 1 Year Warranty30 Day Money Back GuaranteeSafe with overvoltage, shortcircuit and overcurrent protection
▼ Read Reddit mentions57. Kreg MKJKIT Mini Kreg Jig Kit
Makes pocket Hole joinery work easierNo-fence design makes for easy positioningOne-hole Jig is great for furniture repairs or flooring workIncludes 3/8-inch step drill bit, depth Collar, and Allen wrenchHandy for repair applications and space constricted areas
▼ Read Reddit mentions58. Hydraulic Vehicle Automotive Moving Jack Dolly - HYDRAULIC Car Dolly
- Professional positioning hydraulic jack help to move your car or engine easily
- Features with heavy duty all steel constructions and a quick release foot pump
- Maximum capacity rated at 1,500 lbs, rolls easily in any direction
- Package includes one dolly as shown, purchase 4 to lift and move entire vehicle
Features:
▼ Read Reddit mentions59. PWM Dimming Controller For LED Lights or Ribbon, 12 Volt 8 Amp, 3301
- Knob monotoner is a controller which can realize stepless dimming.
- Using the knob control mode, it is a kind of dimmer which can realize 0-100% pole-free dimming. The user can adjust the light to the appropriate brightness according to the actual needs.
- Used to control all kinds of LED lights, such as LED strip, LED module, LED string, etc.
- Operating temperature: -20-60℃. Output: single channel. Net weight: 51g. Static power consumption: <1W.
- Output power: 12V<96W, 24<192W. Power supply voltage: 12v-24v. Product size: L89*W59*H35 mm.
Features:
▼ Read Reddit mentions60. Blue Sea Systems Mini-BUSBAR 2X10-32 100A W/COVR, with Cover
- 100A Mini BusBar with 5 screws and a cover (part number 2314)
- Max voltage: 300V AC/ 48V DC, Continuous Rating: 100A AC/DC
- Terminal Screws: 5 x #8-32, Terminal Studs: 2 x #10-32
- Reinforced polycarbonate base with tin plated pure electrical copper for maximum conductivity and corrision resistance, cover made with clear polycarbonate
- 2 mounting holes accept #10 (M5) screws
Features:
▼ Read Reddit mentions
You really don't have a lot of choice in order to support a desk that tall, the leg joints will have to be the strongest part of the desk. L Brackets won't work.
You don't need fancy joints, but you do need strong ones and you will need bracing on the legs. You could get a Pocket hole jig like this This allows you to join to panels fairly easy and strong (use glue also).
You could build a desk like this without the drawer only using the pocket joints.
Another really good book to look at is by Bill Hylton. It gives really good examples of the types of joints to use in different projects. Every once in a while you can get a really good deal on a used sander through ebay. I got a good Dewalt sander for $25 and it works great.
Do you know about Lumberjocks? It's a great site for references/advice
I had been wanting to build one of these for about a year and finally got around to it this month. I roughly followed the steps in the book "Build Your Own Earth Oven" by Kiko Denzer, like the other pizza oven fella on here. I'm happy with how it turned out. I haven't cooked in it yet but it holds heat very well (the first small fire I lit went out before I went to bed and the oven was still nice and warm in the morning) and it hasn't shown more than hairline cracks (although it's not a big deal if it does crack). I'll do my best to answer any questions anyone has!
It cost about $150 (US) in total which went on bricks, gravel and lots and lots of sand. The clay, of course, was free.
Resources for doing it yourself:
Build Your Own Earth Oven by Kiko Denzer
Build Your Own $20 Outdoor Cob Oven for Great Bread and Pizza
How to Build a Simple Wood-Fired Cob Oven
Building an Earthen (Cob) Oven
Wood Fired Clay Pizza Oven on Imgur
This stuff looks fun and easy - http://amzn.com/B003QKLJKQ
Super strong moldable plastic pellets.
Heat, mold, and use within minutes. Reheat to remold again and again.
Great for all types of art, hobbies, prototypes, props, modeling, etc.
Create custom grips, mounts, brackets, knobs, dials, and connectors without molds.
12 oz of InstaMorph in a convenient screw top storage jar. Enough for many different projects in a single jar.
As far as the electrical goes, its easy to do but, for the love of God, turn the power off while working on it! Networking your house ain't worth your life!! Watch some YouTube videos on how to wire the the receptacle.
Buy this: http://www.amazon.com/gp/aw/d/B002LZTKIA/ref=mp_s_a_1_1?qid=1451424239&amp;sr=8-1&amp;pi=SY200_QL40&amp;keywords=receptacle+checker&amp;dpPl=1&amp;dpID=51hlg2obNeL&amp;ref=plSrch
After you wire the receptacle, turn the power on, and plug this in. It will show you if you made any mistakes. Just read the instructions.
The hardest part you're going to run into is getting from the crawl space to the attic. Try and find a plumbing drain. Plumbers generally cut the holes way bigger than needed and you can slide in beside them.
Another option is using a fireplace if you have one. The framing around it should be loose enough for you to fish wires down beside it.
The easiest thing you can do is run a PVC pipe on the exterior of the house in an inconspicuous spot and paint it to match your house.
Save yourself a million headaches by pulling a pull string along with your wires for subsequent runs. Twine is cheap.
Feel free to ask me anything else you might be curious about!
Source: am electrician.
Holy shit this is one of the best guides I've ever seen for something like this!
However, what are some good tool alternatives for people who don't normally do something like this? I don't have a pickle pot. Or a tumbler. Or a leather mallet. Or a ring mandrel. Or a buffing wheel.
Leather mallet isn't hard, I have a wooden mallet I can just stick some leather on. But pickle pot? Idk what that even does. Tumpler? Nope. Ring mandrel...eh...I could figure something out. Who knows, maybe they're cheap. Buffing wheel? Big fat nope.
Any ideas? I love the idea. I've worked with metal and soldering before, but that was with model airplanes, so things weren't meant to look pretty, they just had to function properly.
EDIT: Ok, time to answer my own questions.
I've already covered the hammer thing, so we'll skip that.
Boom, ring mandrel.
Boom, DIY pickle pot
BOOM, DIY tumbler thingy
And then you can buy a buffing attachment for a Dremel tool, and you can solder with just a standard propane blow torch. Easy peezy.
Nice job, looks great!
I made one too, but I used one of these to modulate the speed.
the pulse width modulation dimmer is a lot easier on the fan motor and uses less power (and it's dirt cheap). You can rip the insides out of the box, it's a pretty small board inside.
Also, old hard drive magnets are great for stir plates.
Total cost: $31.70
Time: ~30 minutes.
Tools required: Hand drill
Now that it gets dark so damn early, I've been using my headlights a lot more, and I noticed that they weren't as bright as they used to be. So, on the advice of a coworker, I picked up THIS headlight restoration kit from amazon, as well as THIS sealer and THIS masking tape (to protect the paint around the lens). The directions were clear and concise and the whole process took about 30 minutes and was extremely easy. It comes with an attachment for your hand drill to which a variety of sanding/buffing discs mount. You start with a coarse grit sandpaper disc to remove the oxidation and then you use progressively finer grit discs to smooth out the surface. Finally you buff and seal the lens.
I couldn't be happier with the results. The lenses look brand new and there are enough sanding discs left over to do at least one or two more cars.
The best clear finish for wood, bar none, is this stuff: https://www.amazon.com/Epifanes-ECVSA-Clear-Varnish/dp/B005ADWQ9U
Highly recommend. Goes on smooth, and extremely durable. Also great customer support. You can contact the mfg if you have questions about application.
There's no such thing as the "best coffee table", or any other piece of furniture. There are a huge variety of designs in furniture, and all have different preferred or required joinery, tools, hardware, storage, wood species, etc, and that's not even mentioning aesthetics.
If you want to know how furniture is designed, there are many resources available. I don't have a lot of books on design, but one I have that I enjoy is Illustrated Cabinetmaking. It provides 'typical' tables/chests/desks/etc designs, as opposed to specific designs. It explains how to size different parts of certain pieces - how tall a writing desk should be, how wide a dining table should be, etc.
Furniture design isn't copyrighted - you can copy a Maloof chair or a Krenov cabinet as closely to the original as you like, and most of the time the techniques and tools required aren't that difficult to figure out on your own, or from other resources.
Looks like a good walkthrough! Good cheap suggestions.
If you're doing plexiglass, you're going to have to use letter stickers to stay cheap. However, if you use glass, you can use glass etching cream and an overhead transparency stencil to etch letters.
Of course, you'd be certain it'd never break if you used plexiglass, but the etched glass would look way better. . .
I would also suggest using 'glazing tips' (just google 'em) instead of hot glue if you end up using real glass, but TheMadHatter made a good list of suggestions!
Very nice. Also curious why you didn't just use an off the shelf LED strip which is like $30 for a reel of 300. Here's an example from amazon that has the LEDs closer together: https://www.amazon.com/CHINLY-Individually-Addressable-Waterproof-waterproof/dp/B01LSF4Q00/
But any of the WS2812b LED strips will work. There are also multiple different strips that are either enclosed in a silicon tube, or bare strip.
You also could have made the holes closer together on your 2x4 soldering jig so that you wouldn't have to bend the wires. Kinda negates the entire point of the 2x4 soldering jig lol. Hindsight on that i'm sure.
It all depends on what you would like to spend. At the cheapest you could do it for around $500. This would restrict you to SVGA resolution which is 800x600 IIRC.
The breakdown for this would be:
If possible I would invest in a nice mid-range projector like the BenQ W107. It is one of the highest rated projectors in its price range although it is a bit pricy.
EDIT: To answer your questions, I doubt there are any outside safe projectors. Your best bet would be some kind of watertight housing if you are keeping it outside. But if you're investing in a projector you might as well use it inside too and have a 5 meter screen. Screens all depend on the material. You want something that is evenly reflective which makes a big difference in the appearance of the image. The cheapest thing right now that works incredibly well is blackout cloth which is used in window blinds to block out the sun by reflecting it. The cost is so small compared to the difference in image to a white sheet or a board that it is generally recommended.
I guess you could call it DIY, but it was pretty easy. I bought the components from Amazon:
The transformer plugs into the wall and then into the dimmer (I extended the wires using 12v wire I had on hand and butt contectors) then 2 wires out of the dimmer into the strip of lights. The light strip comes with a standard looking DC connector, which I removed and just hard wired it. I also used the entire strip, but it can be cut every two inches at certain points. If you choose to cut the strip, you will need to solder the wires onto the strip. Since I used the entire strip I just used the included wire (after removing the DC connector thing)
To give an example of what I would personally use.
LEDs (I would purchase 2 reels (10m total)
http://www.amazon.com/gp/product/B005ST2I9O/ref=oh_details_o04_s00_i03?ie=UTF8&amp;psc=1#productDetails
Dimmer (2 of these, 1 per reel)
http://www.amazon.com/LEDwholesalers-LED-Strip-Lights-Controller/dp/B003L4KKF2/ref=pd_sim_hi_bsb_12?ie=UTF8&amp;refRID=024VHCH0KYFFJDQAM9QV
powered by this (only need the 1 but you can buy 2 if you'd prefer)
http://www.amazon.com/MEANWELL-HitLights-Listed-Adapter-Warranty/dp/B008K4UKLW/ref=sr_1_51?s=hi&amp;ie=UTF8&amp;qid=1397563708&amp;sr=1-51
Mount as much of the strip(s) as possible on U-channel or similar to minimize heat issues (the U channel will act as heat sink with a bit of "work") sideways outside of the square/rectangle lightbox. This will minimize the 0 0 0 0 0 0 lighting effect.
If you can build the desk enough to test you can see if 1 row around the perimeter will work, or 2 or 4... You can use the dimmer(s) to adjust the brightness as needed.
If you still need/want MORE lighting or want to have a separate smaller section that is always on at 100%, you can put some strips in rows across the "bottom" of the lightbox facing directly up.
I pretty much did this on my magnifier lamp. I have about ~.3 meter of the above linked LEDs running constantly at 100% for basic task lighting and a "night light" and ~2-3meter inside periphery of the reflector. I also used some to replace a picture lamp (it needs to be dropped by 50% though, it is too bright) and I am working on figuring out 2 more "ideas" now.
Rough math is rough but I figure it is approximately a 10% and 100% split. I am not using a dimmer on my setup though so I just try to not stare at the light for too long.
Came here to say cob oven. Sand, clay and straw instead of firebrick and mortar, and the cost in materials including the firebricks for the floor (if you want them - you can use cob for that too), and a tarp for mixing is usually under $50 or so. The biggest downside is having to cover it because there is no concrete in the mix, but I've built a few of them and they get just as hot and make great pizza. You can even let them weather and just build a new one every 5-10 years or so as they break down. I mean, $50.
Some great plans here though probably more than $50. And the authoritative text here.
Yes! A few options...
Hope that helps!
OP delivers!
We had originally considered purchasing a vehicle lift, but they were much more expensive, required a lot of headroom (the garage ceiling is only about 8'4" high), and would have required us to change the garage door tracks and opener to let it clear. This was a much simpler (and cooler) solution.
Many parts were purchase from Amazon, so I provided links so you can take a look.
Parts:
==================
Details:
I had access to the studs and rafters as we removed the drywall to remodel the garage, so I was able to use 2x4s and 2x12s to strengthen the areas where the eye hooks were secured.
I built these pivoting support blocks to keep the axle from taking any of the load. I put carpet on the blocks to keep them from scraping the new garage floor.
I use these dollies to position the trailer to be hooked up to the pivot blocks.
I use the rope hoist to make the raising and lowering of the trailer a one person operation. You need to pull the trailer away from the wall to get it to start lowering and also need to steady it on its way up so it doesn't fall into position too quickly.
I probably would have gone with something like this for the lights.
Or if you really wanted to get fancy, you could go with something like this that comes with a remote and is RGB so you can have any color you want. The RGB ones generally come with an adapter for the power and an IR controller so you can change the color like this. Honestly, I would be really leery about using what I assume are just Christmas lights.
How about the DataVac Metro ED500? It's very popular with IT folk, and it's perfect for your intended usage.
http://www.amazon.com/Metro-Vacuum-ED500-500-Watt-Electric/dp/B001J4ZOAW
Bonus -- it's half the price of the compressor you suggested.
I made this prototype a while back, and it is still working great. Since size is not as much of a factor for you, I would recommend that you move up to 6.5" speakers and a more sturdy enclosure.
Here are the main parts I used:
AMP: Lapai Tripath
Speakers: 4 inch full range speakers I would go larger if you have the room in your project.
Battery power: 10 NiMh rechargeable AA
input: Dash Mount Stereo Jack
Bus bars to try to keep the wiring organized
Nice little flush mount switches i will use on the next version to control the lights power etc:
For fun I also added a 12v charging port, and a USB charging port for my phone.
Carl's Blackout Cloth, DIY Projector Screen, Raw Material/Fabric, 66x110-inch, Matte White, 16:9/1.0
http://www.amazon.com/dp/B007KA07YM/ref=cm_sw_r_an_am_ap_am_us?ie=UTF8 This looks like a promising product. You could roll it like you described and maybe put hooks on the bottom corner to stretch it when you are using it to help keep it smooth.
I bought an arm like this a year ago, it is very solid, perfect for my 24" samsung computer monitor. I have it mounted on the side of my computer desk, similar to the way you are describing you want. At $15, you cant go wrong with it.
This is absolutely not what you asked for, but is AWESOME for this type of stuff. $15 (with prime) and you have a remote control, colors, patterns, and more. I have used multiple kits now for all sorts of stuff!
http://www.amazon.com/SUPERNIGHT-Waterproof-300LEDs-Flexible-Controller/dp/B00B2F3KDQ/ref=sr_1_3?ie=UTF8&amp;qid=1427122039&amp;sr=8-3&amp;keywords=rgb+led
They sell etching cream at most craft stores like Michaels or online. You can use it with decals/stickers the same as you did here. You brush it on, then after set time, wipe off. The acid in the cream permanently "etches" the glass. Much safer for items that need to be food safe.
If I were you, I would use 2 x 12" joist material. Laminate two lengths of the material together such that it becomes a 4 x 12". Then, you will want to have a support as /u/wbgraphic suggests out of the same 4 x 12 material. Since this will be outside (from the sounds of it), you will want to use titebond III and then finish the entire assembly in marine varnish for durability (epifanes http://www.amazon.com/Epifanes-ECVSA-Clear-Varnish/dp/B005ADWQ9U is some hardcore shit). I would also suggest that the entire support structure should be attached not just by lagging to one side of the pole, but via a complete wrap around the pole either with steel cable or some other such structure.
100lbs isn't that much weight, but if you're going to use it as a heavy bag for martial arts, there are quite a few lateral forces to contend with and not just static load. Research how heavy signs are hung from buildings using a boom arm and you'll have a better idea.
It looks really good and professional if you do it correctly.
I use armour etch, and it works great:
http://www.amazon.com/Armour-Etch-15-0200-Cream-10-Ounce/dp/B001BE3UM4/ref=pd_sim_ac_bsb_1?ie=UTF8&amp;refRID=0BY6RFNW7CK3FJY4M772
Others have made some great suggestions. I would add to those lists--
a big can of some high quality lubricant, I like Ballistol for all kinds of cleaning/protecting/lubricating things, but there plenty of other kinds on the market.
Duct tape
Electrical tape
A caulk gun, and a few tubes--plain old "painter's caulk" and a waterproof caulk for windows, doors, and bathroom water infiltration areas. --- and a lesson on how and where to use them.
AND, maybe a nice book, with lots of pictures, for how to do lots of varied home repairs and upgrades, perhaps something like this: Reader's Digest New Complete DIY Manual
Balloon dog. Designed by Jeff Koons (website).
Looks like this is just a remake of the famous work and can be bought pretty easily through Amazon.
Mobile Users: This is pretty photo heavy.
&#x200B;
I've worked on this over the last two and a half weeks in the evenings and on weekends. I've probably got around 50-60 hours in so far.
The project is complete, there are just some other things I'd like to eventually do with the programming for the LEDs.
Tools
Exacto/razor blades
Heatgun - for heat shrink, you can just use a lighter
Soldering Iron
Phillips Screwdriver
Laptop/Computer for programming with Arduino or CircuitPython
Printer - laser or inkjet
&#x200B;
Supplies/Parts
Various Rustoleum Spray paints - $20 total
Multi-Strip - $15
Masking tape and paper - $10-15
Extra razor blades - $5
Printer sticker paper - $15
Electrical Tape - $1
3m double sided foam tape - $4
Heat Shrink - Not sure, maybe $5 new for the assorted kit?
Adafruit Trinket: https://www.adafruit.com/product/3500 - $8
5v 4 amp Power Supply: https://www.adafruit.com/product/1466 - $15
White LED On/Off switch: https://www.adafruit.com/product/917 - $5
White LED Momentary Switch: https://www.adafruit.com/product/558 - $5
DC Power Jack: https://www.adafruit.com/product/373 - $0.95
Small Perma Proto PCB Board: https://www.adafruit.com/product/1608 - $3
50 feet (I used about 15 feet) 4 pin RGB extension wire: https://www.amazon.com/dp/B07GFW6ZB3/ref=pd_luc_rh_sspa_dk_huc_pt_expsub_2?psc=1&spLa=ZW5jcnlwdGVkUXVhbGlmaWVyPUExUlMwQ1ZSRzJSQ0tUJmVuY3J5cHRlZElkPUEwNTQzMzg2M1FSRk9TSUFIMllNMyZlbmNyeXB0ZWRBZElkPUEwMzEzNDU5QlQ3MFBCSTZKRUVDJndpZGdldE5hbWU9c3BfaHVjX21yYWkmYWN0aW9uPWNsaWNrUmVkaXJlY3QmZG9Ob3RMb2dDbGljaz10cnVl - $10
50 pair (lol) JST Connectors: https://www.amazon.com/gp/product/B00NBSH4CA/ref=ppx_yo_dt_b_asin_title_o00_s00?ie=UTF8&psc=1 - $11
16.7 foot reel of addressable LEDs: https://www.amazon.com/gp/product/B01LSF4Q00/ref=ppx_yo_dt_b_asin_title_o03_s00?ie=UTF8&psc=1 - $21
&#x200B;
I think that's all of it, I'll update if I think of anything else.
You need a plastic polishing solution, either a DIY like toothpaste and finer polishing pastes, or an off the shelf deal like a headlight restoration kit
I also strongly recommend a receptacle tester. Good for quick checks like OP is talking about. It also indicates any wiring faults.
Projector amazon: optima hd142x $589,https://www.amazon.com/Optoma-HD142X-1080p-Theater-Projector/dp/B01HQCF6R6/ref=sr_1_1?ie=UTF8&amp;qid=1474033012&amp;sr=8-1&amp;keywords=optima+hd142x
screen amazon: Carl's blackout cloth $35 built frame from 1x4s $20, 4 inch felt tape $10 https://www.amazon.com/Carls-Blackout-Projector-Projection-66x110-inch/dp/B007KA07YM/ref=sr_1_1?ie=UTF8&amp;qid=1474033098&amp;sr=8-1&amp;keywords=carls+blackout+cloth
Sound amazon: Onkyo 5.1 reciever and speakers $369 https://www.amazon.com/Onkyo-HT-S3700-5-1-Channel-Theater-Receiver/dp/B00LU0GPAI/ref=sr_1_3?s=hpc&amp;ie=UTF8&amp;qid=1474032983&amp;sr=8-3&amp;keywords=onkyo
Tv stand walmart: $65 https://www.walmart.com/ip/Mainstays-TV-Stand-for-Flat-Screen-TVs-up-to-42/16451703
Side tables walmart $20 https://www.walmart.com/ip/Mainstays-End-Table-Black-Oak-Finish/17126588
Installed outlet and ran cables: $30
Lumber and carpet for riser lowes: $100
Recliners amazon: $299 each https://www.amazon.com/Best-Choice-Products-Ergonomic-Executive/dp/B0187VV2F0/ref=sr_1_fkmr0_1_a_it?ie=UTF8&amp;qid=1474033061&amp;sr=8-1-fkmr0&amp;keywords=best+choice+products+massage+recliner
I bought a special tool called a pocket hole jig which essentially drills a diagonal hole into the wood that hides the screw. I had never heard of it until this project, but it's pretty handy.
http://www.amazon.com/Kreg-MKJKIT-Mini-Jig-Kit/dp/B00065WPP2/ref=sr_1_2?ie=UTF8&amp;qid=1375465882&amp;sr=8-2&amp;keywords=pocket+hole+jig
So far I've ordered these:
https://www.amazon.co.uk/gp/product/B002E2QM6S/ : Multi-purpose lithium grease
https://www.amazon.co.uk/gp/product/B00DVHAAV8/ : Medium thread lock
https://www.amazon.co.uk/gp/product/B0198CEGC8/ : Strong thread lock
I'll most likely use the medium thread lock in this case, as recommended!
This
http://www.amazon.com/Metro-Vacuum-ED500-500-Watt-Electric/dp/B001J4ZOAW/ref=sr_1_1?s=hpc&amp;ie=UTF8&amp;qid=1412294826&amp;sr=1-1&amp;keywords=Data+vac
Is the real pro tip. So much better and cheaper in the long run. Powerful, doesn't freeze your hand if you use it too long and you can turn it upside down without shooting out harmful chemicals.
I would stain first, and then use a high quality spar varnish like Epifanes to seal, waterproof, and UV protect the final product.
http://www.amazon.com/Complete-Do-It-Yourself-Manual-Editors-Readers/dp/0895773783/ref=sr_1_1?ie=UTF8&amp;qid=1381952190&amp;sr=8-1&amp;keywords=diy+readers+digest
This one is great.
I bought this mandrel on amazon and have been using it to shape coin rings. A bit cheaper and free shipping (prime).
I bought [this one] (http://www.amazon.com/VideoSecu-Articulating-Bracket-Screen-Monitor/dp/B000ID7QNI/) and I've been very happy with it.
Sugru, while very useful, wouldn't be ideal in this application because it is too rubbery.
I'd go with a moldable plastic like instamorph.
Well thank you for the suggestion. I went into Home Depot today, and of coarse they didn't have anything close to what I wanted, besides just buying a full wall mount. So I went with your suggestion and tried Amazon. The one you linked has several bad reviews, so I did some more digging and found this one for $15. What I am going to do then is just screw my screen to a wood piece, then screw that the bracket (because the screws don't line up on my LCD and the screw holes on the bracket, so gotta improvise.)
Thanks for your help!
BTW cheapest wall mount was $50 @ Home Depot...
This one has dimming options, but it's all through the IR remote, and I'd like to build something physical.
I think it's this one: http://www.amazon.com/SUPERNIGHT-Waterproof-300LEDs-Flexible-Controller/dp/B00B2F3KDQ/ref=sr_1_1?ie=UTF8&amp;qid=1408906058&amp;sr=8-1&amp;keywords=supernight+RGB+LED+light+strip
If you are able to make it by hand, then InstaMorph (or a similar product) might be an option.
http://www.amazon.com/InstaMorph-Moldable-Plastic-12-oz/dp/B003QKLJKQ
Pro-Protip: Metro Datavac.
http://www.amazon.com/Metro-Vacuum-ED500-500-Watt-Electric/dp/B001J4ZOAW
Seriously, this thing is amazing.
Someone gave me this book when I bought my first house. It was very helpful.
I am not sure if the meteorite is too brittle but if you try again you could use a similar sized meteorite by making the ring a different way.
Drill a hole just big enough to fit the meteorite onto a ring mandrel and then hammer around the outside edge to enlarge the hole.
This lets you keep more material so you avoid ending with a thin section.
If you used a brass hammer you might even be able to keep some edge geometry.
This is not my ring if that wasnt clear.
I believe they are made by drilling out the center and then slowly hammering it down a ring mandrel. I lost interest before I ever bought the steel mandrel lol.
I recommend a book called Illustrated Cabinetmaking
Covers this exact question, and a whole bunch of other stuff.
The Amazon preview doesn't do it justice. The first section of the book is all about the theory of crafting with wood, compensating for the way wood expands and contracts, and using specific joints to account for it.
could possibly buy the wheel dolleys that are hydraulic? Something like these
Could do it on the side away from the wall leaving other side on dolleys?
I agree with this. Ended up wall mounting my 3 24"s
I used these: VESA mounts @ $14 each.
There's two 3M kits. The $14 3M Headlight Lens Restoration System and the $16 3M Lens Renewal Kit. Looks like the more expensive kit is a 4-step process rather than 3-step and you get maybe some different pads and some masking tape.
Buy one of these. Way better than that canned air crap.
http://www.amazon.com/Metro-Vacuum-ED500-500-Watt-Electric/dp/B001J4ZOAW/ref=sr_1_10?ie=UTF8&amp;qid=1412294286&amp;sr=8-10&amp;keywords=air+duster
You'll thank me.
edit: whoever downvoted me... Dude, you have to get one. They're so crazy good.
Any hardware store carries something like this for $10 or less. https://www.amazon.com/Power-Gear-50542-3-Wire-Receptacle/dp/B002LZTKIA
You might like this book; Build You Own Earth Oven
It's polyester pellets with a low melting point
There are similar products like this that are available worldwide:
InstaMorph LINK
as well as
ShapeLock LINK
My girlfriend bought it from a local store, but someone posted a link to one on Amazon that looks very similar: https://www.amazon.com/GTP-Green-Tree-Products-Balloon/dp/B00YHX7FU4/ref=pd_bxgy_201_img_2?_encoding=UTF8&pd_rd_i=B00YHX7FU4&pd_rd_r=3af0fcd0-f24f-11e8-acef-0dacba850be4&pd_rd_w=FFGcq&pd_rd_wg=EzoGM&pf_rd_i=desktop-dp-sims&pf_rd_m=ATVPDKIKX0DER&pf_rd_p=6725dbd6-9917-451d-beba-16af7874e407&pf_rd_r=V482QQD6TJ5GXFN9ZD6D&pf_rd_s=desktop-dp-sims&pf_rd_t=40701&psc=1&refRID=V482QQD6TJ5GXFN9ZD6D
I would avoid those plates, they never seem to hold things tight enough, and they leave sharp corners everywhere, but if you insist on using them get some flat head (that refers to the shape of the head, not what kind of screw driver you use) or oval head screws.
There are a couple of ways I would approach this, depending on how you want it to look at the end. If you don't mind some screw heads in the top, attach a piece of lumber crosswise underneath, like picnic tables are built. Glue everywhere wood touches wood, and screw down through the top into the crosspieces. Depending on the tools you have available you can do anything you want with the crosspiece, angle the ends, round the corners, its up to you.
If screws in the top is a concern, then I would recommend a biscuit joiner. They're not the cheapest tool in the world, and they aren't a tool you'll use every day, but nothing beats them when you want to join two pieces of wood without visible fasteners.
If that's too much money you could consider a pocket hole jig, some woodworkers swear by them, some swear at them, personally I'm not a huge fan but they are cheap and if you glue the joints too it should work fine for your job.
Whatever you choose, get a sanding block and be prepared to sand those joints smooth. Some methods (biscuits) will make smoother joints than others, but they still need sanding to remove the tiny bump that will inevitably remain between the boards.
Edit Oh also, for clamping (which will only really be required if you do the biscuits), tremendous pressure is not required unless you are trying to straighten one of the boards when you clamp it. Put some cardboard or plywood on the edges to protect your tabletop, tie a rope around it loosely, then use a stick to twist the tied rope and put pressure on the joints. Leave the stick in and put something heavy against it to keep it from un-twisting. You'll probably want several of these for the length of your table.
The green screw is irrelevant unless the ground wire is connected. You have to figure out which is which.
An outlet tester will help; connect each wire
https://www.amazon.com/dp/B002LZTKIA
That is a full brick oven. and a very nice one. Mine is clay. There are tons more to see @ http://ukwoodfiredovenforum.proboards.com/ or http://www.fornobravo.com/forum/
but I followed the technique in this book "Kiko Denzer - Build Your Own Earth Oven" http://www.amazon.co.uk/dp/096798467X/?tag=googhydr-21&amp;hvadid=6229408160&amp;hvpos=1t1&amp;hvexid=523520&amp;hvnetw=g&amp;hvrand=643651100990024808&amp;hvpone=&amp;hvptwo=&amp;hvqmt=b&amp;hvdev=c&amp;ref=pd_sl_rq5ew2bfc_b
Agreed, but you'd at least one this guy it comes with the proper bit.
If he was planning on making more than one I'd suggest the full jig, it makes things a lot easier and you don't have to measure every time to get the proper depth... well worth the hundred bucks IMO
hell, with the 40 brackets he used he probably could have paid for the jig and screws...
Try a headlight cleaning kit.
https://www.amazon.com/3M-39008-Headlight-Restoration-System/dp/B001AIZ5HY
OR Meguiars plastic cleaner and polish
https://www.amazon.com/Meguiars-10-Plastic-Polish-Cleaner/dp/B0002VAZ34
it doesn't bother me at all while playing, but if they do its a 1 button press to turn them off -- which i do when i watch shows/movies.
My LED Lights Here
I am not an electrician, nor am I experienced with home wiring.
You can buy a tester for your outlets. That said, it would probably be more prudent to get an electrician in. You're going to need to call one anyway.
Anyway, the 120V/240V/0V thing refers to the split-phase power delivery system common in North America. In this system you have two hot wires, instead of just one. One of those hot wires is the inverse voltage of the other (so if we say that ground is 0V, then when the first hot wire is at 120V, the other hot wire is at -120V). If you connect ground to hot, you get a certain voltage (120V). If you connect the first hot to the second hot, you get double that voltage (240V).
As to what is happening in your case, I've no idea. In a proper wiring setup, the ground wire (and thus all things connected to the ground wire, like the case of an appliance, your junction boxes, etc.) are directly attached to a big metal thing stuck deep in the earth.
The "New Complete Do-It-Yourself Manual" for Reader's Digest. Indispensable...
https://www.amazon.com/dp/B001J4ZOAW/ref=cm_sw_r_cp_api_3TjrybTDF87S2
I've been eyeing this, but can't decide if I'd have enough uses...
An earth oven seems more approachable than a brick one to me. Then again, I've been saying for nine years or so that I'm going to build one and still haven't made it happen...Kiko Denzer's earth oven book
Use this: https://www.amazon.com/dp/B00B2F3KDQ/ and this: https://www.amazon.com/SUPERNIGHT-TM-100V-Switching-Adapter/dp/B008FKDK2M
Get a pocket hole jig and you'll get the same thing without having to buy brackets.
Kreg MKJKIT Mini Kreg Jig Kit https://www.amazon.com/dp/B00065WPP2/ref=cm_sw_r_cp_api_i_8ZSHDbRY2XENK
Kreg MKJKIT Mini Kreg Jig Kit https://www.amazon.com/dp/B00065WPP2/ref=cm_sw_r_cp_api_i_RBZ4Cb55MTRYJ
https://youtu.be/zxMqtmoOVbY
Obviously drill the holes on the inside facing edge
> http://www.bhphotovideo.com/c/product/259157-REG/Giottos_AA1900_Rocket_Air_Blower.html
Now why use that when there's this:
http://www.amazon.com/Metro-Vacuum-ED500-500-Watt-Electric/dp/B001J4ZOAW/ref=sr_1_1?ie=UTF8&amp;qid=1412301341&amp;sr=8-1&amp;keywords=computer+blower
3M Headlight Restoration kit and a house hold drill. https://www.amazon.com/3M-39008-Headlight-Restoration-System/dp/B001AIZ5HY/ref=sr_1_3?ie=UTF8&amp;qid=1482253881&amp;sr=8-3&amp;keywords=3m+headlight+restoration+kit
I used the 3M kit for my 2005 Civic. I paid 13 and some change for it
http://www.amazon.com/gp/product/B001AIZ5HY?psc=1&amp;redirect=true&amp;ref_=oh_aui_search_detailpage
http://www.amazon.com/InstaMorph-Moldable-Plastic-12-oz/dp/B003QKLJKQ
The etching cream I used was this (it comes in other sizes, and it can also be used on glassware/that is its primary purpose), and here is the link to the slate tiles (only $3 home shipping in the U.S. if it's not available at your local store!)
Not sure if this will help solve your particular problem, but I personally plug one of these: http://www.amazon.com/o/ASIN/B002LZTKIA/?tag=dp-us-20
in after every receptacle install.
I actually did something similar for a Christmas gift. Except I used glassware and this stuff etching cream. Didn't come out too terribly, just took a little patience.
Use this stuff.
You can cut it every 4 inches and use wires to reconnect them again.
So you drill 1/4" in. holes to feed wire through, and run it to wherever you hide the power box. I stuck mine in the cabinet above the microwave.
I made a little switch enclosure box that sits flush with the bottom lip of the cabinet.
I used one of their fader units so that I could dim the lights.