Best products from r/composting
We found 40 comments on r/composting discussing the most recommended products. We ran sentiment analysis on each of these comments to determine how redditors feel about different products. We found 52 products and ranked them based on the amount of positive reactions they received. Here are the top 20.
1. AmazonBasics 24-Sheet Cross-Cut Paper, CD and Credit Card Home Office Shredder with Pullout Basket
- Cross-cut paper shredder with 24-sheet capacity; destroys credit cards, CDs, and DVDs (one at a time)
- Shreds paper into strips measuring 7/32 by 1-27/32 inches
- LED indicators: Standby, Overheat, Overload and Door open
- 25 minute continuous run time with 60 minute cool down time; Auto start and auto reverse to clear paper jams
- Measures 26.2 by 16.3 by 11.9 inches; 7-gallon pullout bin; thermal protection with auto shut-off; Backed by an Amazon Basics 1-year Limited Warranty
Features:
 ▼ Read Reddit mentions
2. FCMP Outdoor IM4000 Tumbling Composter, 37 gallon, Black
- Tumbling composter – avoid digging and mixing your compost pile by hand. The tumbling design makes mixing easy and efficient. Just close the door and turn it 5-6 times every 2-3 days. In hot sunny conditions and with a proper balance of ingredients the compost can finish in as little as 2 weeks.
- Easy to use – fantastic for beginners! The large openings and removable door make it easy to add Scraps/clippings and remove finished compost. Deep Fins on the body provide great ergonomic handholds.
- Two composter chambers are better than one – two separate sides allow the first side to finish while leaving the second side Available to add fresh Scraps/clippings. Continuously swapping sides after finishing will create an uninterrupted flow of rich, healthy compost. Total capacity 37 gallons (5 cu Ft)
- Durable construction – BPA free, UV inhibited, 100% post-consumer recycled polypropylene is contact safe and will not degrade under direct sunlight. The galvanized steel frame is corrosion resistant.
Features:
 ▼ Read Reddit mentions
3. Redmon Since 1883 8000 Compost Bin, Full, Black
Convenient snap on lidFour access doors and top snap on lid to retrieve composted material (access doors 13" Width x 8" Height)Easy to assemble (instructions included - NO tools required)Heavy duty constructionMade of UV stabilized material (post consumer PP) for long lasting all weather durabilityM...
 ▼ Read Reddit mentions
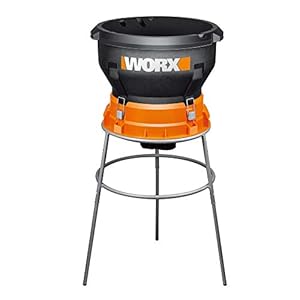
4. WORX WG430 13 Amp Foldable Bladeless Electric Leaf Mulcher, Red
- [53 GALLONS/MIN] That’s right, the 13.0 Amp motor mulches up to 53 Gallons of leaves per minute
- [RIGHT INTO THE BAG] Disposes of leaves and debris into a bag you can attach beneath (bag not included)
- [11:1 MULCH RATIO] That’s 11 bags chopped down into 1, all due to the innovative blade-less Flex-a-Line mulching system
- [STURDY YET PORTABLE] At 20 lbs., this tool is substantial and stays in place during use, but isn’t so heavy that you can’t move it around the yard easily
- [DO IT YOURSELF. DO IT BETTER. DO IT WITH WORX.] WORX tools are engineered with cutting-edge technology, and above modern efficiency standards, so you can build a cost-effective tool collection that’s been designed to last
- [EASY ASSEMBLY] Putting it together is a snap and requires no tools. And it’s designed that way so you can just as easily disassemble it for storage
- [INCLUDES] 13 Amp Leaf Mulcher, Cutting Line, Bag Support Ring
Features:
 ▼ Read Reddit mentions
5. Weston Apple and Fruit Crusher (05-0201), Cast Iron Construction, Stainless Steel Chute & Crushing Blades
- Essential for prepping apples, pears, peaches, pineapples and other hard fruits in the Weston Fruit & Wine Press
- Simply place the crusher above the press, load it with fruit, and spin the handle to drop a perfect pulp into the Wine Press prior to pressing
- Easy to turn handle makes crushing large quantities of fruit quick and easy
- Heavy-duty cast iron construction
- Stainless steel chute and hardware
- Wood drum with stainless steel crushing blades
- Horizontal table mount or vertical wall corner mount options available
- Includes wood mounting base (10” x 17.5” x 0.8”) and two c-clamps for table mounting
- Wooden hopper available for easy loading
- This heavy duty tool works well for making as little as 5 gallons or as many as 50 gallons of juice for wine & cider
- Easy to turn handle makes crushing large quantities of fruit quick an easy
- Horizontal table mount or vertical corner wall mount options available
- Heavy-duty cast iron construction
- Stainless Steel chute and hardware
- Includes wood mounting base (10 inch x 17.5 inch x 1 inch)
Features:
 ▼ Read Reddit mentions
6. Hoss Single Wheel Hoe
- THE ULTIMATE GARDENING TOOL - Keep your garden weed-free with shallow cultivation that doesn't harm soil structure.
- EASY TO USE FOR PEOPLE OF ALL AGES - Has an low center of gravity that provides a smooth and easy operating experience.
- UNIVERSAL TOOLBAR FOR A WIDE VARIETY OF ATTACHMENTS - Easily attach different implements for other gardening tasks.
- BUILT TO LAST A LIFETIME - Adjustable, hardwood handles and a powder-coated steel frame.
- MADE IN THE USA - Includes set of 3 cultivator teeth.
Features:
 ▼ Read Reddit mentions
7. Jora Composter Tumbler JK270
- Time Saver - This tumbler composter is constructed for ease of use and simplicity of rotation. The Jora Composter acts as a compost turner which is simply turned by hand whenever waste is put in. The compost bin outdoor tumbler is divided into two chambers. While one compost container is being filled, the compost in the other chamber matures.
- Incredibly Well Built - Unlike most outdoor composting bins it is the stable, food grade non-toxic insulation in the Jora backyard composter which allows the temperatures to rise up to higher than 160 degrees F, resulting in quick and efficient composting.
- High Volume - The JK 270 is a large compost bin with a volume of up to 70 gallons and a capacity of 7-8 gallons a week. Keep our composter outdoor bin in a convenient place outside where you can easily dispose of waste in an efficient, environmentally friendly manner.
- Allows Air Into Mixture - The Jora Composter is one of the few compost bins that has side vents allowing a flow of oxygen into the compost bin. The side vents of the compost barrel, along with kitchen waste (green) and a carbon source (brown), will result in a successful compost.
- Attractive Design - Having compost bins outdoor is easy and convenient, and the Jora Composter was designed to bring that convenience to our customers. This compost machine is made from galvanized steel to be more durable, longer-lasting, and attractive in your backyard.
Features:
 ▼ Read Reddit mentions
8. The Rodale Book of Composting: Easy Methods for Every Gardener
- Used Book in Good Condition
Features:
 ▼ Read Reddit mentions
9. Worm Factory DS3GT 3-Tray Worm Composter, Green
- Made with post-consumer recycled plastic, Dimensions 16-inch x 16-inch x 13-inch.
- Built in "worm tea" collector tray and spigot for easy draining.
- Odor Free Operation, Year Round Production.
- Digital DVD, Manual, and Warranty included after product registration.
- Expandable up to 7 trays.
Features:
 ▼ Read Reddit mentions
10. Jobe's Organics Compost Starter, 4 lb
- Organic compost starter with Biozome; Speeds up the composting process; Ideal for compost piles
- OMRI listed for organic gardening by USDA;
- Jobe’s Biozome.the proprietary microorganism archaea that aggressively breaks down organic material for faster results
- Jobe’s Biozome improves soil conditions, and drought during the growing season
- Easy pour bag; Guaranteed fertilizer analysis: (4-4-2) 4 pound bag; Apply every 4 to 6 weeks
Features:
 ▼ Read Reddit mentions
11. Bosmere Compost Aerator, 36"
Compost aerator for activating the compost heap at all different levels thus assisting decompositionMade of non rust steel with a vinyl hand gripIt has two sets of activating wings which fold to push into the compost and open out to aerateHandle can be adjusted for left-handed or right-handed useMea...
 ▼ Read Reddit mentions
13. Royal 112MX 12-Sheet Cross Cut Shredder,Black
- Royal Machines CX112X, 12-Sheet Cross Cut Shredder Shreds CD's with Console (Black)
- 12-sheet capacity cross-cut with Auto Start/Stop
- Shreds 12 sheets in a single pass. Accepts staples, credit cards & cd's
- 5/32 inch by 1 5/8 inch cross cut shreds and shreds CD's and credit cards
- 9 inch paper entry slot
Features:
 ▼ Read Reddit mentions
14. OXO Good Grips Easy-Clean Compost Bin, 0.75 GAL/2.83 L (NEWER MODEL AVAILABLE)
Convenient size and design for everyday counter-top useLid flips up for easy filling and flips down to lock in odorsSmooth interior walls prevent foods and liquids from building upContoured bottom and removable lid makes emptying simpleRotating handle for easy transport of waste to outdoor composter...
 ▼ Read Reddit mentions
15. Snapware Airtight 23-Cup Rectangular Food Storage Container with Fliptop Lid
- Snapware Airtight 23-Cup Rectangular Food Storage Container with Fliptop Lid is perfect for storing prepared foods and keeping them fresh.
- Airtight, leak-proof lids with 4 locking tabs opens and shuts easily. Remove and wash each gasket before use to optimize seal.
- Oversized handle makes the container easy to transport to tailgate parties, picnics, and more.
- BPA-free polypropylene container and lid are microwave, freezer, and dishwasher (lid top-rack only) safe.
- Snapware plastic products come with a limited lifetime warranty against manufacturer defect.
Features:
 ▼ Read Reddit mentions
16. Let It Rot!: The Gardener's Guide to Composting (Third Edition) (Storey's Down-To-Earth Guides)
Used Book in Good Condition
 ▼ Read Reddit mentions
17. Compost Bin by GEOBIN - 216 Gallon, Expandable, Easy Assembly
Large capacity—expandable to 4 feet (216 gallon)Easy to assemble with closure keys. Easy to move. Easy to reassemble.Made from 50% recycled plastic content.The best value composting bin on the market.Excellent ventilation.
 ▼ Read Reddit mentions
18. Compost Bin with 7 FREE Charcoal Filters by Silky Road | 1.3-Gallon / 5-Liter | Vintage Cream Powder-Coated Carbon Steel | Kitchen Pail with Lid, Trash Keeper Container Bucket, Recycling Caddy
BEAUTIFUL AESTHETIC: Do you love composting and want your kitchen to look good while doing it? Then look no further! This stylish, rustic, vintage cream-colored composter will look awesome in your home, countertop, office or anywhere! Any guests, friends or family will be sure to compliment you on t...
 ▼ Read Reddit mentions
19. Oasis Biocompatible Dishwash/All-Purpose
- Handcrafted in solid furniture grade beech hardwood with elegant finish.
- 98% UV Ultra Clear Protected Acrylic Door - Lockable Latches
- Pinnable Black Felt Background / Matching Wood Hanger Included
- Fully Assembled With All Mounting Included.
- Outside Dimensions: 31.5" x 23.5" x 2"
Features:
 ▼ Read Reddit mentions
20. AeroPress Coffee and Espresso Maker - Quickly Makes Delicious Coffee Without Bitterness - 1 to 3 Cups Per Pressing
- Popular with coffee enthusiasts worldwide, the patented AeroPress Original is a new kind of coffee press that uses a rapid, total immersion brewing process to make smooth, delicious, full flavored coffee without bitterness and with low acidity.
- Good-bye French Press! The rapid brewing AeroPress Original avoids the bitterness and high acidity created by the long steep time required by the French press. Plus, the AeroPress paper Micro-filter eliminates grit and means clean up takes seconds.
- Versatile: Easily makes 1 to 3 cups of American coffee per pressing in about a minute. Unlike a French press, it can also make cold brew (in just two minutes!) or espresso style coffee for use in lattes, cappuccinos and other espresso based drinks.
- Perfect for home kitchen use, the AeroPress Original is lightweight, compact, portable and durable, making it also ideal for traveling, camping, backpacking, boating and more!
- Includes the AeroPress press, funnel, scoop, stirrer, 350 paper mMicro-filters and a filter holder. Phthalate free and BPA free. Mug not included. Assembled measurements: 9 1/2" h X 4" w X 4" d
Features:
 ▼ Read Reddit mentions
Top comments mentioning products on r/composting:
Summary
1. AmazonBasics 24-Sheet Cross-Cut Paper, CD and Credit Card Home Office Shredder with Pullout Basket
- Cross-cut paper shredder with 24-sheet capacity; destroys credit cards, CDs, and DVDs (one at a time)
- Shreds paper into strips measuring 7/32 by 1-27/32 inches
- LED indicators: Standby, Overheat, Overload and Door open
- 25 minute continuous run time with 60 minute cool down time; Auto start and auto reverse to clear paper jams
- Measures 26.2 by 16.3 by 11.9 inches; 7-gallon pullout bin; thermal protection with auto shut-off; Backed by an Amazon Basics 1-year Limited Warranty
Features:
▼ Read Reddit mentions2. FCMP Outdoor IM4000 Tumbling Composter, 37 gallon, Black
- Tumbling composter – avoid digging and mixing your compost pile by hand. The tumbling design makes mixing easy and efficient. Just close the door and turn it 5-6 times every 2-3 days. In hot sunny conditions and with a proper balance of ingredients the compost can finish in as little as 2 weeks.
- Easy to use – fantastic for beginners! The large openings and removable door make it easy to add Scraps/clippings and remove finished compost. Deep Fins on the body provide great ergonomic handholds.
- Two composter chambers are better than one – two separate sides allow the first side to finish while leaving the second side Available to add fresh Scraps/clippings. Continuously swapping sides after finishing will create an uninterrupted flow of rich, healthy compost. Total capacity 37 gallons (5 cu Ft)
- Durable construction – BPA free, UV inhibited, 100% post-consumer recycled polypropylene is contact safe and will not degrade under direct sunlight. The galvanized steel frame is corrosion resistant.
Features:
▼ Read Reddit mentions3. Redmon Since 1883 8000 Compost Bin, Full, Black
Convenient snap on lidFour access doors and top snap on lid to retrieve composted material (access doors 13" Width x 8" Height)Easy to assemble (instructions included - NO tools required)Heavy duty constructionMade of UV stabilized material (post consumer PP) for long lasting all weather durabilityM...
▼ Read Reddit mentions4. WORX WG430 13 Amp Foldable Bladeless Electric Leaf Mulcher, Red
- [53 GALLONS/MIN] That’s right, the 13.0 Amp motor mulches up to 53 Gallons of leaves per minute
- [RIGHT INTO THE BAG] Disposes of leaves and debris into a bag you can attach beneath (bag not included)
- [11:1 MULCH RATIO] That’s 11 bags chopped down into 1, all due to the innovative blade-less Flex-a-Line mulching system
- [STURDY YET PORTABLE] At 20 lbs., this tool is substantial and stays in place during use, but isn’t so heavy that you can’t move it around the yard easily
- [DO IT YOURSELF. DO IT BETTER. DO IT WITH WORX.] WORX tools are engineered with cutting-edge technology, and above modern efficiency standards, so you can build a cost-effective tool collection that’s been designed to last
- [EASY ASSEMBLY] Putting it together is a snap and requires no tools. And it’s designed that way so you can just as easily disassemble it for storage
- [INCLUDES] 13 Amp Leaf Mulcher, Cutting Line, Bag Support Ring
Features:
▼ Read Reddit mentions5. Weston Apple and Fruit Crusher (05-0201), Cast Iron Construction, Stainless Steel Chute & Crushing Blades
- Essential for prepping apples, pears, peaches, pineapples and other hard fruits in the Weston Fruit & Wine Press
- Simply place the crusher above the press, load it with fruit, and spin the handle to drop a perfect pulp into the Wine Press prior to pressing
- Easy to turn handle makes crushing large quantities of fruit quick and easy
- Heavy-duty cast iron construction
- Stainless steel chute and hardware
- Wood drum with stainless steel crushing blades
- Horizontal table mount or vertical wall corner mount options available
- Includes wood mounting base (10” x 17.5” x 0.8”) and two c-clamps for table mounting
- Wooden hopper available for easy loading
- This heavy duty tool works well for making as little as 5 gallons or as many as 50 gallons of juice for wine & cider
- Easy to turn handle makes crushing large quantities of fruit quick an easy
- Horizontal table mount or vertical corner wall mount options available
- Heavy-duty cast iron construction
- Stainless Steel chute and hardware
- Includes wood mounting base (10 inch x 17.5 inch x 1 inch)
Features:
▼ Read Reddit mentions6. Hoss Single Wheel Hoe
- THE ULTIMATE GARDENING TOOL - Keep your garden weed-free with shallow cultivation that doesn't harm soil structure.
- EASY TO USE FOR PEOPLE OF ALL AGES - Has an low center of gravity that provides a smooth and easy operating experience.
- UNIVERSAL TOOLBAR FOR A WIDE VARIETY OF ATTACHMENTS - Easily attach different implements for other gardening tasks.
- BUILT TO LAST A LIFETIME - Adjustable, hardwood handles and a powder-coated steel frame.
- MADE IN THE USA - Includes set of 3 cultivator teeth.
Features:
▼ Read Reddit mentions7. Jora Composter Tumbler JK270
- Time Saver - This tumbler composter is constructed for ease of use and simplicity of rotation. The Jora Composter acts as a compost turner which is simply turned by hand whenever waste is put in. The compost bin outdoor tumbler is divided into two chambers. While one compost container is being filled, the compost in the other chamber matures.
- Incredibly Well Built - Unlike most outdoor composting bins it is the stable, food grade non-toxic insulation in the Jora backyard composter which allows the temperatures to rise up to higher than 160 degrees F, resulting in quick and efficient composting.
- High Volume - The JK 270 is a large compost bin with a volume of up to 70 gallons and a capacity of 7-8 gallons a week. Keep our composter outdoor bin in a convenient place outside where you can easily dispose of waste in an efficient, environmentally friendly manner.
- Allows Air Into Mixture - The Jora Composter is one of the few compost bins that has side vents allowing a flow of oxygen into the compost bin. The side vents of the compost barrel, along with kitchen waste (green) and a carbon source (brown), will result in a successful compost.
- Attractive Design - Having compost bins outdoor is easy and convenient, and the Jora Composter was designed to bring that convenience to our customers. This compost machine is made from galvanized steel to be more durable, longer-lasting, and attractive in your backyard.
Features:
▼ Read Reddit mentions8. The Rodale Book of Composting: Easy Methods for Every Gardener
- Used Book in Good Condition
Features:
▼ Read Reddit mentions9. Worm Factory DS3GT 3-Tray Worm Composter, Green
- Made with post-consumer recycled plastic, Dimensions 16-inch x 16-inch x 13-inch.
- Built in "worm tea" collector tray and spigot for easy draining.
- Odor Free Operation, Year Round Production.
- Digital DVD, Manual, and Warranty included after product registration.
- Expandable up to 7 trays.
Features:
▼ Read Reddit mentions10. Jobe's Organics Compost Starter, 4 lb
- Organic compost starter with Biozome; Speeds up the composting process; Ideal for compost piles
- OMRI listed for organic gardening by USDA;
- Jobe’s Biozome.the proprietary microorganism archaea that aggressively breaks down organic material for faster results
- Jobe’s Biozome improves soil conditions, and drought during the growing season
- Easy pour bag; Guaranteed fertilizer analysis: (4-4-2) 4 pound bag; Apply every 4 to 6 weeks
Features:
▼ Read Reddit mentions11. Bosmere Compost Aerator, 36"
Compost aerator for activating the compost heap at all different levels thus assisting decompositionMade of non rust steel with a vinyl hand gripIt has two sets of activating wings which fold to push into the compost and open out to aerateHandle can be adjusted for left-handed or right-handed useMea...
▼ Read Reddit mentions13. Royal 112MX 12-Sheet Cross Cut Shredder,Black
- Royal Machines CX112X, 12-Sheet Cross Cut Shredder Shreds CD's with Console (Black)
- 12-sheet capacity cross-cut with Auto Start/Stop
- Shreds 12 sheets in a single pass. Accepts staples, credit cards & cd's
- 5/32 inch by 1 5/8 inch cross cut shreds and shreds CD's and credit cards
- 9 inch paper entry slot
Features:
▼ Read Reddit mentions14. OXO Good Grips Easy-Clean Compost Bin, 0.75 GAL/2.83 L (NEWER MODEL AVAILABLE)
Convenient size and design for everyday counter-top useLid flips up for easy filling and flips down to lock in odorsSmooth interior walls prevent foods and liquids from building upContoured bottom and removable lid makes emptying simpleRotating handle for easy transport of waste to outdoor composter...
▼ Read Reddit mentions15. Snapware Airtight 23-Cup Rectangular Food Storage Container with Fliptop Lid
- Snapware Airtight 23-Cup Rectangular Food Storage Container with Fliptop Lid is perfect for storing prepared foods and keeping them fresh.
- Airtight, leak-proof lids with 4 locking tabs opens and shuts easily. Remove and wash each gasket before use to optimize seal.
- Oversized handle makes the container easy to transport to tailgate parties, picnics, and more.
- BPA-free polypropylene container and lid are microwave, freezer, and dishwasher (lid top-rack only) safe.
- Snapware plastic products come with a limited lifetime warranty against manufacturer defect.
Features:
▼ Read Reddit mentions16. Let It Rot!: The Gardener's Guide to Composting (Third Edition) (Storey's Down-To-Earth Guides)
Used Book in Good Condition
▼ Read Reddit mentions17. Compost Bin by GEOBIN - 216 Gallon, Expandable, Easy Assembly
Large capacity—expandable to 4 feet (216 gallon)Easy to assemble with closure keys. Easy to move. Easy to reassemble.Made from 50% recycled plastic content.The best value composting bin on the market.Excellent ventilation.
▼ Read Reddit mentions18. Compost Bin with 7 FREE Charcoal Filters by Silky Road | 1.3-Gallon / 5-Liter | Vintage Cream Powder-Coated Carbon Steel | Kitchen Pail with Lid, Trash Keeper Container Bucket, Recycling Caddy
BEAUTIFUL AESTHETIC: Do you love composting and want your kitchen to look good while doing it? Then look no further! This stylish, rustic, vintage cream-colored composter will look awesome in your home, countertop, office or anywhere! Any guests, friends or family will be sure to compliment you on t...
▼ Read Reddit mentions19. Oasis Biocompatible Dishwash/All-Purpose
- Handcrafted in solid furniture grade beech hardwood with elegant finish.
- 98% UV Ultra Clear Protected Acrylic Door - Lockable Latches
- Pinnable Black Felt Background / Matching Wood Hanger Included
- Fully Assembled With All Mounting Included.
- Outside Dimensions: 31.5" x 23.5" x 2"
Features:
▼ Read Reddit mentions20. AeroPress Coffee and Espresso Maker - Quickly Makes Delicious Coffee Without Bitterness - 1 to 3 Cups Per Pressing
- Popular with coffee enthusiasts worldwide, the patented AeroPress Original is a new kind of coffee press that uses a rapid, total immersion brewing process to make smooth, delicious, full flavored coffee without bitterness and with low acidity.
- Good-bye French Press! The rapid brewing AeroPress Original avoids the bitterness and high acidity created by the long steep time required by the French press. Plus, the AeroPress paper Micro-filter eliminates grit and means clean up takes seconds.
- Versatile: Easily makes 1 to 3 cups of American coffee per pressing in about a minute. Unlike a French press, it can also make cold brew (in just two minutes!) or espresso style coffee for use in lattes, cappuccinos and other espresso based drinks.
- Perfect for home kitchen use, the AeroPress Original is lightweight, compact, portable and durable, making it also ideal for traveling, camping, backpacking, boating and more!
- Includes the AeroPress press, funnel, scoop, stirrer, 350 paper mMicro-filters and a filter holder. Phthalate free and BPA free. Mug not included. Assembled measurements: 9 1/2" h X 4" w X 4" d
Features:
▼ Read Reddit mentions
The Bin
Leaves
Manure
Composting it All
Most people use the typical method in a 3-bin system: bin 1 = active pile, bin 2 = turned pile, bin 3 = curing pile. I employ this method. Once I get my new 3-bin setup completed, I will be posting pictures of compost at different stages. IN the meantime, here is a picture of potting soil components I use: Left to right: dolomitic lime, perlite, compost (the stuff I make), peat moss.
For added fun, use the compost going into the curing pile as bedding for worm bins. It is rich with food for them (you can add more, of course) and they will pass all of it through them. The end result is a nice, black, humus. I hope to employ a worm bin soon; it's on my list.
This calculator can help with ratios
Get a compost thermometer to help monitor the temperature
This site has a good description for hot composting and a list of ratios
I think this depends on how committed you are and by that I mean how much you're willing to invest. I'm a big fan of John at Growing Your Greens. I am new to composting and did quite a bit of research before discovering that my HOA forbids the use of composters. I'm on the fence about whether I'll get one anyway or not but based on John's reviews of the various types I would have or will purchase a Joraform. It's pricey to start (Note: I've seen it at $299 on Amazon, it seems to be higher right now so you can keep an eye on it if you're interested) but he does a follow up review here and has actually purchased a second, larger one because it works so well and so quickly. He says it turns out high grade usable compost in about 4-6 weeks. That seems much faster than any of the other ones I've read about. I've also read that the insulation keeps the pile hot enough that it works during snowy winters as well if your area experiences that type of climate. John puts the Lifetime tumbler in second place and I've seen the dual 50 gallon model at Costco for $150 which is pretty good as well.
The bonus of the tumblers, as he mentions, is that they're raised and sealed so rodents can't get to your pile. With the Joraform the holes are relatively small, I believe, so it keeps the insects you get to a minimum as well. Being able to tumble your compost has the advantage of making it easier to turn so you can keep the pile processing more easily and preventing it from creating odors. They're long but I highly suggest watching John's videos as they give a pretty good run down of the various types and the pros and cons of each.
I recommend having a larger passive pile and a few smaller active piles. The larger pile can be for food scraps and such... the larger items. The smaller piles will be for active composting -composting you are doing. Turn the larger pile every week or so... or less.
Once the small piles aren't changing in temperature, they can be used as compost but you can take some extra steps.
Amend your soil with the 1/4" stuff. I recommend doing so with a wheel hoe as this will help break into the soil a bit better. Or use a motor tiller if you have one.
As for JUST the leaves, if you place damp leaves (better if they are shredded) into a pile and let it sit for a few months, you'll get something called leaf mold. Sift this as with the compost and combine the two or use separately. It's not quite compost, but it will add biological activity to the soil.
RIP your free time. Composting is strangely fun.
I think you're set on supplies. I never used the coir. I just added shredded newspaper and the stuff the worms were shipped in.
Small chunks are fine. I'll give them larger chunks and they handle them. They really don't eat much. Consult on-line, but I think you feed a lb of worms only a half a lb of food a day. I NEVER have them eat that much. I usually have far more scraps than the worms can eat. You can freeze the scraps and when thawed, they're soft and easier for them to consume. Blending is fine, but not necessary. Really, just putting the entire peel and cores is fine.
I feed the worms on one side of the bin for a few days so I can harvest the opposite side. Not all of them will move, so I pick out the worms and put them back into the bin. They aren't all that bothered.
I think those worm contraptions are more efficient at separating worms, but I've never owned one. I have a small rubbermaid tote with holes.
Starting the bin is kind of tricky because it needs to have the right moisture level. I wouldn't buy a meter. Instead, I'd save it and spend money on a worm house later. Visually inspecting the bin is really all you need to monitor moisture. Also note that some veggie/fruit scraps can quickly add moisture to the bin. They love watermelon rind, but it will add a lot of moisture so use sparingly unless the bin is too dry.
They may try to climb out when the bin isn't the right moisture level, temperature or when the bin is new. Don't fret.
For kitchen waste, a vermicomposter is ideal. I built an OSCR jr from these plans I found online and it lasted for about a decade and a half before the plastic became brittle from exposure to sun/elements. I'm in the process of building a new one (pay attention when drilling the holes, one of the three bins is done differently). The worm castings and the tea that drains into the bottom bin are excellent fertilizers and maintaining the bin is a cinch.
Having a pair of bricks to place in the bottom/drainage bin is helpful to keep the worm bin from sitting in liquid.
I'm going to either install a stop-cock or at least drill a hole and keep a rubber plug in it to make draining the bottom bin easier.
----------------------------------------
For yard/garden or any other bulk/high volume a larger compost bin will be necessary. I find the commercially available ones to be too small. I built the three bin system detailed in the book "Let it Rot!" which is also an excellent resource if you want to understand these processes a little better. The three bin system works fairly well at handling grass and hedge clippings, leaves, old pine shavings from inside the chicken coop, etc.
___
I almost exclusively use the worm casting tea for watering my houseplants and plants in containers, likewise the worm castings get spread primarily as a top dressing for the same containers and the surplus then goes to the garden and landscape plants.
The compost from the big triple bin gets used throughout the yard as mulch or to till in with new plants.
Yeah I would also say to stop adding. A month is a good amount of time. Keep the pile going on standard operating procedure. If you really want to turn it every three days that may help. It also looks a bit wet to me so ease up on watering maybe.
I’ll probably get flamed for this but I’ve gotten great results from this Job’s inoculant in the past. A bag costs $5. You might consider adding some before you process for another month.
Jobe's Organics Compost Starter 4-4-2, 09926, 4 pounds, 4 lb https://www.amazon.com/dp/B002MZ2UOA/ref=cm_sw_r_cp_api_i_SXHPCb2BKK3P9
But adding more unprocessed material to a pile that looks unfinished may be counterproductive, unless you have strong reason to believe your materials are grossly unbalanced.
FCMP Outdoor IM4000 Tumbling Composter, 37 gallon, Black https://www.amazon.com/dp/B009378AG2/ref=cm_sw_r_cp_api_i_U4GJDbFQNRCEF
We got this one and it’s been great so far. I’m sure there are fancier ones but this one works just fine. It has 2 chambers and is pretty easy to empty. Only downside was that it has like 500 screws to put it together the first time!
The compost bin I purchased came with a Wing Digger. I didn't expect it to work well, but I have been pleasantly surprised. It works well enough for turning my pile, which consists almost entirely of coffee grounds and shredded paper and leaves. Using this, I never have to use a pitchfork or dump out the compost and pile it back in.
If I were to get a new one, I would consider getting one with two pairs of wings and an extra hand hold. It looks a little sturdier, and should turn the compost at least twice as much.
I bought this one:
https://www.amazon.com/gp/product/B001LNDBH4/ref=oh_aui_detailpage_o01_s00?ie=UTF8&psc=1
Handles paper great, not cardboard, but I have enough paper now that I can use this no problem. Lots of newspaper thanks to my neighbor. :)
I keep my kitchen compost bucket on the counter, by the sink. I think accessibility would help you. When cooking, you can set up your cutting board (or whatever) near the bin so you can easily transfer scraps.
Oxo makes an easy-open/non-latching countertop bin — that might help it “feel” easier too.
https://www.amazon.com/OXO-Grips-Clean-Compost-White/dp/B003ZFW0YQ
I think adding a multi-bin setup would make your life more complicated.
Good to know. This is the one we use.
Compost Bin with 7 FREE Charcoal Filters by Silky Road | 1.3-Gallon / 5-Liter | Vintage Cream Powder-Coated Carbon Steel | Kitchen Pail with Lid, Trash Keeper Container Bucket, Recycling Caddy https://www.amazon.com/dp/B07982D8WW/ref=cm_sw_r_cp_api_i_KmiSDbW19CKVK
Late to the party but wondering the same thing, was hoping something like this might work but I have my doubts https://www.amazon.com/Weston-05-0201-Construction-Stainless-Crushing/dp/B000XB5UHE/
Nice support from the family!
On the topic of lower waste, composting, and coffee. If you’re more of a one-cup-at-a-time user, check out the Aeropress. I use my filters at least twice (rinsing after use obviously).
AeroPress Coffee and Espresso Maker - Quickly Makes Delicious Coffee without Bitterness - 1 to 3 Cups Per Pressing https://www.amazon.com/dp/B0047BIWSK/ref=cm_sw_r_cp_api_i_G2TxCb441315J
I have a slightly different YIMBY that is a little smaller capacity and is a dual-chamber. It's been working fine so far, although it is a little too small to really get cooking without some direct sunlight to heat it up. Also note that it drains pretty freely since it is made out of 8 panels rather than being a solid container. I've never had to add water, but you'll want to put it over some ground that you don't mind getting drained on.
http://www.amazon.com/Yimby-Tumbler-Composter-Color-Black/dp/B009378AG2
I got one like this a few years ago. Doesn't smell at all. Just don't put any animal bones/meat/oils and you should be fine. Has never smelled bad or had any unusual odors ever.
Tumbler is fine too. I prefer the one that sits on the ground though because worms find their way in it when it's not too hot.
https://amazon.com/gp/product/B003HOR8BK
I do both an outdoor compost bin and an indoor vermicompost bin. Have found these very helpful:
Websites:
Home Composting Made Easy
Red Worm Composting.com
Books:
Let It Rot! The Gardener's Guide to Composting
Worms Eat My Garbage: How to Set Up and Maintain a Worm Composting System
This is pretty much the bible.
AmazonBasics 24-Sheet Cross-Cut Paper, CD, and Credit Card Shredder with Pullout Basket https://www.amazon.com/dp/B00HFJWMV4/ref=cm_sw_r_cp_api_i_UYuQCbTE0R5DK
This is what we use. It’s kind of expensive, but it totally works.
Just get the Rodale Book of Composting.
https://www.amazon.com/Rodale-Book-Composting-Methods-Gardener/dp/0878579915
FCMP Outdoor IM4000 Tumbling Composter, 37 gallon, Black https://www.amazon.com/dp/B009378AG2/ref=cm_sw_r_cp_api_i_3vyBDbG0E8GCS
I have two of these
I've never dealt with such a problem. But my gut tells me to throw a bunch of carbon and nitrogen at it to make it really hot and that should kill anything bad in there with a high nitrogen for a while. You'll also want to add sod as it's a starter. But I think hit it hard with the grass trimmings for the nitrogen to run it hot.
Almost everything I've learned about composting came from this book, that I LOVE.
https://www.amazon.com/Let-Rot-Composting-Down-Earth/dp/1580170234/ref=sr_1_1?ie=UTF8&qid=1484012881&sr=8-1&keywords=composting+book