Reddit mentions: The best milling tools
We found 37 Reddit comments discussing the best milling tools. We ran sentiment analysis on each of these comments to determine how redditors feel about different products. We found 28 products and ranked them based on the amount of positive reactions they received. Here are the top 20.
1. 3.175mm Carbide End Mill Engraving Bits CNC PCB Machinery 0.5mm Cutting Pack of 10
- Cutting edge diameter: 0.5mm
- Shank diameter: 3.175mm /0.125 inch
- A Wide Range of Materials can be engraved, including: Circuit boards,Metal,SMT,Fibre glass ect.
Features:
 ▼ Read Reddit mentions
2. Niagara Cutter N85684 Carbide Square Nose End Mill, Inch, TiAlN Finish, Roughing and Finishing Cut, 30 Degree Helix, 4 Flutes, 2" Overall Length, 0.250" Cutting Diameter, 0.250" Shank Diameter
- 4 flute design for creating finer finishes and a highter metal removal rate^General purpose end mill for working all types of materials^Made of extra-fine grade carbide for ultra high transverse rupture strength^Titanium Aluminum Nitride (TiAlN) combines high thermal stability with excellent hardness for abrasion resistance and a low coefficient of friction, for lubricity^Center Cutting End Mills are designed with "End Teeth" making these ideal for Slotting and Cavity applications
Features:

Specs:
| Number of items | 1 |
| Size | 1/4 in |
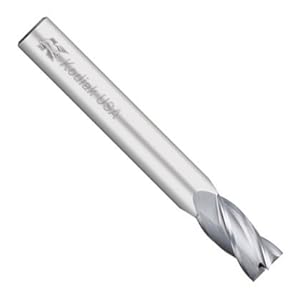
3. 2L inc. Solid Carbide End Mill, Two Flutes, 1/8" Cutter Dia, 1/4" Shank Dia.500" Flute Length, 2.0" OL, Uncoated, Made in The USA, Part No. E2-250x2.0-.125-.5
- Two Flute Solid Carbide End Mill - High Performance.
- 1/8" (.125") Cutter Diameter.
- 1/4" (.250") Tool Shank Diameter.
- .500" Flute Length, 2.0" Overall Length.
- Made in the USA.
Features:

Specs:
| Color | Bright (Uncoated) |
| Number of items | 1 |
| Size | 1/8" Cutter Diameter, 1/4" Shank Diameter |
| Weight | 0.25 Pounds |
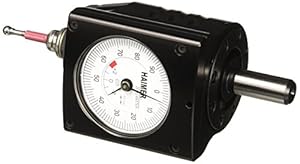
4. Haimer 80.960.00 Zero Master Analog Sensor
- 3-dimensional edge finder locates in X,Y and Z axis
- Measure work piece dimensions
- 1 Short Probe Tip Included w/ Sensor
- Measure surface flatness
- No subtracting indicator tip diameter = NO MATH!
Features:
Specs:
| Number of items | 1 |
| Weight | 0.86 Pounds |
5. Viking Trek 350x Sleeping Bag – Warm 350g Filling & Breathable, Ideal Camping Gear for Music Festivals, DoE Awards, Hiking, and Backpacking - Includes 100% Waterproof Compression Carry Bag
- Handle measures 3-1/2" long
- Removable handle for compact storage
- Seven flutes for smooth bores
Features:

Specs:
| Weight | 3.17 Pounds |
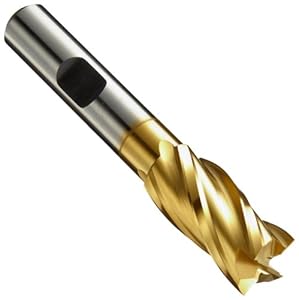
6. Kodiak Cutting Tools KCT131558 USA Made Solid Premium Carbide End Mill, ALTiN Coated, 4 Flute, 1/4" Diameter
- Premium Sub-Micrograin Carbide End Mill Made In the USA
- 1/4" Shank Diameter
- 1/2" Flute Length (Length of Cut), 30 Degree Helix
- 2" Overall Length Center Cutting Carbide Endmill
- 4 Flutes, ALTiN Coated, Single End
Features:

Specs:
| Number of items | 1 |
| Size | 1/4 in |
7. Kodiak Cutting Tools KCT166406 USA Made Solid Carbide End Mill, AlTiN Coated, 4 Flute, 1/8" Diameter, 1/8" Shank, 1/2" Length of Cut, 1-1/2" Overall Length
- Made In the USA
- 1/8 Shank Diameter
- 1/2 Length of Cut
- 1-1/2 Overall Length
- 4 Flutes
Features:

Specs:
| Number of items | 1 |
| Size | 1/8 in |
8. Lavender Essential Oil 80mg Capsules | 60 Pack | Rapid Release in A Convenient Softgel Capsule Has A Long Standing Association with Relaxation

Specs:
| Weight | 0.08157103694 Pounds |
9. Bear Fit - Weight Lifting Wrist Support Wraps, one Size fits All (Sold in Pairs)
- All-in-one pen. Write, delete, re-write
- Erasable gel ink rollerball
- Soft rubber comfort grip
- Ink erases cleanly using friction-generated heat
- Fine, 0.7mm tip. Refillable
Features:

Specs:
| Weight | 0.18 Pounds |
10. Kodiak Cutting Tools KCT136508 USA Made Premium Solid Carbide End Mill Long Series, 4 Flute, 3/8", 1" Flute Length, 4" Overall Length
Kodiak Cutting Tools brand premium quality USA made carbide end millMade from Sub-Micrograin Carbide1" Flute Length (Length of Cut), 30 Degree Helix4" Overall Length Center Cutting Carbide End mill4 Flutes, Single End

Specs:
| Number of items | 1 |
11. Kodiak Cutting Tools KODIAK136486 USA Made Solid Carbide End Mill, Long, 4 Flute, 5/16" Shank, 1-1/8" Length of Cut, 3" Overall Length, 5/16" Diameter
1-1/8 Length of Cut3 Overall LengthMade In the USA4 Flutes5/16 Shank Diameter
Specs:
| Number of items | 1 |
| Size | 5/16 in |
| Weight | 0.11 Pounds |
12. Mlife Portable Light Therapy Lamp,10000 Lux LED Sunlight Daylight Lamp 3 Color 10 Adjustable Brightness Light with Remote Control

Specs:
| Weight | 0.8125 Pounds |
13. 1-1/4" END MILL HOLDER R8 ADAPTER TOOL for Milling Bridgeport
1-1/4'' End Mill AdapterBore: 1-1/4" ; Taper size: R8Precision ground concentric ; Ground shank and hole, heat treated for double accuracyHardened and Ground ; Made for high quality steel forgingsQuantity: 1 ; Weight: 4 LBs

Specs:
| Weight | 4 Pounds |
14. Morse Heavy Duty Large Plastic Wall Chart - Decimal Equivalents, Recommended Drill Sizes for Taps, and Useful Formulas
- HAPPY DOG,CLEAN CAR Lantoo dog seat covers barrier for cars helps keep your dog comfortable during a car ride and also prevents any scratches, claw marks, hair or other damage to your expensive back seat bench. Made of heavy duty 3 layers waterproof oxford material, middle is cotton comfortable for dogs pet on winter season, bottom is nonslip backing design. Strongest reinforced materials to ensure long life, durable
- NON-SLIP QUILTED DESIGN Our pet seat cover has a non-slip surface to prevent your dog from slipping every time you apply the brake. Also built-in nonslip backing and seat anchors to prevent seat cover from sliding around. Built-in strong sticker openings for your Seatbelts (gift one seatbelt for your lovely dog ). All this to ensure your dog safe, safety is always priority
- HAMMOCK WITH SIDE FLAPS Dog car seat cover protector is design with 2 extra side flaps. It is easier for your dog to get in or out of car. Also side flaps can protect your car door from scratch, hair. Versatile split zipper around the side flaps hammock to allow pets and kids can share the back seat when zip up for a full hammock or zip down for half/half so dogs and passengers can travel together
- EASY WASHABLE AND EASY To INSTALL We dare you to get your dog as wet and dirty as possible, have him roll around in the grass and dirt, and see how easy car seat cover for dog is to get the stains and smell out after 1 hand or hose dirt off or vacuum. This cover is 100% waterproof. Perfect for dogs that shed a lot - hair doesn't stick to it so it's easy to wipe off with a damp cloth or run it through hose dirt off! Just snap the buckle straps around your headrests and tuck in the seat anchors
Features:
 ▼ Read Reddit mentions
15. Kodiak Cutting Tools F6-78KG-DBQ3 USA Made Micrograin Carbide End Mill Set, ALTiN Coated, 1/8" to 1/2", 4 Flute (Pack of 6)
- Contains Kodiak brand premium quality USA made ALTiN coated solid carbide end mills
- 4 flute single stub length end mills are center cutting
- Stub length end mills for extra rigidity
- Fitted wood block stand included but each size comes in a plastic tube
- Contains 1pc each 1/8, 3/16, 1/4, 5/16, 3/8 and 1/2
Features:

Specs:
| Number of items | 6 |
| Weight | 1.57 pounds |
16. Niagara Cutter N39200 High Speed Steel Square Nose End Mill, Weldon Shank, TiN Finish, Roughing and Finishing Cutting, 30-Degree, 4-Flute, 2.75" OAL, 0.625" Cut Diameter, 0.625" Shank Diameter
Designed for turning operations – roughing to medium machining -- on aluminum in average machining conditionsH13A uncoated carbide grade provides a balance of hardness and toughness for resistance to wear and shockSquare shape offers edge strength and is suitable for roughing, facing, interrupted ...
Specs:
| Number of items | 1 |
| Size | 5/8 inches diameter, 0.625 inches Shank Diameter, 4-Flute |
17. Precision Twist E6304 Carbide Square Nose End Mills, Inch, Extra Long Length, Straight Shank, Uncoated (Bright) Finish, For Use With Aluminum/Aluminum Alloys, Cast Iron, Steel/Steel Alloys
Four flutes produce a better finish than fewer flutesExtra-long length end mills have longer cutting edges and can make deeper cuts than long-length end millsCarbide can run at higher speeds than high-speed or cobalt steel, resisting wear and high cutting temperaturesUncoated (bright) tools have no ...
 ▼ Read Reddit mentions
18. JERRAY CNC Carving 3.92 Deg 2 Flutes Tapered Angle Ball Tip Radius=1.0mm X 1/4" Shank Tungsten Solid Carbide HRC55 with TiAIN Coated
 ▼ Read Reddit mentions
19. uxcell 28mm Cutting Diameter Straight Shank 4 Flutes End Mill Milling Cutter
- Weight: 346g; Material: HSS
- Package Content: 1 x End Mill, 1 x Plastic Case; Product Name: End Mill
- Shank Diameter: 20mm/0.8"; Main Color: Gray
- Cutting Diameter: 28mm/1.1"; Total Length: 121mm/4.8"
- Flute Number: 4; Flute Length: 50mm/2"
Features:

Specs:
| Height | 1.18 Inches |
| Length | 5.12 Inches |
| Size | 28x20x50x121mm |
| Width | 1.18 Inches |
20. Kodiak Cutting Tools KCT136442 USA Made Premium Carbide End Mill, Long Series, 4 Flute, 1/8" Shank, 3/4" Length of Cut, 2-1/4" Overall Length, 1/8" Diameter
Premium Sub-Micrograin Carbide End Mill Made In the USA1/8" Shank Diameter3/4" Flute Length (Length of Cut), 30 Degree Helix2-1/4" Overall Length Center Cutting Carbide Endmill4 Flutes Long Series End Mill

Specs:
| Number of items | 1 |
| Release date | November 2017 |
| Size | 1/8 in |
🎓 Reddit experts on milling tools
The comments and opinions expressed on this page are written exclusively by redditors. To provide you with the most relevant data, we sourced opinions from the most knowledgeable Reddit users based the total number of upvotes and downvotes received across comments on subreddits where milling tools are discussed. For your reference and for the sake of transparency, here are the specialists whose opinions mattered the most in our ranking.
Interested in what Redditors like? Check out our Shuffle feature
Shuffle: random products popular on RedditTop Reddit comments about Milling Tools:
Summary
1. 3.175mm Carbide End Mill Engraving Bits CNC PCB Machinery 0.5mm Cutting Pack of 10
- Cutting edge diameter: 0.5mm
- Shank diameter: 3.175mm /0.125 inch
- A Wide Range of Materials can be engraved, including: Circuit boards,Metal,SMT,Fibre glass ect.
Features:
▼ Read Reddit mentions2. Niagara Cutter N85684 Carbide Square Nose End Mill, Inch, TiAlN Finish, Roughing and Finishing Cut, 30 Degree Helix, 4 Flutes, 2" Overall Length, 0.250" Cutting Diameter, 0.250" Shank Diameter
- 4 flute design for creating finer finishes and a highter metal removal rate^General purpose end mill for working all types of materials^Made of extra-fine grade carbide for ultra high transverse rupture strength^Titanium Aluminum Nitride (TiAlN) combines high thermal stability with excellent hardness for abrasion resistance and a low coefficient of friction, for lubricity^Center Cutting End Mills are designed with "End Teeth" making these ideal for Slotting and Cavity applications
Features:
Specs:
| Number of items | 1 |
| Size | 1/4 in |
3. 2L inc. Solid Carbide End Mill, Two Flutes, 1/8" Cutter Dia, 1/4" Shank Dia.500" Flute Length, 2.0" OL, Uncoated, Made in The USA, Part No. E2-250x2.0-.125-.5
- Two Flute Solid Carbide End Mill - High Performance.
- 1/8" (.125") Cutter Diameter.
- 1/4" (.250") Tool Shank Diameter.
- .500" Flute Length, 2.0" Overall Length.
- Made in the USA.
Features:
Specs:
| Color | Bright (Uncoated) |
| Number of items | 1 |
| Size | 1/8" Cutter Diameter, 1/4" Shank Diameter |
| Weight | 0.25 Pounds |
4. Haimer 80.960.00 Zero Master Analog Sensor
- 3-dimensional edge finder locates in X,Y and Z axis
- Measure work piece dimensions
- 1 Short Probe Tip Included w/ Sensor
- Measure surface flatness
- No subtracting indicator tip diameter = NO MATH!
Features:
Specs:
| Number of items | 1 |
| Weight | 0.86 Pounds |
5. Viking Trek 350x Sleeping Bag – Warm 350g Filling & Breathable, Ideal Camping Gear for Music Festivals, DoE Awards, Hiking, and Backpacking - Includes 100% Waterproof Compression Carry Bag
- Handle measures 3-1/2" long
- Removable handle for compact storage
- Seven flutes for smooth bores
Features:
Specs:
| Weight | 3.17 Pounds |
6. Kodiak Cutting Tools KCT131558 USA Made Solid Premium Carbide End Mill, ALTiN Coated, 4 Flute, 1/4" Diameter
- Premium Sub-Micrograin Carbide End Mill Made In the USA
- 1/4" Shank Diameter
- 1/2" Flute Length (Length of Cut), 30 Degree Helix
- 2" Overall Length Center Cutting Carbide Endmill
- 4 Flutes, ALTiN Coated, Single End
Features:
Specs:
| Number of items | 1 |
| Size | 1/4 in |
7. Kodiak Cutting Tools KCT166406 USA Made Solid Carbide End Mill, AlTiN Coated, 4 Flute, 1/8" Diameter, 1/8" Shank, 1/2" Length of Cut, 1-1/2" Overall Length
- Made In the USA
- 1/8 Shank Diameter
- 1/2 Length of Cut
- 1-1/2 Overall Length
- 4 Flutes
Features:
Specs:
| Number of items | 1 |
| Size | 1/8 in |
8. Lavender Essential Oil 80mg Capsules | 60 Pack | Rapid Release in A Convenient Softgel Capsule Has A Long Standing Association with Relaxation
Specs:
| Weight | 0.08157103694 Pounds |
9. Bear Fit - Weight Lifting Wrist Support Wraps, one Size fits All (Sold in Pairs)
- All-in-one pen. Write, delete, re-write
- Erasable gel ink rollerball
- Soft rubber comfort grip
- Ink erases cleanly using friction-generated heat
- Fine, 0.7mm tip. Refillable
Features:
Specs:
| Weight | 0.18 Pounds |
10. Kodiak Cutting Tools KCT136508 USA Made Premium Solid Carbide End Mill Long Series, 4 Flute, 3/8", 1" Flute Length, 4" Overall Length
Kodiak Cutting Tools brand premium quality USA made carbide end millMade from Sub-Micrograin Carbide1" Flute Length (Length of Cut), 30 Degree Helix4" Overall Length Center Cutting Carbide End mill4 Flutes, Single End
Specs:
| Number of items | 1 |
11. Kodiak Cutting Tools KODIAK136486 USA Made Solid Carbide End Mill, Long, 4 Flute, 5/16" Shank, 1-1/8" Length of Cut, 3" Overall Length, 5/16" Diameter
1-1/8 Length of Cut3 Overall LengthMade In the USA4 Flutes5/16 Shank Diameter
Specs:
| Number of items | 1 |
| Size | 5/16 in |
| Weight | 0.11 Pounds |
12. Mlife Portable Light Therapy Lamp,10000 Lux LED Sunlight Daylight Lamp 3 Color 10 Adjustable Brightness Light with Remote Control
Specs:
| Weight | 0.8125 Pounds |
13. 1-1/4" END MILL HOLDER R8 ADAPTER TOOL for Milling Bridgeport
1-1/4'' End Mill AdapterBore: 1-1/4" ; Taper size: R8Precision ground concentric ; Ground shank and hole, heat treated for double accuracyHardened and Ground ; Made for high quality steel forgingsQuantity: 1 ; Weight: 4 LBs
Specs:
| Weight | 4 Pounds |
14. Morse Heavy Duty Large Plastic Wall Chart - Decimal Equivalents, Recommended Drill Sizes for Taps, and Useful Formulas
- HAPPY DOG,CLEAN CAR Lantoo dog seat covers barrier for cars helps keep your dog comfortable during a car ride and also prevents any scratches, claw marks, hair or other damage to your expensive back seat bench. Made of heavy duty 3 layers waterproof oxford material, middle is cotton comfortable for dogs pet on winter season, bottom is nonslip backing design. Strongest reinforced materials to ensure long life, durable
- NON-SLIP QUILTED DESIGN Our pet seat cover has a non-slip surface to prevent your dog from slipping every time you apply the brake. Also built-in nonslip backing and seat anchors to prevent seat cover from sliding around. Built-in strong sticker openings for your Seatbelts (gift one seatbelt for your lovely dog ). All this to ensure your dog safe, safety is always priority
- HAMMOCK WITH SIDE FLAPS Dog car seat cover protector is design with 2 extra side flaps. It is easier for your dog to get in or out of car. Also side flaps can protect your car door from scratch, hair. Versatile split zipper around the side flaps hammock to allow pets and kids can share the back seat when zip up for a full hammock or zip down for half/half so dogs and passengers can travel together
- EASY WASHABLE AND EASY To INSTALL We dare you to get your dog as wet and dirty as possible, have him roll around in the grass and dirt, and see how easy car seat cover for dog is to get the stains and smell out after 1 hand or hose dirt off or vacuum. This cover is 100% waterproof. Perfect for dogs that shed a lot - hair doesn't stick to it so it's easy to wipe off with a damp cloth or run it through hose dirt off! Just snap the buckle straps around your headrests and tuck in the seat anchors
Features:
▼ Read Reddit mentions15. Kodiak Cutting Tools F6-78KG-DBQ3 USA Made Micrograin Carbide End Mill Set, ALTiN Coated, 1/8" to 1/2", 4 Flute (Pack of 6)
- Contains Kodiak brand premium quality USA made ALTiN coated solid carbide end mills
- 4 flute single stub length end mills are center cutting
- Stub length end mills for extra rigidity
- Fitted wood block stand included but each size comes in a plastic tube
- Contains 1pc each 1/8, 3/16, 1/4, 5/16, 3/8 and 1/2
Features:
Specs:
| Number of items | 6 |
| Weight | 1.57 pounds |
16. Niagara Cutter N39200 High Speed Steel Square Nose End Mill, Weldon Shank, TiN Finish, Roughing and Finishing Cutting, 30-Degree, 4-Flute, 2.75" OAL, 0.625" Cut Diameter, 0.625" Shank Diameter
Designed for turning operations – roughing to medium machining -- on aluminum in average machining conditionsH13A uncoated carbide grade provides a balance of hardness and toughness for resistance to wear and shockSquare shape offers edge strength and is suitable for roughing, facing, interrupted ...
Specs:
| Number of items | 1 |
| Size | 5/8 inches diameter, 0.625 inches Shank Diameter, 4-Flute |
17. Precision Twist E6304 Carbide Square Nose End Mills, Inch, Extra Long Length, Straight Shank, Uncoated (Bright) Finish, For Use With Aluminum/Aluminum Alloys, Cast Iron, Steel/Steel Alloys
Four flutes produce a better finish than fewer flutesExtra-long length end mills have longer cutting edges and can make deeper cuts than long-length end millsCarbide can run at higher speeds than high-speed or cobalt steel, resisting wear and high cutting temperaturesUncoated (bright) tools have no ...
▼ Read Reddit mentions18. JERRAY CNC Carving 3.92 Deg 2 Flutes Tapered Angle Ball Tip Radius=1.0mm X 1/4" Shank Tungsten Solid Carbide HRC55 with TiAIN Coated
▼ Read Reddit mentions19. uxcell 28mm Cutting Diameter Straight Shank 4 Flutes End Mill Milling Cutter
- Weight: 346g; Material: HSS
- Package Content: 1 x End Mill, 1 x Plastic Case; Product Name: End Mill
- Shank Diameter: 20mm/0.8"; Main Color: Gray
- Cutting Diameter: 28mm/1.1"; Total Length: 121mm/4.8"
- Flute Number: 4; Flute Length: 50mm/2"
Features:
Specs:
| Height | 1.18 Inches |
| Length | 5.12 Inches |
| Size | 28x20x50x121mm |
| Width | 1.18 Inches |
20. Kodiak Cutting Tools KCT136442 USA Made Premium Carbide End Mill, Long Series, 4 Flute, 1/8" Shank, 3/4" Length of Cut, 2-1/4" Overall Length, 1/8" Diameter
Premium Sub-Micrograin Carbide End Mill Made In the USA1/8" Shank Diameter3/4" Flute Length (Length of Cut), 30 Degree Helix2-1/4" Overall Length Center Cutting Carbide Endmill4 Flutes Long Series End Mill
Specs:
| Number of items | 1 |
| Release date | November 2017 |
| Size | 1/8 in |
Get yourself a good build surface if you don't already have one. BuildTak works pretty well but there are plenty of options now. Don't mess with things like hairspray or plastic slurry, they are messy and a waste of time. Just google '3d printer build surface'. You can also just stick with Kapton tape on the 2x, that works fine too but It's not as durable, you'll be replacing it much more often and it really depends if you want to print in ABS or PLA.
I own a Replicator 2 and one of the 2X clones from Monoprice and have used a Flashforge creator, all are basically the same printer. As long as you have the upgraded extruder which most of them came with after the first Makerbot Rep 2 year and a good build surface, you don't likely "need" anything else.
If you do plan on doing a lot of printing though, get yourself a nice set of build removal tools. I use a cheap square headed exacto knife, the more flexible the better but it takes a little bit of practice to not cut your build plate that way. The other options are small spatula with very thin, sharp front edge. I have a kit like this one https://www.amazon.com/Synkia-Print-Removal-Enhanced-Version/dp/B01IMWL1HS/ref=sr_1_1?ie=UTF8&qid=1480291918&sr=8-1-spons&keywords=3d+print+removal+tool&psc=1 that works ok as well.
Also you might want to pick up some small end mills/PCB cutting bits to use for cleaning the nozzle. Something like this https://www.amazon.com/3-175mm-Carbide-Engraving-CNC-Machinery/dp/B00SMDOUPS/ref=sr_1_6?ie=UTF8&qid=1480291965&sr=8-6&keywords=pcb+mill Make sure they are smaller than the diameter of your nozzle before you buy them.
Take your time, get to know the machine, don't go nuts trying to upgrade it until you find out where your pain is. That generation of printer can be hit or miss, either its the best darn thing you've ever owned or... you have a lot of pain. Newer versions of that design should work great out of the box but if it's a machine from the first release year without any upgrades it will have problems.
Good Luck.
Did it all with a hacksaw, a file, cordless drill and sandpaper. Before I put the grip on it weighed about 14 ounces (receiver, barrel and full mag weigh about 4 lbs). Spent about $16 on material. Need some sort of pad for the buttplate.
edit: more pics: 1, 2
edit:
Here's the process. I should mention that the receiver is a 10/22. Here's the basic drawing. It is to scale but I don't know what scale. If someone knows where to host a pdf without it being smushed into a png let me know. The square part is 6061-T6 rectangular tube, 24", the cylinder is 6061-T6 round tube, random length (discount codes)and the grip is a standard AR-15 grip. I had an extra but they're pretty cheap. The inside dimension of 1.5" rectangle tube is 1.25", the exact outside dimension of the receiver. Basically you just want to remove just enough material from the rectangle tube so that it fits snugly into the cylinder. When you're satisfied with the fit drill through both pieces while they are fitted together so that all of the holes align. Use a short machine screw on each side to fasten.
Next remove enough material so that the receiver fits into the rectangular piece. Note that all cuts made along red lines are at 5.5° angle from the edge of the stock material. Also note that if you have tech sights you'll have to remove the front tower to fit a 1.75" cylinder over the end of the barrel. When you're satisfied with that fit drill a hole for the takedown screw.
Now start removing material for weight reduction. Be sure to leave connections between the side walls for strength. For cutting arcs it helps to have a jigsaw blade. If you use a jigsaw you have to run it at a very low speed because the teeth gum up with softened aluminum. In hindsight I wish I had left more material in this area. The butt end should look kind of like a tuning fork. You'll just clamp the prongs together, drill and apply fasteners.
The grip requires cutting to fit snugly and it helps to have a tap and die set so that the stock will receive a screw in the same way it does on an AR.
In the process of building it I found out that they make 1/4" shank milling ends that will fit into most any router. You'll need some way to cool your workpiece though. If anyone has experience with this method let me know how well it works.
This should do nicely: https://www.amazon.com/2L-inc-Carbide-Uncoated-E2-250x2-0-125-5/dp/B01J2KKGDY/ref=sr_1_2?ie=UTF8&qid=1527553815&sr=8-2&keywords=1%2F8+dia+1%2F4+shank+2+flute+endmill
As far as what works in aluminum: 2 flutes, coated HSS or carbide, but you cant really make use of the cutting ability of carbide without the machine rigidity to take a super heavy depth of cut. And I'd get in touch with your local Kennametal or other cutting tool distributor, they can probably get you some free samples. Oh and safety glasses, all the safety glasses. Lexan machine guards if you can.
Best of luck!
>Can someone with a basic understanding of the tools and materials finish an 80% without too many issues?
Yes. It will take several hours to get it perfect, though. If you have a milling machine, then you are golden, if you are using a drill press, it may help to have two people - one to raise/lower the bit, another to move the lower around. On that note - I recommend that you not go the full 1.25" deep from the get-go. Go like 1.2" deep initially to ensure that you don't poke through the bottom.
Purchase this jig (~$90):
http://www.tacticalmachining.com/80-jigs/80-ar15-jigs.html
Purchase this 80% lower (~$39 - consider waiting until they do their 3 for $29 each sale):
http://www.tacticalmachining.com/80-products/80-ar15-lower-receivers.html
Heck, consider getting their Confederate Battle Flag one. anyways...
You said that you have all the tools - make sure you have a 3/8" and 5/16" end mill, if not, here are some that I have used successfully:
This 3/8" end mill ($29.00):
http://www.amazon.com/gp/product/B007BTPBSO
This 5/16" end mill ($19.99):
http://www.amazon.com/gp/product/B007BTPB8Y
Some people have pointed out that 3 flutes are better than 4 for this particular application - that may be true, but either should work fine.
Get whatever drill press you want or borrow a buddy's. If you have access to a milling machine use that instead. Set the speed as close as you can to 1720rpm. Use whatever you have available to clamp it in place. Take your time milling and leave a little bit excess so that you don't destroy your jig and have room to make "fine" cuts at the end.
You will need a few drill bits for the safety selector, and trigger and hammer pins. Try to use new ones, and lightly "bounce" the drill bit while you are making the hole so that the bit doesn't corkscrew and drill an off-center hole.
Get a few teensy set screws and a really small tap (I forget the size right now) so that the rear detent normally held in place by the stock can be held in place by a set screw instead. Make sure that you use some sort of lubricant (CLP works great) and back the tap off a tad after every half turn or so. You will have to cut ~1/8" of the spring that goes there.
Don't forget to have fun.
Ok, I looked for about an hour and I honestly could not find a video. Here's the best I can do to give you instructions.
(I'll try to skim over the obvious)
First, you're using this edge finder or similar
Offset the edge in the y-direction such that it is towards the part. Bring it in to the part until it touches and keep moving at a lower rate (about .01 should be efficient) until the cylinder looks all but solid. Now moving at about 0.001, keep moving while rubbing your thumb up and down the side inline with the y-axis until you no longer feel a lip. Mark the position and then continue in the same direction by 0.001 (or smaller) until you feel a lip again. At the point that you feel a lip again, you are about .0985 (+- .0005) off from the edge of the part assuming you did this right.
Do the exact same thing on the x-axis.
Let me know how this works out for you. It should be the next best thing to buying a dial edge finder for like $470+
Depends on the climate. I take this one ordered from Amazon (£26.99) which is rated comfort at 8 degrees, limits at 3 degrees and extremes of -11.
It’s also a good size and lightweight - it fits in with all my camping stuff in an Oxford 30L drybag.
I’m 6ft and fit in it, wouldn’t be good if you’re much taller though.
Could you clarify this?
>Don't cut more than 2x the tool diameter deep
>Start at 0.050 in aluminum
What are you trying to say here? Like, 2x the tool diameter of a 1/4" bit is 0.5"...
Are you suggesting that I should do like 0.2x? That would give a pass depth of 0.05"
Finally, I'm not planning to do too much with metal, so would this and [this] (https://www.amazon.com/Kodiak-Cutting-Tools-KCT166406-Diameter/dp/B0070YYOI8/ref=pd_bxgy_328_2?_encoding=UTF8&psc=1&refRID=Y4FFGXENFZ3C128D9K9G) be sufficient alternatives to the set that you mentioned?
Hi, I ended up going with the Lindens version
https://www.amazon.co.uk/Lindens-Lavender-Essential-Capsules-Manufacturer/dp/B06XPLTLLN/ref=pd_nav_hcs_bia_t_1?_encoding=UTF8&psc=1&refRID=5TGKZHNFDWGT95XYT5N8
as it says Lavender Angustifolia and the reviews were good. I would say the effects were subtle but better than l-theanine for me. I did double the dose a couple of times too.
I get the impression that they're all pretty similar so I just bought the cheapest ones I could find. I think it is these ones:
https://www.amazon.co.uk/Bear-Fit-weight-lifting-support/dp/B01GWIEWXO/ref=mp_s_a_1_9?ie=UTF8&qid=1551087981&sr=8-9&pi=AC_SX236_SY340_FMwebp_QL65&keywords=bear+wrist+wraps&dpPl=1&dpID=51zP%2BZocj%2BL&ref=plSrch
Your body and brain are going through heaps of changes - take all the help you can get and more - make it as easy on yourself as possible. Especially if you feel that familiar slump. See your doctor. Ask for counselling. Just know that how you feel right now isn't forever.
Can wholeheartedly recommend SAD lamps too ( https://www.amazon.co.uk/dp/B07XGQLFD7/ref=cm_sw_r_other_apa_i_rsmWDb9GKP4VH ).
They're small, about the size of a Kindle and as sceptical as I was, they definitely work some kind of magic on me. Helped me get out of bed for a start.
Can you bore it halfway from both sides?
You could probably get away with your idea, I don't know if its the best approach though. Do you have any Endmill holders you could run it in?
Morse Heavy Duty Large Plastic Wall Chart - Decimal Equivalents, Recommended Drill Sizes for Taps, and Useful Formulas https://www.amazon.com/dp/B07J57XZXS/ref=cm_sw_r_cp_api_i_.X7lDbQFQ23DV
Just get some 4 flute end mills (best you can afford, AlTin coating helps aluminum not stick) and run it on the manual machine unless your doing complex geometry. Don't take to much width of cut tell you know how it will cut and no more than 2x the tool diameter deep. Start at .050 in aluminum. As for rpm the best bs way is to start out slow and spin it tell the flutes blend together. This is a ok set I got in school they cut steel and aluminum just fine. https://www.amazon.com/dp/B00D5TQ8GS/ref=cm_sw_r_cp_apa_arI.zbPH7VNV9
You say an endmill is out of the question and then ask if you can buy a flat bottomed endmill. Yes, they do make those.
http://www.amazon.com/dp/B00075FWVU/ref=biss_dp_t_asn
I use that exact set, a pin vise, and the magnets /u/PostEmUp linked when building gaming minis. The only potential issue is that standard drill bits are pointed, and need to drill more out than is always desired. If you're feeling flush, pick up one of these end mill bits, drill your starter hole only until your hole has 'sides' (the hole has the cone at the bottom, with short vertical walls), and finish with the end mill so the magnet sits flush. If the piece is too thin for that you may get away with using a magnet on one side and a pin head on the other.
for reference, i'm using something like this: https://www.amazon.com/JERRAY-Carving-Tapered-tungsten-Carbide/dp/B015C6CHUC
Forstner bits seems to be for wood. I'd want to use tooling meant to be used with metal such as an end mill.
From a quick search:
https://www.amazon.com/uxcell-Cutting-Diameter-Straight-Milling/dp/B01AXUU5EW/ref=sr_1_7?ie=UTF8&qid=1506308742&sr=8-7&keywords=28mm+end+mill
https://www.amazon.com/Kodiak-Cutting-Tools-KCT136442-Diameter/dp/B007BTPAJE/ref=redir_mobile_desktop?_encoding=UTF8&psc=1&ref=ppx_pop_dt_b_pd_title is the bit
Using .479 inch birch plywood
Starting using .62 doc at 35 ipm
*.062 sorry