(Part 2) Reddit mentions: The best electric motor mounts & accessories
We found 228 Reddit comments discussing the best electric motor mounts & accessories. We ran sentiment analysis on each of these comments to determine how redditors feel about different products. We found 97 products and ranked them based on the amount of positive reactions they received. Here are the products ranked 21-40. You can also go back to the previous section.
21. STEPPERONLINE Nema 17 Bipolar Stepper 0.9deg(400 steps/rev) 1.68A 44Ncm(62.3oz.in) Motor
- Fine Resolution High Torque
- 44Ncm(62.3oz.in) holding torque
- NEMA 17 bipolar 1.65"x1.65"x1.85" 4-wire
- 0.9 deg. step angle(400 steps/rev)
- Rated current 1.68A & resistance 1.65ohms
Features:

Specs:
| Height | 1.85 Inches |
| Length | 1.65 Inches |
| Weight | 0.79 Pounds |
| Width | 1.65 Inches |
| Size | Nema 17 |
| Number of items | 1 |
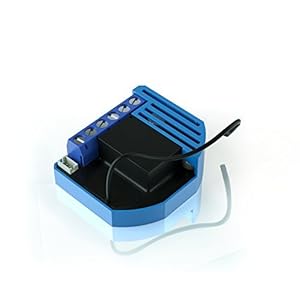
22. QUBINO Flush ZMNHBD3 Z-Wave 2 relays - the smallest double relay switch
- Z-Wave Plus relay module adds individual and grouped On/Off commands to two devices
- Compatible with toggle and pushbutton switches, as well as plug-in outlets
- Add delayed/scheduled/responsive triggers to connected devices
- Small device size allows for quick and easy installation in nearly any setting
- Optional sensor input enables responsive automation scene implementation
Features:
 ▼ Read Reddit mentions
23. MagiDeal 5 Pieces 3D Printer Stepper Motor Driver Module TMC2130 Stepper Motor Driver
1.2A two-phase stepper motor single-phase current (peak 2.5A); adjustable motor operating current.Support two control methods: Step / DIR interface and SPI interface control.256 subdivision.Maximum efficiency and optimum motor torque operation without noise.Motor input voltage range: 4.75 ~ 46V Logi...
 ▼ Read Reddit mentions
24. Rf Remote , 12 V 315 MHZ 2 Channel wireless Control Switch Transmitter and Receiver with battery(2CH)
EASY to INSTALL,Wireless controlGOOD WIRELESS RF SIGNAL,it can pass through walls, floors and doors,control receiver from any place within a reliable distance.WIDE USE It applies to remote control motor reversing, bumper gate, electric doors and windows, electric dining table, showcase, a variety of...
 ▼ Read Reddit mentions
25. Qubino Z-Wave Plus Flush Dimmer ZMNHDD3 - First truly universal Z-Wave micro dimmer
- The adjustable waist range is 27.5in-39.3in, which is suitable for most women.Receive 1 * Leather Necklace (B07MZRHKCC) free when you purchase 1 * Leg Harness Style 5 offered by homelix. Enter code AQ6IJSSO at checkout.
- Three-layer composite PU , absolute thickness, super high-quality on the front, very soft; soft and non-irritating flannel on the bottom, no cold when in contact with the skin, no deformation under any pressure.
- Great for LARP (live action role playing), kids, cosplay, Halloween, fancy dress, theatrical props, and historical reenactments.
- Can be used with daily dress up, this will bring more highlights to your style of dress,If you need to wear special occasions such as clubs, concerts , it will make you look special and beautiful.
- Provides exactly what you need to complete that perfect look. Harness is Fully Wearable and Comfortably made.
Features:
 ▼ Read Reddit mentions
26. WINOMO Nema 17 Stepper Motor Mounting Bracket w/ M3 Screws 2 Pack

Specs:
| Height | 0.87 Inches |
| Length | 1.22 Inches |
| Weight | 0.08 Pounds |
| Width | 0.87 Inches |
27. Honeywell 802360JA Motor
- Voltage: 24V;
- Frequency: 50/60Hz;
- Electrical Connections: 6" Leads;
- Brand Name: Honeywell
Features:

Specs:
| Color | 2 |
| Height | 2 Inches |
| Length | 2 Inches |
| Weight | 0.26896395964 Pounds |
| Width | 2 Inches |
| Number of items | 1 |
28. Qubino Z-Wave Plus RGBW Controller ZMNHWD3 for 12-24V LED Strips and Light Bulbs
WHAT DOES IT DO? Connect it to your 12-24VDC RGBW LED strip for Z-Wave wireless control. Dim and control 16 million shades.WHAT ELSE DO I NEED? A matching power supply for the Qubino, so if your strip runs on 12VDC, get a 12 VDC power supply, if it needs 24 VDC, power the Qubino with 24 VDC (VERY IM...

Specs:
| Height | 0.57 Inches |
| Length | 1.77 Inches |
| Weight | 0.06 Pounds |
| Width | 1.25 Inches |
29. Electric 12vdc Reversible 36 Rpm Dc Gear Motor for DIY Parts
- ✔Rated voltage: DC12V; No-load speed: 36RPM; Rated torque: 1.375kg.cm; Rated Current: 0.27A;
- ✔Reduction ratio: 1/255; Protection class: IP54; Low noise: db<45 (A); Certification: CE; Material: Metal; Commutation: Brush;
- ✔Gear Motor Body Dimensions: 3 x 1.25 x 1.06inches(L*W*H); Out Shaft Dimensions: 0.53*0.23inches(L*D) with 0.047*0.43inches flat cut off;
- ✔Usage: windows and doors, household electrical appliances, Car, Boat and Robot model, DIY engine, home automation, mini winch and other occasions;
- ✔Package: 1PCS x DC Geared Motor; if you need other voltage and rpm, pls contact us, there are many other models of this motor in store.
Features:
 ▼ Read Reddit mentions
30. STEPPERONLINE 1 Axis CNC Kit 3Nm(425oz.in) Nema 23 Stepper Motor & Driver CNC Mill Router Lathe Robot
1 x Digital Stepper Drive 1.0-4.2A 20-50VDC for Nema 17, 23, 24 Stepper Motor1 x Nema 23 Bipolar 3Nm (425oz.in) 4.2A 57x57x114mm 4 Wires CNC Stepper Motor

Specs:
| Weight | 3.968320716 Pounds |
31. ReFaXi Universal Heavy Duty Power Door Lock Actuator Motor 2 Wire w/Hardware 12V New
Fits most of vehiclesEasy to installPowerful and extra durable motorAdd power door lock systems to your carDC 12V
 ▼ Read Reddit mentions
32. Variable Frequency Drive, CNC 110V 2.2KW 3HP VFD Drive VFD Spindle Inverter Professional Variable Frequency Drive Inverter for Spindle Motor Speed Control (Single phase 110V input, 3HP 110V output)
Variable Frequency Drive Inverter use for: Lathes, Mill, car Hoists, Pumps, conveyors, etc. Notice: the machine can't work on single phase motor, and it can't work with the Mach 3 software.PID control: advanced calculous PID closed-loop arithmetic, quick responding speed and high suitability.RS485 c...
 ▼ Read Reddit mentions
33. SainSmart 3-Axis GRBL USB Driver Controller Board DIY Engraver Control Board for GRBL
- Applicable Software: GRBL control, Un Gcode Sender, GRBL controller, or other software that supports GRBL code
- Stepper Motor Drivers: A4988 motor driver,16 microstep 1.5A phase current output
- Support Stepper Motor: NEMA17 NEMA23 stepper motor, phase current less than 1.5A
- Spindle Motor Interface: the maximum support 400W DC spindle motor
- With fan interface and TTL signal output interface (for controlling the laser module with TTL module)
Features:

Specs:
| Size | 3-Axis |
34. Router Speed Control
- Dial controls the variable speed (high, medium or low)
- 3-way rocker switch
- 6 ft. cord;
Features:
 ▼ Read Reddit mentions
35. STEPPERONLINE 50:1 Nema 17 Geared Stepper Motor L=39mm High Precision Planetary Gearbox for 3D Printer DIY CNC
High accuracy, high efficiencyNema 17 stepper motor 39mm length48.3mm Planetary gearbox of 50:1 gear ratioMoment Torque 25Nm(3540oz.in) & Max Torque 15Nm(2124oz.in)Rated current 1.68A & Rated voltage 2.7V

Specs:
| Height | 3.437001 Inches |
| Length | 1.69291 Inches |
| Width | 1.65354 Inches |
36. uxcell M20 12V 0.06A 80RPM 5Kg.cm Electric Speed Reducing DC Geared Motor
- Product Name : DC Speed Reduce Motor;Model : M20;Rated Voltage : DC 12V
- Rated Current : 0.06A ( no load );Speed : 80RPM;Rated Torque : 5Kg.cm
- Shaft Diameter : 3mm/ 0.118";Gearbox Size : 14 x 12 x 10mm/ 0.55" x 0.47" x 0.39" (L*W*H);Total Length : 34mm/ 1.3"
- Main Color : Silver Tone, Gold Tone;Material : Metal
- Weight : 10g;Package : 1 x DC Speed Reduce Motor
Features:

Specs:
| Height | 0.39 Inches |
| Length | 4.33 Inches |
| Weight | 0.0220462262 Pounds |
| Width | 3.94 Inches |
| Size | 80RPM |
37. Yosoo Mini High Torque 6V 50/100/ 150/200/ 300RPM with Metal Gearbox Replacement N20 for RC Car, Robot Model, DIY Engine Toys (6V 150RPM)
- Good performance: This gear motor has great workmanship, perfect replacement for the old one. A great choice for you
- Reliable: The DC gear motor supports guaranteed quality, used with confidence, which is made via many inspections before leaving the factory. You can use it with confidence
- Convenient for use: Professional and practical design with beautiful appearance, easy to carry and use. Bring you a new and different using feeling
- Advantages: The DC gear motor has the advantages of long life, high accuracy, high efficiency, stable performance and easy installation. Its quality is guaranteed
- High quality material: This gear motor made of high quality material, which is sturdy and has long service life. Meet your needs
Features:

Specs:
| Height | 0.787401574 Inches |
| Length | 1.574803148 Inches |
| Weight | 0.022 Pounds |
| Width | 0.787401574 Inches |
| Size | 6V 150RPM |
38. Mini DC Motor PWM Governor 1.8V 3V 6V 9V 12V Speed Switch Uultra-Small LED Dimmer
- System: Intel i7-8750H 2.2GHz Six-Core | Intel HM370 Chipset | 16GB DDR4 | 1TB M.2 SSD | Genuine Windows 10 Home 64-Bit
- Graphics: NVIDIA GeForce GTX 1060 6GB video card | FHD IPS Anti-Glare 15.6" LED Display | Audio: 2.1 Digital Surround Sound Stereo Speakers
- Connectivity: 1x HDMI | 2x Mini DisplayPort | 1x USB 2.0 | 2x USB 3.1 | 1x USB Type C | 1x RJ-45 network Ethernet 10/100/1000 | 802.11 AC Wi-Fi | Bluetooth 5.0 | 2-in-1 Card Reader
- Special feature: Programmable RGB Mechanical Keyboard & Click pad
- 1 Year Limited Warranty & Lifetime Toll Free Tech Support Services
Features:
 ▼ Read Reddit mentions
39. Leviton MS303-DS 30 Amp 600 Volt, Three-Pole, Three Phase AC Motor Starter, Suitable as Motor Disconnect, Toggle, Industrial Grade, Non-Grounding, Black
- Fits in standard wall box
- Accepts back or side wiring, terminal clamps or ring terminals
- Oversized toggle provides clear actuation feedback and long-lasting durability
- Nickel-plated #10 triple-combination terminal screws for corrosion resistance
Features:

Specs:
| Color | Black |
| Height | 4 Inches |
| Length | 4 Inches |
| Weight | 0.34999817097203 Pounds |
| Width | 4 Inches |
| Number of items | 1 |
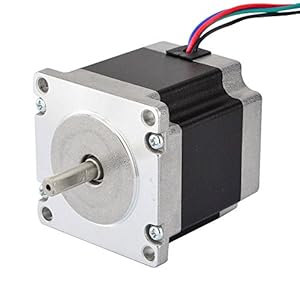
40. STEPPERONLINE Nema 23 CNC Stepper Motor 2.8A 178.5oz.in/1.26Nm CNC Stepping Motor DIY CNC Mill
Higher Torque1.26Nm(178.5oz.in) holding torqueNEMA 23 bipolar 2.24"x2.24"x2.2" 4-wire1.8 deg. step angle(200 steps/rev)Rated current 2.8A & resistance 0.9ohms
Specs:
| Color | As Shown |
| Height | 2.2 Inches |
| Length | 2.24 Inches |
| Weight | 1.5 Pounds |
| Width | 2.24 Inches |
| Size | Small |
🎓 Reddit experts on electric motor mounts & accessories
The comments and opinions expressed on this page are written exclusively by redditors. To provide you with the most relevant data, we sourced opinions from the most knowledgeable Reddit users based the total number of upvotes and downvotes received across comments on subreddits where electric motor mounts & accessories are discussed. For your reference and for the sake of transparency, here are the specialists whose opinions mattered the most in our ranking.
Interested in what Redditors like? Check out our Shuffle feature
Shuffle: random products popular on RedditTop Reddit comments about Electric Motor Mounts & Accessories:
Summary
21. STEPPERONLINE Nema 17 Bipolar Stepper 0.9deg(400 steps/rev) 1.68A 44Ncm(62.3oz.in) Motor
- Fine Resolution High Torque
- 44Ncm(62.3oz.in) holding torque
- NEMA 17 bipolar 1.65"x1.65"x1.85" 4-wire
- 0.9 deg. step angle(400 steps/rev)
- Rated current 1.68A & resistance 1.65ohms
Features:
Specs:
| Height | 1.85 Inches |
| Length | 1.65 Inches |
| Weight | 0.79 Pounds |
| Width | 1.65 Inches |
| Size | Nema 17 |
| Number of items | 1 |
22. QUBINO Flush ZMNHBD3 Z-Wave 2 relays - the smallest double relay switch
- Z-Wave Plus relay module adds individual and grouped On/Off commands to two devices
- Compatible with toggle and pushbutton switches, as well as plug-in outlets
- Add delayed/scheduled/responsive triggers to connected devices
- Small device size allows for quick and easy installation in nearly any setting
- Optional sensor input enables responsive automation scene implementation
Features:
▼ Read Reddit mentions23. MagiDeal 5 Pieces 3D Printer Stepper Motor Driver Module TMC2130 Stepper Motor Driver
1.2A two-phase stepper motor single-phase current (peak 2.5A); adjustable motor operating current.Support two control methods: Step / DIR interface and SPI interface control.256 subdivision.Maximum efficiency and optimum motor torque operation without noise.Motor input voltage range: 4.75 ~ 46V Logi...
▼ Read Reddit mentions24. Rf Remote , 12 V 315 MHZ 2 Channel wireless Control Switch Transmitter and Receiver with battery(2CH)
EASY to INSTALL,Wireless controlGOOD WIRELESS RF SIGNAL,it can pass through walls, floors and doors,control receiver from any place within a reliable distance.WIDE USE It applies to remote control motor reversing, bumper gate, electric doors and windows, electric dining table, showcase, a variety of...
▼ Read Reddit mentions25. Qubino Z-Wave Plus Flush Dimmer ZMNHDD3 - First truly universal Z-Wave micro dimmer
- The adjustable waist range is 27.5in-39.3in, which is suitable for most women.Receive 1 * Leather Necklace (B07MZRHKCC) free when you purchase 1 * Leg Harness Style 5 offered by homelix. Enter code AQ6IJSSO at checkout.
- Three-layer composite PU , absolute thickness, super high-quality on the front, very soft; soft and non-irritating flannel on the bottom, no cold when in contact with the skin, no deformation under any pressure.
- Great for LARP (live action role playing), kids, cosplay, Halloween, fancy dress, theatrical props, and historical reenactments.
- Can be used with daily dress up, this will bring more highlights to your style of dress,If you need to wear special occasions such as clubs, concerts , it will make you look special and beautiful.
- Provides exactly what you need to complete that perfect look. Harness is Fully Wearable and Comfortably made.
Features:
▼ Read Reddit mentions26. WINOMO Nema 17 Stepper Motor Mounting Bracket w/ M3 Screws 2 Pack
Specs:
| Height | 0.87 Inches |
| Length | 1.22 Inches |
| Weight | 0.08 Pounds |
| Width | 0.87 Inches |
27. Honeywell 802360JA Motor
- Voltage: 24V;
- Frequency: 50/60Hz;
- Electrical Connections: 6" Leads;
- Brand Name: Honeywell
Features:
Specs:
| Color | 2 |
| Height | 2 Inches |
| Length | 2 Inches |
| Weight | 0.26896395964 Pounds |
| Width | 2 Inches |
| Number of items | 1 |
28. Qubino Z-Wave Plus RGBW Controller ZMNHWD3 for 12-24V LED Strips and Light Bulbs
WHAT DOES IT DO? Connect it to your 12-24VDC RGBW LED strip for Z-Wave wireless control. Dim and control 16 million shades.WHAT ELSE DO I NEED? A matching power supply for the Qubino, so if your strip runs on 12VDC, get a 12 VDC power supply, if it needs 24 VDC, power the Qubino with 24 VDC (VERY IM...
Specs:
| Height | 0.57 Inches |
| Length | 1.77 Inches |
| Weight | 0.06 Pounds |
| Width | 1.25 Inches |
29. Electric 12vdc Reversible 36 Rpm Dc Gear Motor for DIY Parts
- ✔Rated voltage: DC12V; No-load speed: 36RPM; Rated torque: 1.375kg.cm; Rated Current: 0.27A;
- ✔Reduction ratio: 1/255; Protection class: IP54; Low noise: db<45 (A); Certification: CE; Material: Metal; Commutation: Brush;
- ✔Gear Motor Body Dimensions: 3 x 1.25 x 1.06inches(L*W*H); Out Shaft Dimensions: 0.53*0.23inches(L*D) with 0.047*0.43inches flat cut off;
- ✔Usage: windows and doors, household electrical appliances, Car, Boat and Robot model, DIY engine, home automation, mini winch and other occasions;
- ✔Package: 1PCS x DC Geared Motor; if you need other voltage and rpm, pls contact us, there are many other models of this motor in store.
Features:
▼ Read Reddit mentions30. STEPPERONLINE 1 Axis CNC Kit 3Nm(425oz.in) Nema 23 Stepper Motor & Driver CNC Mill Router Lathe Robot
1 x Digital Stepper Drive 1.0-4.2A 20-50VDC for Nema 17, 23, 24 Stepper Motor1 x Nema 23 Bipolar 3Nm (425oz.in) 4.2A 57x57x114mm 4 Wires CNC Stepper Motor
Specs:
| Weight | 3.968320716 Pounds |
31. ReFaXi Universal Heavy Duty Power Door Lock Actuator Motor 2 Wire w/Hardware 12V New
Fits most of vehiclesEasy to installPowerful and extra durable motorAdd power door lock systems to your carDC 12V
▼ Read Reddit mentions32. Variable Frequency Drive, CNC 110V 2.2KW 3HP VFD Drive VFD Spindle Inverter Professional Variable Frequency Drive Inverter for Spindle Motor Speed Control (Single phase 110V input, 3HP 110V output)
Variable Frequency Drive Inverter use for: Lathes, Mill, car Hoists, Pumps, conveyors, etc. Notice: the machine can't work on single phase motor, and it can't work with the Mach 3 software.PID control: advanced calculous PID closed-loop arithmetic, quick responding speed and high suitability.RS485 c...
▼ Read Reddit mentions33. SainSmart 3-Axis GRBL USB Driver Controller Board DIY Engraver Control Board for GRBL
- Applicable Software: GRBL control, Un Gcode Sender, GRBL controller, or other software that supports GRBL code
- Stepper Motor Drivers: A4988 motor driver,16 microstep 1.5A phase current output
- Support Stepper Motor: NEMA17 NEMA23 stepper motor, phase current less than 1.5A
- Spindle Motor Interface: the maximum support 400W DC spindle motor
- With fan interface and TTL signal output interface (for controlling the laser module with TTL module)
Features:
Specs:
| Size | 3-Axis |
34. Router Speed Control
- Dial controls the variable speed (high, medium or low)
- 3-way rocker switch
- 6 ft. cord;
Features:
▼ Read Reddit mentions35. STEPPERONLINE 50:1 Nema 17 Geared Stepper Motor L=39mm High Precision Planetary Gearbox for 3D Printer DIY CNC
High accuracy, high efficiencyNema 17 stepper motor 39mm length48.3mm Planetary gearbox of 50:1 gear ratioMoment Torque 25Nm(3540oz.in) & Max Torque 15Nm(2124oz.in)Rated current 1.68A & Rated voltage 2.7V
Specs:
| Height | 3.437001 Inches |
| Length | 1.69291 Inches |
| Width | 1.65354 Inches |
36. uxcell M20 12V 0.06A 80RPM 5Kg.cm Electric Speed Reducing DC Geared Motor
- Product Name : DC Speed Reduce Motor;Model : M20;Rated Voltage : DC 12V
- Rated Current : 0.06A ( no load );Speed : 80RPM;Rated Torque : 5Kg.cm
- Shaft Diameter : 3mm/ 0.118";Gearbox Size : 14 x 12 x 10mm/ 0.55" x 0.47" x 0.39" (L*W*H);Total Length : 34mm/ 1.3"
- Main Color : Silver Tone, Gold Tone;Material : Metal
- Weight : 10g;Package : 1 x DC Speed Reduce Motor
Features:
Specs:
| Height | 0.39 Inches |
| Length | 4.33 Inches |
| Weight | 0.0220462262 Pounds |
| Width | 3.94 Inches |
| Size | 80RPM |
37. Yosoo Mini High Torque 6V 50/100/ 150/200/ 300RPM with Metal Gearbox Replacement N20 for RC Car, Robot Model, DIY Engine Toys (6V 150RPM)
- Good performance: This gear motor has great workmanship, perfect replacement for the old one. A great choice for you
- Reliable: The DC gear motor supports guaranteed quality, used with confidence, which is made via many inspections before leaving the factory. You can use it with confidence
- Convenient for use: Professional and practical design with beautiful appearance, easy to carry and use. Bring you a new and different using feeling
- Advantages: The DC gear motor has the advantages of long life, high accuracy, high efficiency, stable performance and easy installation. Its quality is guaranteed
- High quality material: This gear motor made of high quality material, which is sturdy and has long service life. Meet your needs
Features:
Specs:
| Height | 0.787401574 Inches |
| Length | 1.574803148 Inches |
| Weight | 0.022 Pounds |
| Width | 0.787401574 Inches |
| Size | 6V 150RPM |
38. Mini DC Motor PWM Governor 1.8V 3V 6V 9V 12V Speed Switch Uultra-Small LED Dimmer
- System: Intel i7-8750H 2.2GHz Six-Core | Intel HM370 Chipset | 16GB DDR4 | 1TB M.2 SSD | Genuine Windows 10 Home 64-Bit
- Graphics: NVIDIA GeForce GTX 1060 6GB video card | FHD IPS Anti-Glare 15.6" LED Display | Audio: 2.1 Digital Surround Sound Stereo Speakers
- Connectivity: 1x HDMI | 2x Mini DisplayPort | 1x USB 2.0 | 2x USB 3.1 | 1x USB Type C | 1x RJ-45 network Ethernet 10/100/1000 | 802.11 AC Wi-Fi | Bluetooth 5.0 | 2-in-1 Card Reader
- Special feature: Programmable RGB Mechanical Keyboard & Click pad
- 1 Year Limited Warranty & Lifetime Toll Free Tech Support Services
Features:
▼ Read Reddit mentions39. Leviton MS303-DS 30 Amp 600 Volt, Three-Pole, Three Phase AC Motor Starter, Suitable as Motor Disconnect, Toggle, Industrial Grade, Non-Grounding, Black
- Fits in standard wall box
- Accepts back or side wiring, terminal clamps or ring terminals
- Oversized toggle provides clear actuation feedback and long-lasting durability
- Nickel-plated #10 triple-combination terminal screws for corrosion resistance
Features:
Specs:
| Color | Black |
| Height | 4 Inches |
| Length | 4 Inches |
| Weight | 0.34999817097203 Pounds |
| Width | 4 Inches |
| Number of items | 1 |
40. STEPPERONLINE Nema 23 CNC Stepper Motor 2.8A 178.5oz.in/1.26Nm CNC Stepping Motor DIY CNC Mill
Higher Torque1.26Nm(178.5oz.in) holding torqueNEMA 23 bipolar 2.24"x2.24"x2.2" 4-wire1.8 deg. step angle(200 steps/rev)Rated current 2.8A & resistance 0.9ohms
Specs:
| Color | As Shown |
| Height | 2.2 Inches |
| Length | 2.24 Inches |
| Weight | 1.5 Pounds |
| Width | 2.24 Inches |
| Size | Small |
For OnStep cost/kit: Here's one of the cheaper kits with wifi, and serial support: https://www.stmbluepillkits.com/ ($35 There's a hand controller which is $22, both plus shipping https://baheyeldin.com/astronomy/onstep-esp32-smart-hand-controller-shc.html which is probably $10) Then you can either bend a metal bracket, or use a 3D printed one. (I use a modified version of I think this one: https://www.thingiverse.com/thing:1833860 Look at any of the EQ-5 types here for ideas: https://onstep.groups.io/g/main/wiki/Showcase%3A-What-Users-Built-With-OnStep ) Then add stepper drivers (Several, I think TMCs are the preferred one, but I use DRV8825s which are like $10 for 5, as I have a lot from 3D printing.) and Stepper motors (0.9 degree ones are $23 on amazon^1, but they are cheaper elsewhere) and Belts/Pulleys (Depending on how you want to, I think most people use 60 tooth ^2 and 20 tooth, or 20 & 80 for gear reduction. Plus the belt.^4)
This is a quick response for examples on cost, so if you would like to do it, I can get together what I'd do at this point. (Probably look into which TMCs are setup right.) I haven't included a few things like sensors (<$10) for doing PEC correction, or another motor to allow it to do things like focus (which is REALLY HANDY for AP, though most scopes will require a custom solution. EX: https://www.thingiverse.com/thing:1260785)
So for this, $350 + bracket + 35 + 22 + 10 + 224 + 28+7+13 = 501 + shipping.
^1 https://www.amazon.com/STEPPERONLINE-Bipolar-Stepper-0-9deg-62-3oz/dp/B00PNEQMLY/ (242)
^2 https://www.amazon.com/RuiLing-Aluminum-Timing-Pulley-Printer/dp/B07QWRGCLY/ (28)
^3 https://www.amazon.com/Timing-Pulley-Wheel-20Teeth-Printer/dp/B07RXJ5GVG/ (17, with spares)
^4 https://www.amazon.com/2GT-Timing-Belt-Closed-Loop/dp/B014KKRSLY/ (113, with spares)
If you think that things are worth potentially doing, I can give you a list that's got a bit more time into it.
A RAMPS 1.6* kit would be the cheapest. Best would be something like a Einsy RAMBO* (a board very similar to the one on the Prusa MK3), but that's $120. A good middle of the road solution is the RUMBA+* combined with some stepstick format stepperdrivers. The stock anet uses A4988's*, there's also the option to use DRV8825's* (better resolution, but some people experience resonance related issues) or TMC2130's*. (allows for very silent running) and a screen* (if not included)
In any case, make sure that it has some kind of overcurrent protection. I prefer solutions with blade fuses (also commonly referred to as automotive fuses) It really pays to do some research of your own and to see what you want to get out of a printer. Eventually most A8 frames get converted to other models using the other parts of the kit for the electronics. You should check out the wiki, it contains a couple of good pointers to get you started.
*^(please note that the links provided are meant as illustrations and that I don't necessarily mean to endorse the linked products)
[edit]
As stated before, just toss the melzi and/or anet controller. They're fire hazards. And while you're at it, better improve rather than sidegrade.
hey thanks man, nice find! on a whim i searched for exact same item on Amazon and found it and ordered it that way. i'll report back here with a review when i get it installed.
my mechanic buddy told me i can install this at the horn relay. i haven't looked at where this is or anything for my car, but i doubt it'll be difficult. i'll just mount the unit near there and run leads to wherever the steering wheel leads attach. i might have to hack into the wires just upstream from the actual lead connectors and basically turn it into a Y maybe? not sure about best way to do that, or if there's a super slick Radio Shack type thingy for that. i'll likely just snip the wires and use tiny wire nuts to make little 3way pigtails or whatever.
and since the device has another channel to play with i also thought maybe i could rig up the same basic idea except with a 12v wire on the inside of the car that runs to one of those blindingly bright LED flashlights they sell for cheap these days. might be useful if i didn't want to blast the horn for some reason.
thanks again, hopefully this will be my magic fix. and if not, hey at least it'll be a fun project to tinker around with.
here's the item i bought on Amazon: https://www.amazon.com/Channel-wireless-Control-Transmitter-Receiver/dp/B01MQV7KRZ/ref=sr_1_1?s=instant-video&amp;ie=UTF8&amp;qid=1491308204&amp;sr=8-1&amp;keywords=12V+315MHz+Wireless+Remote+Control+Switch+Transmitter+Receiver
Hmm.
My system is Z-Wave and HomeSeer based so that is where most of my knowledge lies...
Best option- wait a few months, Inovelli I think is coming out with a combo fan/light switch. I'm sure there will be other options also- fan and light in one gang is not an uncommon request.
However with what's available today, I'd get a single gang fan switch with scene control capability and decoupling like the HomeSeer HS-FC200+. Wire that in with the fan. Then wire the light through a micro dimmer (a few of these exist from different companies...). If there's not enough space in the box, then bridge the light wire to hot in the box (so the light wire from switch to fan is always energized) and then stick the micro dimmer in the box above the fan).
Now program your Z-Wave hub. On the fan control, set it so two taps up turns the light on, two taps down turns the light off.
Ideally you'd disable local control, so that one tap up or down turns the light on or off, and two taps up or down turns the fan on or off, but I don't know if the HomeSeer fan controller supports that function.
These are the motor mounts and pulleys I used. Cheap, sturdy and easy. In the video above you can see how well the line up. The aluminum pulleys are okay, not great, but they seem to be wearing well and have not had any problems. There are better ones out there, but these are the ones from my amazon shopping cart and should be a good starting point.
https://www.amazon.com/gp/product/B01HHPD7LY/ref=oh_aui_search_detailpage?ie=UTF8&amp;psc=1
https://www.amazon.com/CTYRZCH-Aluminum-Pulley-Bearings-Printer/dp/B06XHY2RWZ/ref=sr_1_31?s=industrial&amp;ie=UTF8&amp;qid=1494562287&amp;sr=1-31&amp;keywords=gt2+pulley
https://www.amazon.com/BIQU-Smooth-Precise-Bearing-Printer/dp/B01FTZMXDW/ref=sr_1_27?s=industrial&amp;ie=UTF8&amp;qid=1494562287&amp;sr=1-27&amp;keywords=gt2+pulley
I'm a little late to the party but I'll offer my advice just in case you still need help.
From the other comments I understand you have a thermostat with a mercury bulb in it. This means you don't have electric baseboard but rather hot water heating baseboards. All the wiring is low voltage which means you don't need to worry about zapping yourself.
From the sounds of it your thermostat is working. I would assume then that your zone valve is stuck open now. A zone valve is a mechanical device that opens and closes the flow of hot water through the baseboard piping. 9 times out of 10 the zone valve motor gets seized open or closed, open in your case.
http://www.homedepot.ca/product/honeywell-motorized-zone-valve/903029
The above image is what the most common zone valves look like. Under the removable cover is the motor. On the side of the valve is a small lever. If the lever moves side to side with ease then the valve is stuck open. I would then try replacing the motor.
http://www.amazon.com/Honeywell-802360JA-Replacement-Motor-Valves/dp/B0006UPLQC
This is what the motor looks like. Any hardware store should carry a replacement. All you have to do is remove the two screws that hold the motor in place and you can pull the motor up. Sometimes the motor might need a few wiggles to get it loose, but don't worry about that. You just put the new motor in place, the two screws, then connect the two wires.
edit: put the same link in twice, fixed it to show the motor
One tip about the screws for the new motor is if it is hard to get the back screw in don't worry about it. I leave the back screw out all the time if I can't get to it easily. It only needs the one screw to hold it in.
I hope this helps. But in reality I hope you have already gotten the problem fixed. If so, no worries. Good luck.
Ok I think i see what you're shooting for.
It would probably be easiest to have the animation cells connected in one continuous loop so you wouldn't need to worry about programming the motors to stop at a certain point, but it's possible.
The lego NXT would be great if you already have those available for you to use, but if all you need it to do is turn one direction, at one speed with an on/off switch, it is kinda overkill.
The simplest way I can think of doing it is just wiring up a simple DC motor similar to this: Electric 12vdc Reversible 36 Rpm Dc Gear Motor for DIY Parts https://www.amazon.com/dp/B07DN6VQSM/ref=cm_sw_r_cp_apa_i_6D14BbMDWVWWA
And for the other side just use a roller.
You could enclose it all in a box and power it with regular 9 volt batteries ( the motor is rated for 12v so it will run at ~3/4 the rpm you choose).
Then just wire in any switch that you like and you should be golden.
This is also just my back of the napkin design so I could be overlooking something, but I think it will work for you.
How big is your reel of slides?
You're going to get flex the first time you try to mill anything significant when Y is pulling on X, the fact it feels solid to you when you pull on it with your hands is immaterial.
A CNC mill needs a solid aluminum extrusion frame or better, full stop. Especially if you want to "take a quarter inch out of copper"
You're getting into the territory of non-trivial machining, and hobby grade equipment isn't up to the task, and the difference is reflected in price.
Also, yes the steppers are grossly insufficient, you're going to need to get a pair of something like this for the axis steppers, driving solid threaded rods or ballscrews. 3d printer sized nema steppers and belts will not provide the torque required, and the steppers we use will not put out the power needed to step the big boys under load. You'll need a more powerful PSU too, these larger stepper motors can draw at peak as much as all the steppers on a Prusa style machine combined.
https://www.amazon.com/dp/B012QFRKAO/ref=cm_sw_r_cp_apa_qaqUBbYKSTW5H
A latch solenoid should only be activated to unlock, and then only for a short time, lest it overheat. These should be fine for batteries. However, solenoids are generally pretty weak; any pressure, whether from spring or human pulling or warped hinge or anything will tend to bind them up. Car door locks are better. A linear actuator is very strong and reliable, but usually aren't short enough to be a latch.
You may be interested in a cabinet latch. This type has a nice "pop" open.
You can't use a speed control like the one you have linked. Those are for universal/brushed AC motors only; using one with a induction/capacitor motor like you have is bad for the windings. You need a VFD.
The advantage of using a VFD and induction motor is that you get full torque unlike what you would get using the AC chopping speed control like you purchased when used with a universal motor. Your only other option would be to use a DC motor, but then that gets very expensive pretty quickly.
If you do buy the VFD you should also get a 10K potentiometer to go with it; something with a big knob so it's easily adjustable and so you don't have to get clay all over your nice new VFD.
I would say that if you're going to upgrade the rods and such and have access to a 3D printer (which you will need to do that), just buy your own extrusions and build it yourself. Use a dual rail gantry to hold up the beefier 12mm rods to stiffen everything then get a 500w or so spindle and driver from Amazon. The default 3018 spindle is weaksauce. No sense buying any of it, you'd just be replacing it all. All the parts are available on Amazon, and better 3018 parts are available on Thingiverse.
Get a raspberry Pi and a Protoneer CNC Hat (my current solution for the 3018) or just get a cheap GRBL controller from Amazon. That way you can get the nice Trinamic drivers and such too if you want it to be quieter.
They are commonly used for fan speed or router speed controllers and for $20 well worth the cost. Harbor freight carries them or there a ton on Amazon like this one. I just zip tied the trigger on the drill all the way on then dial the knob up until I’m at the manufacturers recommended rpm (200 for my monster mill).
Buy a swagelok valve from here (paying full price is for suckers and these guys ship faster than Swagelok anyways). For reference you can get a brand new swagelok for less than $40 from this site. Just compare the part number to the swagelok website to check seal/o ring materials.
Buy a high torque stepper motor and hook it up to the valve. You will also need a stepper motor driver that can deliver sufficient amperage. This is pretty much the simplest/cheapest way to get 150 in-lbs of torque delivered to the valve. Theoretically you'd only need about 50 but better safe than sorry.
This is the cheapest and simplest way to get what you want. If you already have gear for pneumatic control (air tank, solenoids, regulator, etc) pneumatic might be cheaper but you also don't get fine position control with pneumatic so take that as you will.
I agree that a servo would be the best option. But a servo can only rotate 180° so if you need it to rotate more you have to go with a geared down Dc motor.
https://www.amazon.co.uk/sourcingmap-Reduction-Electric-Gearbox-Centric/dp/B01KTZXZDE/ref=sr_1_6?ie=UTF8&amp;qid=1491417991&amp;sr=8-6&amp;keywords=dc+motor
https://www.amazon.co.uk/0-06A-5Kg-cm-Electric-Reducing-Geared/dp/B00977HK2S/ref=sr_1_7?ie=UTF8&amp;qid=1491417991&amp;sr=8-7&amp;keywords=dc+motor Or a stepper motor.
https://www.amazon.co.uk/HALJIA-4-Phase-Stepper-ULN2003-Arduino/dp/B01DM8N9HW/ref=sr_1_7?ie=UTF8&amp;qid=1491418126&amp;sr=8-7&amp;keywords=stepper+motor This one even comes with a h bridge.
How did you fit the drive sprockets, and what circuits did you use?
You mentioned off the shelf stuff, so I'm mildly curious.
And by gearbox, I assume you mean something like this?
https://www.amazon.com/Yosoo-Torque-300RPM-Gearbox-Replacement/dp/B01NCQTK3S/ref=sr_1_2?ie=UTF8&amp;qid=1519191975&amp;sr=8-2&amp;keywords=200+rpm+metal+gear+motor
I would go back to the drawing boards and first understand how rgb led’s work and then look into pulse with modulation (PWM). I would agree with everyone else that voltage regulating isn’t what you need.
I’m assuming that your strips are rated for 12V and since they will be connected to 12V they are good in terms of voltage. Now in order to tune to specific colors you’ll need a PWM setup. You could use the pots you have in order to achieve what you want, but the LM317 or LM337 is not the correct route for this. If you want a simpler A>B setup that has dialed controls something like this would be what you would want.
Mini DC Motor PWM Governor 1.8V 3V 6V 9V 12V Speed Switch Uultra-small LED Dimmer https://www.amazon.com/dp/B01MXR4TSD/ref=cm_sw_r_cp_api_i_qxYnDb7TCVTHG
That sounds like a cool project, can I ask what features are being added with IOT integration? I assume the loadbank is for testing the generators?
Here's a pretty good motor control video that explains the basics. If you post a picture of the diagram I can probably help you with the connection, it might even already be correct.
I'm used to magnetic motor starters so that's what I suggested but for such a small motor you can probably get away with a horsepower rated 3 pole switch like this and skip the overloads.
Thank you so much! This is very useful information. My plan was to use one of the following 2 z-wave controllers, but whether I can use 1 or if I"ll need more will depend on the actual power requirements of these strips.
Fibaro
Qubino
I'm going to email the seller to see if they can clarify the power information.
edit: The seller responded and they said 85 watts is correct. Ultimately doesn't matter since I overlooked the fact that they are not outdoor rated! Any recommendation for quality affordable strip lights? I'm looking at something like this now.
LEDENET RGBW
Those look fine but they aren't super powerful. The g shield can supply 2.5 amps so any motor that needs less power than that will be fine. If you are just cutting wood those steppers are fine, maybe shop around for something with a lower inductance, 13mh is pretty high. These guys look much better but you won't be able to get full current into them:
https://www.amazon.com/dp/B00PNEPF5I/ref=asc_df_B00PNEPF5I5078529/?tag=hyprod-20&amp;creative=395033&amp;creativeASIN=B00PNEPF5I&amp;linkCode=df0&amp;hvadid=198064502357&amp;hvpos=1o1&amp;hvnetw=g&amp;hvrand=4174940156511751979&amp;hvpone=&amp;hvptwo=&amp;hvqmt=&amp;hvdev=m&amp;hvdvcmdl=&amp;hvlocint=&amp;hvlocphy=9032550&amp;hvtargid=pla-323464553412#productDescription_secondary_view_div_1500259475627
I used one of these on that exact same double switch for the same purpose. Works great. https://www.amazon.com/gp/product/B06XFC2V6M/ref=oh_aui_search_detailpage?ie=UTF8&amp;psc=1
You can install an in-wall dual z-wave relay, like one of these:
I don't know if there are any dual in-wall dimming switches. Personally, I'd rip out the single gang work-box, and put in a old-work double gang work-box.
Qubino makes one, as well as Fibaro
I'm looking at these two:
http://www.amazon.com/Bipolar-Stepper-0-9deg-steps-62-3oz/dp/B00PNEQMLY/ref=sr_1_8?ie=UTF8&amp;qid=1421105539&amp;sr=8-8&amp;keywords=nema17+stepper+motor
http://www.amazon.com/RioRand-57oz--Stepper-router-mill-K42HS40-1304/dp/B00JI5LTYE/ref=sr_1_10?ie=UTF8&amp;qid=1421106142&amp;sr=8-10&amp;keywords=nema17+stepper+motor
Do you have any opinion on either of them?
Oh boy time to buy a mill and convert it to a <$1.5k CNC mill to make small parts!
Motor speed controller
Other Z-Wave LED strip controllers include Fibaro Qubino RGBGenie.
I didn't realize the Hue line included LED strips. I apologize for any confusion.