(Part 2) Reddit mentions: The best camera accessories
We found 13,509 Reddit comments discussing the best camera accessories. We ran sentiment analysis on each of these comments to determine how redditors feel about different products. We found 4,614 products and ranked them based on the amount of positive reactions they received. Here are the products ranked 21-40. You can also go back to the previous section.
21. OP/TECH USA 9001132 Rainsleeve - Original, 2-Pack (Clear)
- Compact design fits easily in a bag or pocket
- Designed for handheld use or tripod application
- Unique eyepiece opening adapts to most viewfinders for viewing through the lens - not plastic!
- Drawstring lens opening offers easy access and a snug fit. Camera and lens controls are easily visible and operable
- RAINSLEEVE fits Lenses up to 18" L X 7" Diameter (45.7cm L X 17.8cm Diameter)
Features:

Specs:
| Color | clear |
| Height | 4 Inches |
| Length | 1.25 Inches |
| Number of items | 1 |
| Release date | March 2019 |
| Size | Original |
| Weight | 0.00220462262 Pounds |
| Width | 1.25 Inches |
22. Professional Grade Lavalier Lapel Microphone Omnidirectional Mic with Easy Clip On System Perfect for Recording Youtube / Interview / Video Conference / Podcast / Voice Dictation / iPhone/ASMR
- 100% WIRED. Always ready to use. Stable communication without radio interference in any place. Never requires charging, works without a battery. Just plug in and start recording audio.
- UPGRADED 2022. Professional Grade Lavalier Microphone has new fully shielded cord that makes your voice perfectly clear and free of extraneous noise. TRRS to TRS 3.5 mm Jack adapter is included.
- UNIVERSAL COMPATIBILITY. For Android, Cameras, Camcorders, Audio Recorders, Tablets, Laptops (some may require a USB Adapter, not included) and iPhone (adapter is not included).
- EXTRA-LONG CORD WITH EXTENSION CORD. Our clip-on microphone has 79" (2m) length cord and additional extension cord 2m included in box. Handy case for easy keeping and carrying included.
- ONE YEAR WARRANTY. We help with any issue with the clip lav lapel microphones - just contact PowerDeWise support.
Features:

Specs:
| Color | Black |
| Height | 3.15 Inches |
| Length | 4.33 Inches |
| Width | 0.79 Inches |
23. CowboyStudio Shoulder Support Pad for Video Camcorder Camera DV / DC
- Fully adjustable for camcorders and cameras
- Fits most video cameras
- Stabilizes and reduces shaking
- Adjustable to different body sizes
Features:

Specs:
| Color | black |
| Height | 5.905511805 Inches |
| Length | 5.905511805 Inches |
| Weight | 1 Pounds |
| Width | 5.905511805 Inches |
24. Rode VideoMicPro Compact Directional On-Camera Microphone with Rycote Lyre Shockmount
- A true shotgun microphone designed for camcorders, DSLR cameras and portable audio recorders as primary and reference audio
- The 1/2" condenser capsule provides broadcast-quality audio via a 3.5mm connector with an incredibly low self-noise of just 14db
- The Rycote Lyre based shock mounting system provides isolation from external factors that may cause unwanted rumble and vibrations
Features:

Specs:
| Color | Black |
| Height | 5 Inches |
| Length | 9 Inches |
| Number of items | 1 |
| Release date | May 2015 |
| Weight | 0.187375 Pounds |
| Width | 3 Inches |
25. Fotodiox Lens Mount Adapter - Nikon Nikkor F Mount D/SLR Lens to Canon EOS (EF, EF-S) Mount SLR Camera Body
- Mounts Nikon Nikkor F Mount D/SLR lenses to Canon EOS (EF, EF-S) Mount SLR Cameras. This is a manual adapter.
- High-tolerance precision craftsmanship; infinity focus or beyond allowed
- All-metal design; hardened anodized aluminum construction
- Premium grade Fotodiox adapter
- Limited 2-Year Manufacturer Warranty
Features:

Specs:
| Color | None |
| Height | 3 Inches |
| Length | 3 Inches |
| Number of items | 1 |
| Release date | October 2012 |
| Size | Nikon F |
| Weight | 0.0440924524 Pounds |
| Width | 1 Inches |
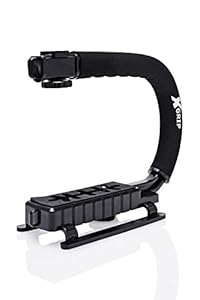
26. Opteka X-Grip Professional Camera/Camcorder Action Stabilizing Handle- Black
- Hold your camera down low or high when filming skiing, snowboarding, skateboarding, auto racing, motocross, BMX/FMX, sporting events and even when boating.
- Cushioned finger groove padded foam handle alleviates the stress of lengthy filming and provides a secure grip, as well as non-slip rubber rails for further securing your camera.
- Made out of high-grade heavy duty ABS impact-absorbent plastic which can handle the toughest abuse.
- Removable accessory shoe mount on the top, which can hold your video light, camera flash or external microphone.
- COMPATIBILITY: Most DSLR, mirrorless, video cameras and other cameras with an 1/4-20 standard tripod hole.
Features:
Specs:
| Color | Black |
| Height | 9.75 Inches |
| Length | 8.25 Inches |
| Size | Black |
| Weight | 0.9 Pounds |
| Width | 3.5 Inches |
27. GoPro Hero4 Silver
Built in touch display for easy camera control, shot framing and playbackProfessional 1080P60 and 720P120 video with 12MP photos at up to 30 frames per secondBuilt in wi fi and bluetooth support the GoPro app, smart remote and moreImproved camera control and built in video trimming lets you create a...

Specs:
| Color | Silver |
| Height | 1.53 Inches |
| Length | 2.8 Inches |
| Size | One Size |
| Weight | 0.32 Pounds |
| Width | 2.79 Inches |
28. Celestron 93625 Universal 1.25-inch Camera T-Adapter, Single
- The Celestron Universal T-Adapter connects a DSLR or SLR camera to a refractor for prime focus photography
- The adapter’s chrome barrel slides into any focuser that accepts 1.25” accessories
- T-Threads accept camera brand specific T-Ring (sold separately)
Features:

Specs:
| Height | 1.9 Inches |
| Length | 3.8 Inches |
| Number of items | 1 |
| Size | 1.25” |
| Weight | 0.1543235834 Pounds |
| Width | 2.1 Inches |
29. Celestron – 1.25” Eyepiece and Filter Accessory Kit – 14 Piece Telescope Accessory Set – Plossl Telescope Eyepiece – Barlow Lens – Colored Filters – Moon Filter – Sturdy Metal Carry Case
- 5 SUPERIOR-GRADE PLOSSL EYEPIECES: Our Celestron Accessory Kit includes 5 Plossl telescope eyepieces, ranging from low to high power: 32mm, 17mm, 13mm, 8mm, and 6mm. Each eyepiece features a four-element design with a 52-degree field of view.
- 2X BARLOW LENS: The 2x Barlow lens can be easily paired with each of the 5 eyepieces in this kit (or any 1.25” eyepiece) to enhance your view and instantly double its magnification for even more power. It’s like having 10 telescope eyepieces in your collection
- COLORED FILTERS FOR ASTRONOMICAL VIEWING: Colored filters are perfect for bringing out various details on a planet’s surface or in its cloud structure.
- DURABLE HARD-SIDED CARRYING CASE: Your kit will remain safe in a protective metal, foam-lined carrying lens filter case, perfect for organizing each piece and keeping your equipment ready to use.
Features:

Specs:
| Color | Silver |
| Height | 5.7 Inches |
| Length | 13.2 Inches |
| Number of items | 1 |
| Release date | October 2002 |
| Size | 2 GB |
| Weight | 3.37748185384 Pounds |
| Width | 11.7 Inches |
30. Apple Lightning to USB3 Camera Adapter
- With the Lightning to USB 3 Camera Adapter, it’s easy to transfer photos and videos from your high-resolution digital camera to your iPad Pro.
- After you connect the Lightning to USB 3 Camera Adapter, your iPad Pro automatically opens the Photos app, which lets you choose photos and videos to import, then organizes them into albums.
- Add even greater capability and versatility to your iPad Pro by powering the Lightning to USB 3 Camera Adapter with a USB Power Adapter. Then you can connect USB peripherals like hubs, Ethernet adapters, audio/MIDI interfaces, and card readers for CompactFlash, SD, microSD, and more.
- The Lightning to USB 3 Camera Adapter supports standard photo formats, including JPEG and RAW, along with SD and HD video formats, including H.264 and MPEG-4.
- The 12.9-inch iPad Pro (1st and 2nd generation) and 10.5-inch iPad Pro transfers data at USB 3 speeds, while the 9.7-inch iPad Pro uses USB 2.
Features:

Specs:
| Color | white |
| Height | 6.1 Inches |
| Length | 2.6 Inches |
| Number of items | 1 |
| Release date | August 2020 |
| Weight | 0.11 Pounds |
| Width | 0.67 Inches |
31. Flash Diffuser Light Softbox 6x5” by Altura Photo (Universal, Collapsible with Storage Pouch) for Canon, Yongnuo and Nikon Speedlight
- Altura Photo Softbox Flash Diffuser for Shoe Mount Flash Units.
- EVEN LIGHTING: Reduces harshness and softens shadows. Features an additional internal diffuser for better wrap around light.
- SIMPLE AND COMPACT: Integrated hook and loop fastener strap secures around the flash head. Folds down flat when not in use.
- ONE SIZE FITS ALL: Compatible with most shoe mount flash units (including Canon Nikon Sony Olympus and more). Product Dimensions 6" x 5"
- SATISFACTION GUARANTEED: Backed by Our 90-Day Satisfaction Guarantee.
Features:

Specs:
| Height | 1 Inches |
| Length | 10 Inches |
| Size | 6 x 5” |
| Weight | 0.15 Pounds |
| Width | 6 Inches |
32. AC to DC 12V 1.5A 12V1.5A Power Supply Adapter Switching for Cameras DVR NVR LED Light Strip DC3.51.35mm UL listed FCC
- [NOT fit for hero 5]With high-tech Japanese cells, rechargeable Li-ion batteries with 1290 mAh for longer battery life.
- Rapid 3Channel Charger allows charging 3pcs batteries for camera at once for time-saving.
- Smatree batteries and charger are compatible with the gopro hero 4 camera.
- Smart LED light indicated RED when charging and GREEN when complete.
- Package Contents: 2 x Battery; 1 x 3-Channel Charger; 1 x USB Cord.
Features:
 ▼ Read Reddit mentions
33. Nikon 7072 Lens Pen Cleaning System, Black
- Introducing our new simple lens-cleaning system effective, durable and long lasting
- Introducing our new simple lens-cleaning system effective, durable and long lasting
- Quality is assured and maintained up-to a certain level, another very important feature of this cleaning kit is that it has Soft brush retracts into pen body to stay clean
- Removes fingerprints, dust, and other debris that may compromise your image
- Works with all types of cameras (digital and film), as well as binoculars, telescopes, and other optical products
Features:

Specs:
| Color | Black |
| Height | 1 Inches |
| Length | 6 Inches |
| Number of items | 1 |
| Size | One Size |
| Weight | 0.03125 Pounds |
| Width | 3 Inches |
34. Spy Tec Adhesive Mount For Mobius Action Camera and Standard 1/4"-20 Tripod Thread Cameras
 ▼ Read Reddit mentions
35. GoPro Suction Cup Mount (GoPro Official Mount)
- Attach your GoPro to cars, boats, motorcycles and more
- Industrial strength suction cup proven at speeds of 150+ mph
- Engineered to provide a broad range of motion and stability
- Quick release base makes moving between shots and locations quick and convenient
Features:

Specs:
| Color | Black |
| Height | 9 Inches |
| Length | 6 Inches |
| Number of items | 1 |
| Release date | September 2013 |
| Size | One Size |
| Weight | 0.13007273458 Pounds |
| Width | 1.7 Inches |
36. Neewer Portable FilmMaker System With Camera/Camcorder Mount Slider, Soft Rubber Shoulder Pad and Dual-hand Handgrip For All DSLR Video Cameras and DV Camcorders
Lightweight for mobile film-making, suitable for long-hour continuous workCustomized design for adding/replacing component(s) in some specialized occasions for film-makingErgonomic design, angle and position adjustments enabledCan be installed with video-capture series of related accessoriesSuitable...

Specs:
| Color | Blue |
| Height | 3.93700787 Inches |
| Length | 15.354330693 Inches |
| Release date | June 2014 |
| Weight | 2.998125 Pounds |
| Width | 6.692913379 Inches |
37. Fotodiox RB2A 52mm Filter Thread Lens, Macro Reverse Ring Camera Mount Adapter, for Nikon D1, D1H, D1X, D2H, D2X, D2Hs, D2Xs, D3, D3X, D3s, D4, D100, D200, D300, D300S, D700, D800, D800E, D40, D50, D60, D70, D70S, D80, D40X, D90, D3000, D3100, D3200, D5000, D5100, D7000, Fuji S1, S2, S3, S5
- Mounts lenses with Ø 52mm filter thread to a Nikon F camera
- Reverse mounting lenses enables macro abilities
- All metal anodized aluminum construction
- Premium grade Fotodiox adapter
Features:

Specs:
| Height | 1 Inches |
| Length | 1 Inches |
| Size | 52mm Macro Reverse Ring |
| Weight | 45.4 Grams |
| Width | 1 Inches |
38. Sigma 10-20mm f/4-5.6 EX DC HSM Lens for Canon Digital SLR Cameras
- 10-20mm focal length
- 15-30mm equivalent focal length on APS-C cameras, 20-40mm equivalent focal length on Four Thirds / Micro Four Thirds cameras, 16-32mm equivalent focal length on Canon APS-C cameras
- F4-5.6 maximum aperture; F22-32 minimum
- Ring-type ultrasonic-type AF motor with full-time manual focusing
- 77mm filters
- 0.24m/9.45" minimum focus
- Available in Canon EF, Four Thirds, Pentax KAF, Sony Alpha, Sigma SA, Nikon F (DX) mounts
- Vignetting will occur if the lens is used with digital cameras with image sensors larger than APS-C size or 35mm SLR cameras.
Features:

Specs:
| Color | Black |
| Height | 3.30708 Inches |
| Length | 3.18897 Inches |
| Weight | 1.0361726314 Pounds |
| Width | 3.30708 Inches |
39. SVBONY Telescope Eyepiece Fully Mutil Coated 1.25 inches Telescope Lens 66 Degree Ultra Wide Angle HD (6mm 9mm 15mm 20mm)
- 66 degree AFOV perfects for broad field lunar observations;medium sized star clusters;wide range of cloudy nebulas and deep sky targets with extra sharpness
- 6/9/15/20mm for different magnifications;high power and medium eyepiece fits for viewing surface and potholes details on the moon;the planetary;lunar;double stars;nebulas and deep sky
- Fully multi coated broadband green optics with superior optical performance;clarity is great and the magnification is truly represented
- Multi group lens combination to improve optical performance;the eyepieces sets delivers sharp images with good color correction and contrast
- Edge blackened optics;internally blackened to eliminate light scattering;minimize internal reflection and maximize contrast
Features:

Specs:
| Height | 3.9 Inches |
| Length | 4.7 Inches |
| Size | 6mm 9mm 15mm 20mm |
| Weight | 0.7936641432 Pounds |
| Width | 4.7 Inches |
40. Phot-R Photo Studio Multi-Function Dual Spring Tripod Flash Reflector Holder Mount Clip Clamp with 1/4" Screw Ball Head for DSLR Cameras
- Flash holder with ball head and a spring clamp.
- This will clamp onto almost anything in your studio to provide you with flexibility to mount your camera wherever you need it most
- You can use it to clamp on to light stands, background supports and boom arms. This can be done by attaching your camera/ cold shoe via tripod screw mount and clamp wherever you want
- The ball head can rotate 360 degrees, which makes it very convenient for adjusting shooting angles.
- It has rubber caps on the clamp to protect your expensive photographic equipment.
Features:

Specs:
| Height | 3.543307083 Inches |
| Length | 5.7086614115 Inches |
| Number of items | 1 |
| Release date | April 2015 |
| Size | Spring Clamp Ball Head |
| Weight | 0.185 Kilograms |
| Width | 3.93700787 Inches |
🎓 Reddit experts on camera accessories
The comments and opinions expressed on this page are written exclusively by redditors. To provide you with the most relevant data, we sourced opinions from the most knowledgeable Reddit users based the total number of upvotes and downvotes received across comments on subreddits where camera accessories are discussed. For your reference and for the sake of transparency, here are the specialists whose opinions mattered the most in our ranking.
Subcategories:
Interested in what Redditors like? Check out our Shuffle feature
Shuffle: random products popular on RedditTop Reddit comments about Camera & Photo Accessories:
Summary
21. OP/TECH USA 9001132 Rainsleeve - Original, 2-Pack (Clear)
- Compact design fits easily in a bag or pocket
- Designed for handheld use or tripod application
- Unique eyepiece opening adapts to most viewfinders for viewing through the lens - not plastic!
- Drawstring lens opening offers easy access and a snug fit. Camera and lens controls are easily visible and operable
- RAINSLEEVE fits Lenses up to 18" L X 7" Diameter (45.7cm L X 17.8cm Diameter)
Features:
Specs:
| Color | clear |
| Height | 4 Inches |
| Length | 1.25 Inches |
| Number of items | 1 |
| Release date | March 2019 |
| Size | Original |
| Weight | 0.00220462262 Pounds |
| Width | 1.25 Inches |
22. Professional Grade Lavalier Lapel Microphone Omnidirectional Mic with Easy Clip On System Perfect for Recording Youtube / Interview / Video Conference / Podcast / Voice Dictation / iPhone/ASMR
- 100% WIRED. Always ready to use. Stable communication without radio interference in any place. Never requires charging, works without a battery. Just plug in and start recording audio.
- UPGRADED 2022. Professional Grade Lavalier Microphone has new fully shielded cord that makes your voice perfectly clear and free of extraneous noise. TRRS to TRS 3.5 mm Jack adapter is included.
- UNIVERSAL COMPATIBILITY. For Android, Cameras, Camcorders, Audio Recorders, Tablets, Laptops (some may require a USB Adapter, not included) and iPhone (adapter is not included).
- EXTRA-LONG CORD WITH EXTENSION CORD. Our clip-on microphone has 79" (2m) length cord and additional extension cord 2m included in box. Handy case for easy keeping and carrying included.
- ONE YEAR WARRANTY. We help with any issue with the clip lav lapel microphones - just contact PowerDeWise support.
Features:
Specs:
| Color | Black |
| Height | 3.15 Inches |
| Length | 4.33 Inches |
| Width | 0.79 Inches |
23. CowboyStudio Shoulder Support Pad for Video Camcorder Camera DV / DC
- Fully adjustable for camcorders and cameras
- Fits most video cameras
- Stabilizes and reduces shaking
- Adjustable to different body sizes
Features:
Specs:
| Color | black |
| Height | 5.905511805 Inches |
| Length | 5.905511805 Inches |
| Weight | 1 Pounds |
| Width | 5.905511805 Inches |
24. Rode VideoMicPro Compact Directional On-Camera Microphone with Rycote Lyre Shockmount
- A true shotgun microphone designed for camcorders, DSLR cameras and portable audio recorders as primary and reference audio
- The 1/2" condenser capsule provides broadcast-quality audio via a 3.5mm connector with an incredibly low self-noise of just 14db
- The Rycote Lyre based shock mounting system provides isolation from external factors that may cause unwanted rumble and vibrations
Features:
Specs:
| Color | Black |
| Height | 5 Inches |
| Length | 9 Inches |
| Number of items | 1 |
| Release date | May 2015 |
| Weight | 0.187375 Pounds |
| Width | 3 Inches |
25. Fotodiox Lens Mount Adapter - Nikon Nikkor F Mount D/SLR Lens to Canon EOS (EF, EF-S) Mount SLR Camera Body
- Mounts Nikon Nikkor F Mount D/SLR lenses to Canon EOS (EF, EF-S) Mount SLR Cameras. This is a manual adapter.
- High-tolerance precision craftsmanship; infinity focus or beyond allowed
- All-metal design; hardened anodized aluminum construction
- Premium grade Fotodiox adapter
- Limited 2-Year Manufacturer Warranty
Features:
Specs:
| Color | None |
| Height | 3 Inches |
| Length | 3 Inches |
| Number of items | 1 |
| Release date | October 2012 |
| Size | Nikon F |
| Weight | 0.0440924524 Pounds |
| Width | 1 Inches |
26. Opteka X-Grip Professional Camera/Camcorder Action Stabilizing Handle- Black
- Hold your camera down low or high when filming skiing, snowboarding, skateboarding, auto racing, motocross, BMX/FMX, sporting events and even when boating.
- Cushioned finger groove padded foam handle alleviates the stress of lengthy filming and provides a secure grip, as well as non-slip rubber rails for further securing your camera.
- Made out of high-grade heavy duty ABS impact-absorbent plastic which can handle the toughest abuse.
- Removable accessory shoe mount on the top, which can hold your video light, camera flash or external microphone.
- COMPATIBILITY: Most DSLR, mirrorless, video cameras and other cameras with an 1/4-20 standard tripod hole.
Features:
Specs:
| Color | Black |
| Height | 9.75 Inches |
| Length | 8.25 Inches |
| Size | Black |
| Weight | 0.9 Pounds |
| Width | 3.5 Inches |
27. GoPro Hero4 Silver
Built in touch display for easy camera control, shot framing and playbackProfessional 1080P60 and 720P120 video with 12MP photos at up to 30 frames per secondBuilt in wi fi and bluetooth support the GoPro app, smart remote and moreImproved camera control and built in video trimming lets you create a...
Specs:
| Color | Silver |
| Height | 1.53 Inches |
| Length | 2.8 Inches |
| Size | One Size |
| Weight | 0.32 Pounds |
| Width | 2.79 Inches |
28. Celestron 93625 Universal 1.25-inch Camera T-Adapter, Single
- The Celestron Universal T-Adapter connects a DSLR or SLR camera to a refractor for prime focus photography
- The adapter’s chrome barrel slides into any focuser that accepts 1.25” accessories
- T-Threads accept camera brand specific T-Ring (sold separately)
Features:
Specs:
| Height | 1.9 Inches |
| Length | 3.8 Inches |
| Number of items | 1 |
| Size | 1.25” |
| Weight | 0.1543235834 Pounds |
| Width | 2.1 Inches |
29. Celestron – 1.25” Eyepiece and Filter Accessory Kit – 14 Piece Telescope Accessory Set – Plossl Telescope Eyepiece – Barlow Lens – Colored Filters – Moon Filter – Sturdy Metal Carry Case
- 5 SUPERIOR-GRADE PLOSSL EYEPIECES: Our Celestron Accessory Kit includes 5 Plossl telescope eyepieces, ranging from low to high power: 32mm, 17mm, 13mm, 8mm, and 6mm. Each eyepiece features a four-element design with a 52-degree field of view.
- 2X BARLOW LENS: The 2x Barlow lens can be easily paired with each of the 5 eyepieces in this kit (or any 1.25” eyepiece) to enhance your view and instantly double its magnification for even more power. It’s like having 10 telescope eyepieces in your collection
- COLORED FILTERS FOR ASTRONOMICAL VIEWING: Colored filters are perfect for bringing out various details on a planet’s surface or in its cloud structure.
- DURABLE HARD-SIDED CARRYING CASE: Your kit will remain safe in a protective metal, foam-lined carrying lens filter case, perfect for organizing each piece and keeping your equipment ready to use.
Features:
Specs:
| Color | Silver |
| Height | 5.7 Inches |
| Length | 13.2 Inches |
| Number of items | 1 |
| Release date | October 2002 |
| Size | 2 GB |
| Weight | 3.37748185384 Pounds |
| Width | 11.7 Inches |
30. Apple Lightning to USB3 Camera Adapter
- With the Lightning to USB 3 Camera Adapter, it’s easy to transfer photos and videos from your high-resolution digital camera to your iPad Pro.
- After you connect the Lightning to USB 3 Camera Adapter, your iPad Pro automatically opens the Photos app, which lets you choose photos and videos to import, then organizes them into albums.
- Add even greater capability and versatility to your iPad Pro by powering the Lightning to USB 3 Camera Adapter with a USB Power Adapter. Then you can connect USB peripherals like hubs, Ethernet adapters, audio/MIDI interfaces, and card readers for CompactFlash, SD, microSD, and more.
- The Lightning to USB 3 Camera Adapter supports standard photo formats, including JPEG and RAW, along with SD and HD video formats, including H.264 and MPEG-4.
- The 12.9-inch iPad Pro (1st and 2nd generation) and 10.5-inch iPad Pro transfers data at USB 3 speeds, while the 9.7-inch iPad Pro uses USB 2.
Features:
Specs:
| Color | white |
| Height | 6.1 Inches |
| Length | 2.6 Inches |
| Number of items | 1 |
| Release date | August 2020 |
| Weight | 0.11 Pounds |
| Width | 0.67 Inches |
31. Flash Diffuser Light Softbox 6x5” by Altura Photo (Universal, Collapsible with Storage Pouch) for Canon, Yongnuo and Nikon Speedlight
- Altura Photo Softbox Flash Diffuser for Shoe Mount Flash Units.
- EVEN LIGHTING: Reduces harshness and softens shadows. Features an additional internal diffuser for better wrap around light.
- SIMPLE AND COMPACT: Integrated hook and loop fastener strap secures around the flash head. Folds down flat when not in use.
- ONE SIZE FITS ALL: Compatible with most shoe mount flash units (including Canon Nikon Sony Olympus and more). Product Dimensions 6" x 5"
- SATISFACTION GUARANTEED: Backed by Our 90-Day Satisfaction Guarantee.
Features:
Specs:
| Height | 1 Inches |
| Length | 10 Inches |
| Size | 6 x 5” |
| Weight | 0.15 Pounds |
| Width | 6 Inches |
32. AC to DC 12V 1.5A 12V1.5A Power Supply Adapter Switching for Cameras DVR NVR LED Light Strip DC3.51.35mm UL listed FCC
- [NOT fit for hero 5]With high-tech Japanese cells, rechargeable Li-ion batteries with 1290 mAh for longer battery life.
- Rapid 3Channel Charger allows charging 3pcs batteries for camera at once for time-saving.
- Smatree batteries and charger are compatible with the gopro hero 4 camera.
- Smart LED light indicated RED when charging and GREEN when complete.
- Package Contents: 2 x Battery; 1 x 3-Channel Charger; 1 x USB Cord.
Features:
▼ Read Reddit mentions33. Nikon 7072 Lens Pen Cleaning System, Black
- Introducing our new simple lens-cleaning system effective, durable and long lasting
- Introducing our new simple lens-cleaning system effective, durable and long lasting
- Quality is assured and maintained up-to a certain level, another very important feature of this cleaning kit is that it has Soft brush retracts into pen body to stay clean
- Removes fingerprints, dust, and other debris that may compromise your image
- Works with all types of cameras (digital and film), as well as binoculars, telescopes, and other optical products
Features:
Specs:
| Color | Black |
| Height | 1 Inches |
| Length | 6 Inches |
| Number of items | 1 |
| Size | One Size |
| Weight | 0.03125 Pounds |
| Width | 3 Inches |
34. Spy Tec Adhesive Mount For Mobius Action Camera and Standard 1/4"-20 Tripod Thread Cameras
▼ Read Reddit mentions35. GoPro Suction Cup Mount (GoPro Official Mount)
- Attach your GoPro to cars, boats, motorcycles and more
- Industrial strength suction cup proven at speeds of 150+ mph
- Engineered to provide a broad range of motion and stability
- Quick release base makes moving between shots and locations quick and convenient
Features:
Specs:
| Color | Black |
| Height | 9 Inches |
| Length | 6 Inches |
| Number of items | 1 |
| Release date | September 2013 |
| Size | One Size |
| Weight | 0.13007273458 Pounds |
| Width | 1.7 Inches |
36. Neewer Portable FilmMaker System With Camera/Camcorder Mount Slider, Soft Rubber Shoulder Pad and Dual-hand Handgrip For All DSLR Video Cameras and DV Camcorders
Lightweight for mobile film-making, suitable for long-hour continuous workCustomized design for adding/replacing component(s) in some specialized occasions for film-makingErgonomic design, angle and position adjustments enabledCan be installed with video-capture series of related accessoriesSuitable...
Specs:
| Color | Blue |
| Height | 3.93700787 Inches |
| Length | 15.354330693 Inches |
| Release date | June 2014 |
| Weight | 2.998125 Pounds |
| Width | 6.692913379 Inches |
37. Fotodiox RB2A 52mm Filter Thread Lens, Macro Reverse Ring Camera Mount Adapter, for Nikon D1, D1H, D1X, D2H, D2X, D2Hs, D2Xs, D3, D3X, D3s, D4, D100, D200, D300, D300S, D700, D800, D800E, D40, D50, D60, D70, D70S, D80, D40X, D90, D3000, D3100, D3200, D5000, D5100, D7000, Fuji S1, S2, S3, S5
- Mounts lenses with Ø 52mm filter thread to a Nikon F camera
- Reverse mounting lenses enables macro abilities
- All metal anodized aluminum construction
- Premium grade Fotodiox adapter
Features:
Specs:
| Height | 1 Inches |
| Length | 1 Inches |
| Size | 52mm Macro Reverse Ring |
| Weight | 45.4 Grams |
| Width | 1 Inches |
38. Sigma 10-20mm f/4-5.6 EX DC HSM Lens for Canon Digital SLR Cameras
- 10-20mm focal length
- 15-30mm equivalent focal length on APS-C cameras, 20-40mm equivalent focal length on Four Thirds / Micro Four Thirds cameras, 16-32mm equivalent focal length on Canon APS-C cameras
- F4-5.6 maximum aperture; F22-32 minimum
- Ring-type ultrasonic-type AF motor with full-time manual focusing
- 77mm filters
- 0.24m/9.45" minimum focus
- Available in Canon EF, Four Thirds, Pentax KAF, Sony Alpha, Sigma SA, Nikon F (DX) mounts
- Vignetting will occur if the lens is used with digital cameras with image sensors larger than APS-C size or 35mm SLR cameras.
Features:
Specs:
| Color | Black |
| Height | 3.30708 Inches |
| Length | 3.18897 Inches |
| Weight | 1.0361726314 Pounds |
| Width | 3.30708 Inches |
39. SVBONY Telescope Eyepiece Fully Mutil Coated 1.25 inches Telescope Lens 66 Degree Ultra Wide Angle HD (6mm 9mm 15mm 20mm)
- 66 degree AFOV perfects for broad field lunar observations;medium sized star clusters;wide range of cloudy nebulas and deep sky targets with extra sharpness
- 6/9/15/20mm for different magnifications;high power and medium eyepiece fits for viewing surface and potholes details on the moon;the planetary;lunar;double stars;nebulas and deep sky
- Fully multi coated broadband green optics with superior optical performance;clarity is great and the magnification is truly represented
- Multi group lens combination to improve optical performance;the eyepieces sets delivers sharp images with good color correction and contrast
- Edge blackened optics;internally blackened to eliminate light scattering;minimize internal reflection and maximize contrast
Features:
Specs:
| Height | 3.9 Inches |
| Length | 4.7 Inches |
| Size | 6mm 9mm 15mm 20mm |
| Weight | 0.7936641432 Pounds |
| Width | 4.7 Inches |
40. Phot-R Photo Studio Multi-Function Dual Spring Tripod Flash Reflector Holder Mount Clip Clamp with 1/4" Screw Ball Head for DSLR Cameras
- Flash holder with ball head and a spring clamp.
- This will clamp onto almost anything in your studio to provide you with flexibility to mount your camera wherever you need it most
- You can use it to clamp on to light stands, background supports and boom arms. This can be done by attaching your camera/ cold shoe via tripod screw mount and clamp wherever you want
- The ball head can rotate 360 degrees, which makes it very convenient for adjusting shooting angles.
- It has rubber caps on the clamp to protect your expensive photographic equipment.
Features:
Specs:
| Height | 3.543307083 Inches |
| Length | 5.7086614115 Inches |
| Number of items | 1 |
| Release date | April 2015 |
| Size | Spring Clamp Ball Head |
| Weight | 0.185 Kilograms |
| Width | 3.93700787 Inches |
> Buffered parking mode.
Dash cams pretty much come in two different veins. Excellent parking mode, Excellent build quality, Good/Fair video quality (with buffered parking mode) vs Lackluster parking mode (not buffered), good/fair/poor build quality, Excellent video quality. The A119S currently does not have a working parking mode, and if firmware is updated to support that, the expectation will be lackluster parking mode.
> IMX322 or better sensors on both channels.
Most people don't know what this means, and not all sensors of the same name are made with equal stats. Example: The small Sony Exmor sensor, isn't equivalent to the large Sony Exmor sensor of the same name.
> 1080p @ 30fps or better on both channels.
Many complain about Fair video quality, however this dash cam meets the above requirement.
The level of expectation for all dash cams should be: Read the plate out loud, and record via audio. By footage is nice to have, but should not be expected. Even Excellent video quality might miss the plate, especially at speed, and at night. Also pen/paper write down the plate #, and call the police with telling them the number.
> Screen available to use for pseudo-backup cam.
This requirement will servery limit your options, and I do not know many dash cams with this feature. However, you could install: Backup Camera and Monitor Kit For Car,Universal Waterproof Rear-view License Plate Car Rear Backup Camera + 4.3 LCD Rear View Monitor ($29.99 USD) or other similar devices, and it would likely be more effective.
> Integrated voltage cutoffs to prevent battery drain.
Most hardwire kits will have this. Even cheap ones like this ($13USD) hardwire kit has it. This hardwire kit's voltage cut off is preset and not changeable. More expensive hardwire kits may have an adjustable voltage based, and/or timer based shut off.
More expensive hardwire kits:
Built in voltage cut off is a very desirable feature, and it to be adjustable both voltage/timer based. However, only Excellent parking mode, Excellent build quality, good/fair video quality dash cams have it. Lackluster parking mode, good/fair/poor build quality, Excellent video quality dash cams do not have this feature.
> Support over 128gb.
This is a great number, but many dash cams that you should consider, do not meet this requirement.
Thinkware F770: superior night vision & Dual Save mode Maximum SD Card 64GB (Micro SD)
----
Anyways, I suggest fully researching your options:
Excellent Build quality, Excellent parking mode, Good/Fair video quality:
Wifi/Cellphone app adds a lot, it helps with setup, changing settings, maintenance (formatting every 30-45 days), and gives you the ability to discreetly view footage at the scene of an accident.
BlackVue DR650S-2CH Unique feature, Cellphone notifications of G sensor activation(s) in parking mode (Free), and cloud streaming feature (paid.) Maximum SD Card 128 GB (Micro SD)
BlackVue over the cloud feature part 1
BlackVue over the cloud feature part 2
Thinkware F770: superior night vision & Dual Save mode Maximum SD Card 64GB (Micro SD)
Lackluster parking mode, fair/good/poor build quality, Excellent video quality: People pick these dash cams generally for video quality.
---
A note for Micro SD Cards: Sandisk Ultra is not made for Dashcams.
What is recommended for dash cams: Transcend High Endurance or any MLC card.
For more on this issue:
ABOUT ME
Hi! I'm Keri
I'm 34 years old and I'm a camgirl/model/artist.
I've been an art nude/fetish model for over 17 years and Have been painting landscapes and abstracts for 20.
I am a sweet, honest, and hard working American girl. However cliche that sounds, it is the core of me. I am into a number of interests and hobbies, am very artistic, love nature, and I have a goofy and quirky sense of humor. I love cheering people up and making someone's day simply makes mine! I'd love to chat with you in between cam shows or filming videos, when I wake up and go to sleep. I love taking pics when I'm outside in the sunshine-- few people get to see the sides of me I show to gfe clients. I'm not just a fuckdoll-- but I am happily one, mind you! If you let me in, I'll find my way into your deepest darkest corner- and put a little pot of flowers there for you to always remember me by. I'd like to be your friend, someone you can tell your secrets, and fantasies you're afraid to tell. If you need someone I will be there day or night. Regardless what package you choose to pay for, the "service" you get is simply me, the dosage (and supplimental service perks) vary between packages ;)
***
I prefer honest, direct, and communicative clients who are open and willing to get to know me, this is a 2 way street. If you want something strictly sexually based, or something thematic or role play oriented-- I may not be right for you :) I am just me, I play 'roles' in my videos, but truth be told, I don't role play at all for camshows or sexting really. If it is already a part of me inside, I will show it to you. I don't manufacture fake feelings to make money, nor do I want to.
Some things I enjoy talking about are:
FIRST AND FOREMOST- What do we have in common? What are you into?
I enjoy all types of music except modern country, which to me is not music. LOVE comedies, documentaries, psychological thrillers, gritty well done horror, thrillers, and crime dramas. I love Netflix/HULU/Torrenting I do not watch Cable. I love yoga, drinking tea, giving myself pedicures, playing Okami or Undergarden on my PS3, watching my beautiful flowers and herbs grow, smoking wayyyyyyy too much pot for a 110 lb girl, I love to sing and have been singing for most my life. There's tons more to me, but that's the point of GFE :)
art/technique (this goes for everything from painting to music production to woodworking), gardening (mostly indoor activities right now, but I do dig in the dirt), marijuana (I am in full support of it for recreation and medicinal purpose) stupid people (yes, I'm a sapiophile and I enjoy teasing the deficient), mundane shit/the weather/pleasantries, deep thoughts (no Jack Handy here, I can get deep-- if it's too much, just tell me), dirty thoughts (I am usually horny, so random talk of my desire to masturbate or suck a dick will pop up), nature/animals (sometimes I think I love animals more than people, they're more deserving anyway)
Some things I like to send you are:
pics [5-15/day, rated G-X] (selfies of all kinds with all manner of content, and random pics of what I may be doing, eating, drinking, see my ad pics before anyone else, and more no one got to see!) video messages [2-10/day, rated G-XXX] (fyi, I probably send more of these than you might expect outside a chat session. Messages range from the a cute salutation, a boobie flash, or an anal show prep peek of me stretching my ass with a plug)
OFFERING 3 DAY TRIALS FOR $70-- BASIC PACKAGE ONLY
I accept CMD, google wallet & venmo
If you are interested in a gfe experience with me, please don't hesitate to ask me any questions you may have. All serious inquiries Please PM me with this info:
>Thsnk you so much for taking the time to read about me, I hope to hear from you soon! XOXO
Feel free to add my Skype to chat :)
keriberry420
*
MY WEBSITE**
CHECK OUT MY VIDEOS!! Ask about my awesome bulk price breaks! :D
[My gfe packages are listed on my fancy ass spreadsheet here! :p]
(https://docs.google.com/spreadsheets/d/1-clDZpDugk0uw7okNmJpkWUj4e-6LMjGYQ5-BUe6F28/edit?usp=sharing)
***
MOST SEX SHOWS ARE $3/MIN PLEASE INQUIRE VIA PM
ALL fetishes except for feet are $4/M, I DON'T CHARGE EXTRA FOR FOOT FETISH
KIK IS $1.50-2/MIN, I SEND PLENTY OF PICS AND VIDS
SPECIFIC OUTFIT REQUESTS EXTRA $5
CUSTOM VIDS FROM MY GOPRO RANGE FROM $6-10/MIN,
PLEASE PM ME YOUR DIRTY LITTLE SECRET, FETISH OR IDEA!!! :)
*
I use a [GoPro Hero4](http://www.amazon.com/gp/product/B00NIYJF6U?keywords=go
%20pro%20hero%204&qid=1449782559&ref_=sr_1_2&s=photo&sr=1-2) for my $5/m+ customs
I have a Nexus 6P
(fucking WICKED CAM) so customs made with my phone are pretty awesome. I shhot these vertical and they start at $4/M
WHAT I GOTS
NEW EXCITING TOYS:**
***
Popular Vanilla Shows :)
POV | Deepthroat | Dildo Riding | Control/Denial| Breast/Nipple Play | Light Femdom/Worship
Kitty Play|Small Butt Plugs|Squirt Shows|Light Femdom/Worship|Light Foot Fetish/Worship
###Popular Fetish Shows ;)
Please give me 2 hours minimum to prep for anal shows!! Thank you :)
ANAL, an expertise | Light-Mod BDSM|Little/Daddy Play
Foot Sex Shows | SPH/Humiliation | Bathroom/Pee
Sorry, I do not offer ANY filth related materials or services
*
EQUIP:
I have a Logitech Conference Cam with remote on a great PC in my cam room
for live shows.
CAD U37 unidirectional mic
16MP FujiFilm FinePix DSLR for shooting cutom photo sets of optimum quality
I have super high bandwidth here, so connection problems are rarely an issue.
I use a 3 point lighting system, so my space is always well lit, day or
night.
GO PRO HERO 4 for customs 1920x1080 @ 60 FPS!!
AVAILABILITY:*
> I AM FULL TIME! As you can see, my ads are 99% original content daily, meaning I wake up everyday and start working on new content, or just to show what my mood is that day, or what I'm wearing or how I look when I wake up :)*
>
FYI I prefer Skype for all work I do, including sexting because I hate kik's cam controls. This is not a restriction, I do have kik and I am able to use it if you don't have access to Skype :)
*
PAYMENT**: I ACCEPT CMD, GOOGLE WALLET, VENMO, AMAZON (+$5 for amazon)
No problem. :)
Ok, so flash is pretty easy. My setup might be a bit outdated, but here is what I use currently:
I have 3 of those flashes, they're really pretty great if you aren't too snobby about brands. I believe Yongnuo has flashes now with the transmitter built into them, but I have never used those and the only time I've seen them in action it didn't go super well. I'm sure they're fine, I just can't recommend them.
So basically you put the controller on your camera. You put each flash you want to use off camera on the transceivers. The controller lets you adjust each flash's settings remotely and triggers them. It's awesome.
If you generally don't know what you're doing with flash for the reception, it's generally best to bounce the light off the ceiling. Point the flashes roughly upward and fire away. At receptions with a defined dance floor you can get pretty great results by placing them in a couple of the corners. Your light might come back kinda yellow. If you don't want to worry about using gels on your flashes then just keep an eye out for it and adjust the white balance in Lightroom after the fact.
Aside from flashes you will want some modifiers to place on them. When I was starting out the two that I used are these (these aren't the exact ones, but they're close):
So there are probably better modifiers to use, but these are cheap and they work pretty well at diffusing/directing light. The softbox is great for portraits and I frequently would use the flash bender to direct light gently over a wide area, like when the toasts are going on or the bridal party is entering the room or the dance floor. When used correctly you should get pretty great lighting and avoid hard shadows.
Anyways, how I shot those photos. You're generally right. I love shots like that (probably too much), and so I do them all the time. The general idea is the same for all of them, soft light in front and a bright light in the back. Using the specific equipment I listed above, my usual MO is to put a bare flash behind them, typically on the ground (using these)or on a stand as low as possible to the ground. Point it at the couple and slightly upward (photo 1 is the exception, it was pointed essentially straight up to make the gazebo light up like that).
Set up a flash in front of them. In most of those photos I used the flashbender modifier on the flash pointing at the couple to direct but diffuse the light. It helps it look a bit more natural. Generally you want to position it in a way that the shadows aren't too distracting, so do it slightly off to the side to get more natural lighting. Obviously I messed up in a few of mine but it is what it is and most people don't even notice. We're always our own harshest critic.
Next is the settings. This is honestly the toughest part in my opinion. You need to expose for the background you want and then use the flashes to achieve the lighting you want on the subjects. I don't know how to describe this, but the easiest way is with photo #6 on my website. I exposed the photo for the city behind the couple and got the look I wanted, THEN I added flashes and whatnot. General rule of thumb is the light behind the couple should be one step brighter than the light in front. That way you get the glowing backlight effect.
Thanks for the compliments on the photos! I hope this helps. I'm sorry if I did a bad job of explaining things, just ask me to clarify anything you don't understand.
EDIT: All this being said you don't NEED off camera flash. I've shot entire receptions using on-camera flash. The most important thing to remember is you just want to diffuse the light in some way. When you're using flash on camera you typically achieve this by bouncing it at the ceiling. Practice this at home, it usually works pretty well!
Glad I could help :-)
> deep space photos
Oh, that's a whole different topic :-)
Imaging is complex, expensive and more sources for headaches when getting started.
See https://www.reddit.com/r/astrophotography/wiki/what_telescope - Great resource to chose the right gear.
While the 127 SLT works fine for some planetary imaging and some snapshots of other bright targets, it's not a good set for DSO imaging.
For serious deep-sky imaging, you need a mount that doesn't only track, but also counters field-rotation, e.g. an equatorial mount.
The SLT mount is a simple AltAz (Altitude Azimuth, Updownleftright) mount and not suited for long exposures due to field rotation and the (relatively) low precision.
The Maksutov has a "slow" aperture ratio, long focal length, and isn't exactly the first choice for deep-sky imaging.
While cheaper equatorial mounted and motorized sets are available, stability is key. E.g. a Celestron 130EQ-MD makes no sense. A NEQ3/CG4 is better suited, but does not really make sense long-term. E.g. Orion Sirius, (H)EQ5. The Orion Sirius wih GoTo costs well over $1000. Without a telescope. The manual CG4/NEQ3 costs $250-$300.
Combining terrestrial, stargazing AND imaging will result in a major headache. :-) In this case a decent apochromatic refractor might be the only thing that can cover all bases to some extend, but for visual, you really need aperture.
 
If you are unsure what route to take, get something smaller/cheaper first. Observe, get to know the do's and dont's of observing and imaging. Find out what you really need beyond what sounds good
on paperont the screen :-) 
> deep space photos
As you already seem to have a DSLR or similar, you can actually do some nice wide-field without even using a telescope.
 
> eyepieces
For a 127/1500 Maksutov, there are several choices.
A zoom-eyepiece is great for day-time use, but as with many zoom-binoculars/spotting-scopes, dedicated eyepieces tend to give you better contrast. Also zoom eyepieces have a narrow apparent field of view at the lower magnification, only 40° or so, making them poor overview eyepieces.
Short version:
Kit eyepieces 10mm & 25mm for now, consider a 7-8mm^1 2 for planets and a 15mm^123 to fill the gap. A 32mm for a bit move overview.
Zoom eyepieces are usually available in 8-24 or 7-21mm 1 2, but only the Baader Zoom offered a bit more field of view on the lower magnification. For day-time use a zoom is nice sometimes, but you can usually get 2-3 better fixed-focal-length eyepieces for the same price that perform better in the long run.
Long version:
 
Here is an overview for eyepiece stats at 127/1500. The magnification, true field of view, and the exit pupil
(True field of view: Extend your arm, extend your index finger. It covers a width of 1° in the sky: Twice the full moon- even if it seems larger when over the horizon. At higher magnification, you just see a fragment of that in the eyepiece)
(Exit pupil = amount of light exiting the eyepiece, under 0.5-0.6mm it gets too dim. 2-3mm is ideal for many deep-sky objects; 1-2mm for some of the smaller nebulae)
25mm: 60x Magnification / 0.86° field of view / 2.1mm exit-pupil
10mm: 150x / 0.33° fov / 0.8mm EP
32mm: 46x / 1.1° / 2.7mm
15mm: 100x / 0.5°-0.81° depending on the eyepiece / 1.2mm
7mm: 214x / 0.26°-0.33° / 0.59mm
More magnification is always tempting, but it will make things dimmer. Crude simulation. So usually you can see more details with less magnification, even if the planet isn't view-filling.
Atmospheric seeing^YoutubeExample often limits magnification to <=200x. The image wobbles, the higher you magnify, the blurrier and more apparent it becomes. For day-time over the horizon, this might be way more apparent, restricting you to 100-150x. You have probably seen the effect of heat-haze/heat-shimmer over a hot road or field, and that moving air is exactly what makes day-time observing at high magnification problematic.
Spend BIG on your tripod, lighting and audio if you're looking at narrative work. ESPECIALLY tripod. I have the Sachtler Ace M and it's excellent, especially for a lighter setup. IMO avoid manfrotto "fluid" heads. Most of them within your price range are not fluid. Their legs are excellent though! Also look at a used Miller or Sachtler kit. For narrative work, chances are that 80-90% of your shots are going to be locked down, tripod shots or pan/tilt shots. The G7 is NOT a camera that you want to be using for the "handheld" look. (I also have a horrible bias against unnecessary camera movement, especially handheld or shoulder rig shots in narrative work). As a rule, NEVER take your camera off the tripod unless you have very good reason to do so.
I put a good $300 into my G7 kit so it's hard to say what $1500 will get you, but you should be able to get a good start, especially since you already have some lenses.
----------
AUDIO - Audio is arguably more important than video quality for low budget work. Audiences will forgive slightly out of focus/unsteady and grainy footage, but poor audio will IMMEDIATELY make your work seem amateurish,The boom mic is king for narrative audio, and truth be told, mic placement is often far more important than the hardware. I'd take a boom op who knows how to mic, with a $400 setup, over a guy with $$$$ of equipment who doesnt know how to mic talent. A solid entry audio kit can be put together for under $450. Pick up a decent shotgun (https://www.bhphotovideo.com/c/product/495302-REG/Audio_Technica_AT875R_AT875_Short_Condenser_Shotgun.html) and a recorder. A boom pole and shock mount are necessary. If you're on a real tight budget, a painter's pole with a shockmount can be used. Shop monoprice for any audio cables. I recommend the following on a budget: Mic Kit ($200) https://www.bhphotovideo.com/c/product/563843-REG/Audio_Technica_AT875_Short_Condenser_Shotgun.html, Tascam Recorder ($150) https://www.bhphotovideo.com/c/product/821259-REG/Tascam_DR_40_DR_40_4_Track_Handheld_Digital.html, Used Sony MDR-V6 ($40) https://www.amazon.com/gp/offer-listing/B00001WRSJ/ref=dp_olp_all_mbc?ie=UTF8&amp;condition=all, Painter's pole ($20-30)
------------
LIGHTING - LED panels are cheap, portable, and convenient. The Yongnuo YN-300III is excellent for the money. Pick up two of those and a reflector (as well as a couple $30 light stands), and as long as you have some daylight or even practicals, you have a very decent light setup as long as you're not trying to light an entire room or scene super bright. Very portable as well. Eventually you'll want to save up for heavier stuff like maybe Arri Fresnels or Kino Flos. LEDs are pretty viable these days also...you can pick up 2-3 nice Aputure panels for under $500. If you're very cheap and need more light, shop lights can be useful if you dont care about modifying the light. Clamp lights or Halogen work lights can help.
------------
LENSES... there's a couple routes you can go. You've already got a decent start. The vintage lenses are great but you wont be able to get fast, wide legacy glass for the G7. Wide focal lengths are VERY important for narrative work, as they're used almost any time the camera moves and for wide/establishing shots. Your canon 17mm will be roughly 40mm at the widest without a speedbooster, which IMO isn't wide enough for narrative. As far as i'm concerned a Metabones Speedbooster is required kit if you want to shoot with Panasonic mirrorless, IF you're planning to stick to one system. For example, i have a Nikon one, and thus i can use my Sigma 18-35 as well as my old manual Nikon glass. If you only have one Canon i don't know if the price tag is worth it quite yet. Maybe just get a couple of dumb adapters for around $20 for the time being. You can also pick up something like a Rokinon 12mm f2.0 for around $300, which will be around a 27mm on the sensor of the G7 at 4k.
--------------
SUPPORT - Dont worry about cage, rail system, mattebox, follow focus, dolly for now. Dont worry about external recorder or monitor. That is stuff that you should invest in and spend big to get good stuff. If you can fashion a DIY dolly., by all means do that. If you want to be taken seriously, a great tripod is number one priority. How can you expect to shoot great video if your gear isn't even capable of smooth pans and tilts? A $3000 camera body is essentially useless on a cheap tripod. A $500 G7 on an $800 tripod will result in much better movement than an a7sii on a cheap one. And no, a $200-300 tripod will NOT get you smooth movement. Keep in mind that a dolly is pretty useless without proper lights and a fast wide lens. Any dolly movement (especially a push) typically involves a wide lens and you need to throw plenty of light at the scene to ensure you can stop down enough to keep the subject in focus while you're pushing into them. And for $23, there's no reason why you shouldnt pick up one of these: https://www.amazon.com/CowboyStudio-Shoulder-Support-Camcorder-Camera/dp/B0036NMQ7S/ref=sr_1_1?ie=UTF8&amp;qid=1479589459&amp;sr=8-1&amp;keywords=shoulder+rig+cowboy
------------------
BAGS: The Canon "Gadget" bags are excellent. I have the Canon 200DG https://www.bhphotovideo.com/c/product/351537-REG/Canon_9320A003_200DG_Deluxe_Gadget_Bag.html. Picked it up in B&H used section for like $23. It should hold your camera, all your lenses and have room for additional things. Ebay is also a good place for bags.
---------------------
I would look at a glidecam type stabilizer or slider as a first upgrade past your initial purchases. You can get very decent ones for around the $200 mark. I've heard very decent things about the "off-brand" glidecams. Or find a used one. A slider can do more than you'd think. Especially for narrative work, usually all you need is just a tiny bit of smooth camera movement, which a decent sized slider can allow. Truth be told, you can spend YEARS studying cinematography just using well composed tripod shots with proper lighting, blocking, and staging. There's really no reason to be moving to camera movements until you have shot quite a bit on sticks.
--------
Here is what i would suggest for a little over $1.5k:
-----
Tripod - $800
Audio - $400
Lighting - $200 (two cheap panels, two stands, and reflector)
Remaining ~$200: Bag, Batteries, SD cards, slate, cables
As far as specs go, the only difference is in price and in variable aperture. Variable aperture is something I work with on a daily basis but would be a great thing to not have to deal with. IMO, just an annoyance. Light will likely not come into play because you already can just switch to your 55 f/1.8 for low-light. Other than that, I think it comes down to focal length. Do you want to have the 18-30 range or will you not miss it because you already usually shoot at 55?
I would not consider it "easy" to get good slider shots but also not hard. It largely depends on your slider and experience with the slider. Gentle hand + smooth slider = great shots. I think that it would be better to invest in good lenses, a good tripod, good mics, and good lights before getting a slider as you can make an equally good video without a slider.
Yes, here are some cheaper options. However, I should note that the mic I recommended has a "+20dB" setting that can allow you to turn down the pre-amps in your camera or recorder and get better, cleaner audio. Most other mics do not have the feature. The mic I recommended has a bunch of younger brothers. The rode videomic that I have. Great mic, no boost setting, a bit bigger than I would like. The rode videomic go, no battery required mic, pretty cheap. Some people say it is no better than just for scratch audio and barely better than on-board mics, I can't speak to the claims. I'm not trying to scare you away from it, just letting you know what is out there. The rode videomic micro, a super small mic, more intended for small cameras or smartphones, I don't know how good the audio quality is. Outside of the Rode brand family, there is also the Shure LensHopper that is often said to rival the videomic pro. It comes in two different versions, one with a built-in audio recorder, and one without.
Let me know what else I can help with!
Thanks /u/lamic
I looked through your post and recommendations, it looks awesome! I know I really should wait for the Hero5 but I'm not sure if I can wait.
I started to put a list of things I want/need into a spreadsheet, to start looking at Price. I have Amazon Prime so I'm thinking about ordering everything through Amazon.
Can you take a quick look through my list and see if everything checks out and if I missed anything for "Basic" operations? Then could you make any more recommendations, or let me know what my next purchases should be?
So with everything in my cart I’m sitting at $488 which is with in my budget.
I’m still reading about the remote. That might be something we add down the line. I think I’ll be pretty content with just my phone app or getting the “waterproof touch screen” case cover too.
Do you think this is a good setup? Will this get me going? Do you have any recommendations, or anything that I should add or not buy yet?
In the last few years, I have owned and/or used Canon 5DII, 7D, Blackmagic Pocket and now GH4. Lots of pictures (hey, I'm visual).
The basic Field Of View (FOV) of lenses don't change - a 50mm is a 50mm, no matter if the lens is made for a full-frame 35mm film camera, or a native Micro Four Thirds cam like the GH4. The only difference is the image circle a lens projects behind it is (usually) designed for the size of sensor it has to cover. If the lens is designed for a larger sensor, it can usually be used on a smaller sensor, but the FOV will appear smaller. The lens will appear more telephoto, just as if you cropped out the center of a photo on a larger camera. thus, "crop factor".
Here are the basic video shooting modes for the GH4. Now, that picture compares the modes to the full MFT sensor. 1080 uses the full width of the sensor, but not the full height, due to the 16x9 Aspect Ratio. the MFT sensor is quite a bit smaller than a "Full Frame" camera such as the Canon 5D, or an APS-C Like the 7D.
Sidenote: I said basic video shooting modes, because the v2 firmware has added several other 4K modes only really useful for pulling stills, or special-use videos in more square-ish aspect ratios (like shooting with an anamorphic lens).
Various sensor sizes, and modes within them can seem super complicated, and difficult to wrap your head around. Mainly, I think it's due to the wealth of choices available: with mirrorless cameras, you can adapt almost any lens made for stills or cinema, and quite a few lenses originally made for video. This is because the Flange Focal Distance, or the distance between the sensor and the lens mount, is so short. As long as the FFD is longer, you can adapt the lens easily with a basically a dumb tube that moves the lens farther out, and has the proper mounts at each end.
That's fine for all-manual lenses, where you can adjust the iris, focus and (for zoom lenses) focal length manually. But for more modern lenses that require electronic control, you need a "smart" adapter like the ones from Metabones. Metabones also make Speedboosters, which "condense" the image circle of a larger lens into the size of a smaller sensor, giving you three advantages: .7x wider FOV than a "dumb" adapter; 1 stop more light; and, better image detail.
If you compare the GH4s sensor sizes to other common film/video formats, it's rather on the small-ish size for either motion picture or still photography, but larger than most 1/3" or 1/2" pro video cameras of the last few decades. In 4K, it's a bit larger than the BMPCC, which is almost identical to Super-16mm film. Add a Speedbooster, and it's very similar to APS-C or Super 35mm film.
I like this general range a lot. Many of the fast & small C-mount lenses that cover the Pocket also cover 4K, and using a Speedbooster opens up (relatively) inexpensive and high-quality Canon lenses. Like any camera with a smaller sensor, telephoto is easy. Getting a true wide-angle rectilinear is where it starts to get hard and pricey. 18mm is NOT a wide angle on this size sensor without a speedbooster.
That said, my single, ideal all purpose lens would be the Tamron 17-50mm f2.8 VC, Canon Mount on a Canon Speedbooster. Why Canon instead of Nikon? Because of the flange distance, I could also use old manual Nikon lenses with a simple cheap adapter. Can't do that the other way around.
This gives me a very nice, nearly parfocal, constant f2.0 lens that goes from a nice wide to a medium telephoto. This lens and the Speedbooster are abouth 30% more than the most popular native MFT lens, but you only have to buy the SB once. If you don't need stabilization, the lens is even less.
This is a good place to start. Here are a few more thoughts/suggestions:
Feel free to ask any questions you might still have. Also, congratulations and good luck!
I'm no expert when it comes to DSLR's, but as someone who started with a 700D then moved up to a 70D after three years learning the basics, go for the 70D first. The auto-focus is phenomenally better, higher megapixel count and wifi connectivity. In terms of quality they're all pretty much the same and a beginner such as yourself wouldn't really be able to notice many of the main differences, but if you're going to throw some cash at a starting line I'd make sure you're in the perfect place rather than wanting to upgrade later down the road. :)
Another pointer from my experience would be to get a variety of glass, best quality you can afford. It doesn't really matter which camera you go with when you're starting out if you have some decent lenses to mix up your shots. Get yourself a wide angle, a prime and a zoom; 10-18mm, 50mm/35mm & 75-300mm. That's your starter kit, then upgrade to better quality lenses and cameras as you go - worth noting that the ones I linked are all the lowest quality (except the 35mm) considering you're probably on a tight budget, but you'll still get some sweet footage. It simply means you'll be able to get a wider variety of shots and you'll be prepared for most occasions - the beautiful city skyline scene, the crispy portrait with a bokehed out background, and the "Oh! There's a deer 50ft away! Let's capture it on video rather than running up to it and being kicked in the balls!".
One other thing that might be worth mentioning is that I always carry a point-and-shoot with me. My choice is the Sony RX100 IV - shoots in 4k, incredible slow motion (up to 1000fps), slog2 recording (higher dynamic range to make your scenes look incredible after colour grading), no hassle with interchangeable lenses and in my opinion is generally more convenient than lugging a DSLR around with you when you're on holiday somewhere.
Throw me a message if you have any questions, or just leave a reply and I'll check it when I can. Here're a few video samples for you to compare your possibilities: Canon 70D Auto-Focus, Sony RX100 IV Sample.
EDIT: Fixed up some grammar & wanted to throw you a few accessories incase you hadn't thought that far ahead:
• Gorillapod: Your trusty ol' wrap-around-a-tree tripod. Way more versatile than your traditional kit and easier to travel with.
• Røde Shotgun Microphone: The best quality microphone you're going to be able to find for the price. Canon's default mic sucks balls, so grab one of those if you run with the DSLR.
• Class 10, 64GB SD Card: If you decide to grab the Sony RX100 IV, you'll want one of these to shoot in 4K otherwise your camera will just give up after a few seconds. If you run with the Canon, grab this anyway for faster transfer speeds, but it's really not necessary.
I bought and EOS-M after the price crash back when it was new and Canon realised it wasn't selling and I love it - probably the most affordable way to get an APS-C sensor and just enough video features to have some sort of use professionally.
However, that was years ago, and competition has stepped up since then. I'd certainly be looking more at the G6 than the EOS-M now. G6 has:
It's just a more all-inclusive package for video and you get a lot of camera for your money.
The EOS-M does have a few advantages though.
So yeah, I'd probably give the G6 a second look if I were buying today unless there were specific reasons that an EOS-M would be more useful to you.
Either way you go, a mirrorless camera isn't a complete video kit. At the very least to make a professional bit of kit out of it, you'll need a Shoulder Support, some way to record audio, a reasonably selection of lenses, and plenty of media.
Not a problem. I'm not an expert on that type of scope either, which is why I linked and mentioned the other sub, but the general consensus is that they are decent entry level scopes that will give you a good start in the hobby, but leave you wanting more over time, and it seems $50 is about what they are generally worth, so I think you made the right call to get into the hobby and figure out if you like it or not.
You didn't mention anything about eyepieces, but I would assume it came with 1 or 2 plossl or kelners, likely around 25mm for 40x magnification. I would recommend getting one of the "gold line" eyepieces this sun always praises. They have great eye relief and about the same FOV as a plossl, so they are great for higher mag when plossls force you to damn near touch your eye to the eyepiece.
I generally wouldn't recommend an eyepiece kit, as they are generally not that great with overlap of ranges and being bundled with other useless filters and stuff, but this one is a bit better, though I would suggest getting only 1 or 2 of the eyepieces in the kit anyway (the 6mm for sure, maybe the 9 or 15 as well):
https://www.amazon.com/SVBONY-Telescope-Eyepiece-Accessories-Astronomy/dp/B01MR78I42/ref=pd_day0_hl_421_9?_encoding=UTF8&amp;pd_rd_i=B01MR78I42&amp;pd_rd_r=38600535-6f7e-11e9-8571-61275becdf34&amp;pd_rd_w=lYs1c&amp;pd_rd_wg=Ezw2r&amp;pf_rd_p=ad07871c-e646-4161-82c7-5ed0d4c85b07&amp;pf_rd_r=JGJ2X0WVDD2MC1DZSXRQ&amp;psc=1&amp;refRID=JGJ2X0WVDD2MC1DZSXRQ
The 6mm will give you 166x, 9mm 111x, 15mm 66x, and 20mm 50x. I'm getting these values by dividing your focal length (1000m) with the eyepiece focal length. Again, I'm assuming you already have a low power eyepiece around 25mm, so a 20 won't be much different. The 15mm or 9mm will be medium mag, which I like to use on larger objects like the Orion nebula, and the 6mm will let you zoom in on small objects, which based on your pic of Jupiter is probably something you are interested in.
In general, the mag limit of a telescope is about 2x the aperture in mm, but with the spherical mirror, you have have focusing issues before getting to that point, so I wouldn't recommend going further than the 6mm.
Eyepieces will transfer well from scope to scope, so if you are at all interested in continuing the hobby, I think it's well worth it to start getting slightly better eyepieces early.
I don't think it all looks like crap, it just looks like DSLR footage shot during a live event. That will mean shaky, mostly out of focus, and grainy.
These camera really aren't designed for live event shooting, but you can work around some of those issues.
First, the shaky-ness. What were you using to stabilize the camera? Do you have a shoulder mount, or a monopod that you can run and gun with? The last thing you want to do is hand-hold these cameras. If you HAVE to hand hold it without any kind of support, my advice would be to flip it into 720p/60 frames mode. You can then slow that footage down loss-less and it tends to take the bite out of shaky CMOS stuff. I use this trick for weddings all the time. The slow-motion makes boring activies (like make-up) look more dramatic, and smoothes the shot out.
Concerning the out-of-focus shots, that all comes down to your lens and how you approach your shots. It looks like you had poor lighting in there, and so you probably opened that 50mm up to get an exposure. I know that seems like the right thing to do, but for live-event keep that lens stopped down as much as you can. F5.6 to F8 would help keep most of the shots sharp(er). Compensate the light lost with a higher ISO. You can fix grain in post way easier then fixing an out of focus shot. For my money, these cameras are acceptable way up to 1600 ISO.
With the DSLR at 1600 or so, a more traditional 3 chip live event style camera would probably exhibit the same amount of grain around 12db of gain, and that's still perfectly acceptable. I assume you are delivering in SD on disc, or upload HD to the web, which would smooth a lot of the grain out anyway.
I might recommend this shoulder mount. It's plastic-fantastic but for $23 bucks you really can't beat it. Unless you break it, like I did, but for such a low price to replace, who cares?
A sharper, constant aperture kit lens might help with some of your out-of-focus shots. I think the Tamron 17-50 f2.8 is a great lens for Canon DSLRs and can be usually be caught as a deal of the day cheap, or for around $325 used and in good condition.
Just keep shooting, you'll get there.
So I have a Canon T3i and a 50mm f/1.8 II. In the near future, I will be purchasing a new lens. I'm still a newbie, so I don't really have a specific style and I just shoot what's in front of me. I've been doing predominantly street photography and auto photography, but i'm also looking to branch out. It's come to my attention that I should have a wide angle lens in my arsenal as I was begging for a wider perspective when I went to my first auto show a couple weeks ago. It made framing weird, and I had to move back which was quite inconvenient in a packed show like that. I also love landscapes and views so I want something wide to capture those as well.
Here are some of the choices I'm considering.
Tokina 11-16mm f/2.8
Canon EF-S 10-18mm f/4.5-5.6 IS STM
Sigma 10-20mm f/4-5.6 EX DC HSM Lens
Tamron AF 10-24mm f/3.5-4.5 SP Di II LD Aspherical (IF) Lens
There are also a couple lenses that I have stumbled upon that are not as wide, but have a longer focal length which may double as more than just a wide-angle.
Tamron SP AF 17-50mm F/2.8 XR Di II LD Aspherical (IF) Lens (really have my eye on this one!)
Canon EF-S 18-135mm f/3.5-5.6 IS Standard Zoom Lens
This is all a bit confusing for a noob like me, so any help is appreciated it. If you feel like there is a better option, please do recommend it to me! And also, i'm on a working-class student budget.
One last question, how do you feel about used lenses. Just curious towards your experiences as i feel like they can be bargains. Lenses are built to last a long time if they're taken care of right? Sorry for the long post but thanks in advanced!
Gonna try to give you a good answer here, but understand that you get what you pay for. The a7sii is a great camera but if you load it up with a bunch of shit accessories you should expect sub par performance.
I've bought a ton of gear over the years for both myself and for my company and it really comes down to you get what you pay for. You can spend $1000 finishing out your kit and expect that to get you a year or two of decent use. Or you could invest in better equipment that will last you for many years to come, and perform better while doing it. There's nothing more frustrating than a cheap piece of gear that you're always fighting only to have it break anyway.
I've seen this gets posted frequently. Here's a high level overview with some specific parts.
You need at least one camera (duh) and a way to get audio. The camera can be gopro or knock off, but you need a sturdy mount like this or this or this.
The easiest way to synch audio is to connect your camera straight in to the audio panel, with a cable like this or doing the "stuff the mic in your ear" trick that was mentioned already.
You could also get a billet mount like this to get some awesome external views and/or a wing strut clamp like this but your battery may not last as long as your flight!
Then head on over to your favorite video software and go at it!
Good luck and share your videos w/ us when you're done awesomeing it up!
Basically, yes, but you'll also need a few relatively cheap things to make sure you have power and a way to mount the camera to the scope. And you can definitely go much cheaper (especially on the camera). I just had the camera prior to getting into astrophotography because I do photography as well.
To answer your question, the only other thing I purchased separately that was involved in my setup for this shot was the battery pack that powers the mount, a T-Ring, and a T-Adapter that allows me to mount my camera to the scope.
Power Tank
T-Ring
T-Adapter
Again. You can go much cheaper on the camera and can actually just use a webcam to shoot the video that you'll stack into a still. Registax is free. Autostakkert is free. And there are free photoshop alternatives. You'll also want to use this program called BackyardEOS to shoot the videos at 5x zoom (My computer was acting up for this shot, so I didn't use it this time around) but it's well worth the $30 I think I paid for it. You can get even clearer shots like this one I got a while back. The program allows you to digitally zoom in at 5x using and use only a part of the camera's sensor. Please let me know if you need any other information. I'd be glad to help. Hope this helps some!
I can go over some of the math too. That telescope has a 130mm primary mirror, hence the 130 in its name. In inches that's about 5", this is also called the aperture. The maximum magnification on a very clear night is 50x your aperture. 50 x 5=250. So you don't want to go above 250 power. I looked up the focal length and it is 650mm. This is important because you divide the focal length by the mm of the eyepiece you're using to get magnification. Your telescope will come with a 10mm and a 25 mm, so 650/10= 65x and 650/25= 26x. These will be good for viewing the moon, and a decent view of the planets but not for galaxies, nebulae or star clusters. Reversing the math, if you wanted an eyepiece that gave you the full 250 magnification that you can theoretically get you'd need about a 3mm lens. 650/250=2.6.
The Svbony or similar Gold Line series is highly touted on here. Under $100 for 4 lenses that are very good you get a 6, 9, 15 and 20 mm lens. If you pair that with a 2x Barlow, which is a lens you put your other lens into that doubles its magnification, you can stretch those 4 lenses into also being 3, 4.5, 7.5 and 10 mm. So for ~$130 you can get the most out of your scope and not have to buy anything for a long time.
What I've been getting the most use out of is a Celestron zoom lens. It can go from 24mm to 8 mm by just twisting the body of it. At its lowest magnification it can't see very much of the sky, so it isn't super popular because it's hard to find what you're looking for, but when you zoom in it really opens up what you can see. If I can't find what I'm looking for I switch to a 25 mm lens with better field of vision then put the Zoom back in. The zoom is ~$70.
Lastly buy the book Turn Left at Orion. Note: Don't accidentally buy Turn Right at Orion!! This book gives you history, cool facts and will help you find hundreds of cool objects in Space. If you just cruise around without a guide you'll lose interest quick. Best advice I got for using this book is to rotate the book in your hands until it matches what you're seeing in your scope. Don't assume up is up or left is left. The book is on sale right now for a better price than I got, might want to scoop it up now. It's the current edition and just came out this year.
If I confused you with anything I can clarify!
Svbony Goldlines
2X Barlow
Celestron Zoom
Turn LEFT at Orion
Thanks so much for the reply, yeah the scope is normally set up about an hour before I want to use it :)
Yes using the focus dose help sharpen the image or make it worse but compared to some of the Pics I have seen people post of the sky from there scope (the same one or next moble down) the images always look a lot clearer and always seem to be of objects at a far greater distance than good old Jupiter lmao.
Am I right in thinking that a 2x barlow will help with this a bit?
Is this set worth getting or is it a bit OTT for this budget scope?
Again thanks so much for getting back to me so quick and thanks for the help and advice :)
Hi /u/nerdress -
The Rode Videomic Pro is a pretty good mic but the t3i is really, really bad for audio no matter how good the microphone. I'd strongly suggest getting an external recorder like the H4N or, at the very minimum, a H1N. You may want to pair it with a XLR shotgun mic like this if you can find the $$$.
A tripod is something that can last for many years, but the one you linked to is really bottom of the barrel. This is something I'd suggest investing a little more money into, you are going to want a universal fluid head specifically if you plan on doing video work semi-regularly. I'd get a semi-compact Manfrotto tripod like that one, you won't regret it.
Lastly, do you plan on using the kit lens? I'd suggest grabbing the famous nifty fifty. It's a legend for many reasons (super sharp, great lowlight, durable as can be).
Also you are going to want to get this battery grip for the t3i if you don't have one already. I remember when I shot on a t3i I purchased that out of whim, and I'm pretty sure I never took it off for 3+ years. It not only extends your battery, but it makes the camera much more comfortable to hold.
Hope some of this helps, sounds like you'll be in good shape! Remember, audio is just as important as video, so it's smart to invest in that type of gear.
I just recently bought a thread adapter so I could use various filters on my 195. I think the 49mm one you linked to would the wrong size. The 180, 190 and 195 use a 45mm, but apparently it's also a finer thread than normal. The Heliopan ones are supposedly one of the few compatible adapters you can use. After seeing it recommended by others, I got this one: https://www.bhphotovideo.com/c/product/160285-REG/Heliopan_700222_45mm_49mm_Step_Up.html
I can confirm it fits both the 180 and 195 perfectly fine (though I tried to be gentle and not screw it in too tight). That LED ring light you linked to looks like it comes with a 49mm adapter already, but if you did want a 55mm thread, it looks like they do make a 45mm-55mm (hopefully it's designed the same way).
I'm pretty sure I have that same ring light for my DSLR, too. It works well for continuous lighting on macro shots, but I've never actually used the flash mode so I can't really comment on how powerful it is. The setup should work, but another option would be to just put a diffuser on a regular electronic flash like this one: https://www.amazon.com/Altura-Photo-Universal-Collapsible-Speedlight/dp/B01ERRQ802
I bought this Neewer rig last week. There is so little written about this brand of rig so me buying it was a big shot in the dark. However, my initial reaction was that it was pretty damn decent for the price range. I think that I will create a video review for it to hopefully elucidate the pros and cons for future buyers.
I'll disclaim that not only am I a film making rookie (only doing corporate film making for about half a year now) but I am also using an incredibly light - not to mention outdated - GH2 setup. Also, at the time of writing I have used this rig in a pro capacity only once, so I only have one point of data to base it's professional performance on. Therefore take my opinion with the caveat that I have never experienced any other rigs, but also that it may not be a suitable rig for much heavier cameras. With that in mind, I can't help but feel that the rig was worth the £60 I paid for it.
I forgot to buy a counterweight for the job I was working on and so I wasn't really using the product as intended. But just the unbalanced rig alone seemed to reduce excess camera movement to a satisfying level. One thing that did turn out to be a bit challenging is that the rig did make the camera significantly heavier, so in shots that required me to film for more than a few minutes my arms got tired and a little bit more shake started to come into frame. I imagine that this will be solved when I pick up a counterweight, but I can't be sure until I test it.
Another of my big concerns pre-purchase was build quality. I made sure to prioritise the Aluminium build for strength and it seems sturdy and well fitted. There were some comments on the Amazon article about the thumb screws not tightening firmly enough but I found that they fitted quite snugly. People also talked about the loose handle bars sliding out of position and - while they aren't immovable - they certainly don't move unless I make them. Once again, this may be different under the weight of a heavier camera. I also made sure to prioritise the model featuring aluminium thumbscrews for reasons that I am sure are obvious.
The model I went for had a different shoulder pad; moulded out of a single foam block that is shaped to fit on your shoulder. I went for this version over the shoulder pad that is featured in your link because I wanted to make sure that I could fit a counterweight to my build and I wasn't sure if this was possible with the model you linked. This is definitely something to consider.
I also looked at other models, but the [next affordable shoulder rig] (http://www.amazon.com/gp/product/B005RQK4B2/ref=as_li_ss_tl?ie=UTF8&amp;camp=1789&amp;creative=390957&amp;creativeASIN=B005RQK4B2&amp;linkCode=as2&amp;tag=drippingdawn-20) was significantly more expensive and seemed to ultimately be the same product. It even was missing some of the features of the Neewer shoulder rig like the height-adjustable camera mount and quick release plate.
Oh! That's another thing, the quick release plate is pretty decent in some regards and a bit iffy in others. It is solid enough, and the QR system works fine, but the screws on the plate get in the way of my GH2's flip-out screen unless you slightly unscrew them before attaching the camera. This doesn't affect stability or structural integrity but it does mean you could lose the larger screw if you aren't careful. I would consider sticking it down with tape. One other factor in the base plate is that the 1/4" screw isn't a thumbscrew. You might want to look into buying a replacement screw on ebay or Amazon (or whatever) to replace it with. I'm sorry I didn't do this when I bought the rig. On my last job I had to carry around a 2 pence piece to unscrew the camera from the base plate in order to change the battery. This was obviously a big faff and because the battery switch took so long I actually missed some useful footage. I'm now looking into an external battery setup so that I can dodge this problem in the future. Hopefully the external battery doubles as a counterweight as well.
In conclusion it seems like a decent bit of kit. Not something that would service you for your entire professional career but definitely an acceptable starting rig, especially for the price range. One of the biggest advantages to using the unbalanced rig on a corporate job was that nobody mistook me for a stills photographer. Which is normally a big pain.
If I have missed anything feel free to ask.
There are a lot of things wrong with this post.
The 50mm/1.8 is one of the cheapest lenses out there. Because it is a prime (instead of a zoom) they can have fairly good image quality and still offer it at a decent price.
There aren't any wide angle prime lenses in this range I'm aware of (there is a 28mm prime for $400+ but that's really not very wide on an crop sensor body). For wide angle shots your best bet is using your kit lens wide open (assuming it's something like 18mm or 28mm) and saving for a true wide angle.
Saying I want a cheap wide angle lens with good quality is like saying I want a cheap computer that can play Battlefield 3 with max settings on at full resolution. You can buy a cheap lens that might be sort of a wide angle but it's not going to perform very well.
The cheapest wide angle for a Canon that's nice is probably the Sigma 10-22mm zoom lens for close to $500.
http://www.amazon.com/Sigma-10-20mm-4-5-6-Digital-Cameras/dp/B0007U00X0/ref=sr_1_1?ie=UTF8&amp;qid=1320951022&amp;sr=8-1
If you are looking for a good all around lens that can go fairly wide open I'd look at something like this Tamron for $500
http://www.amazon.com/Tamron-17-50mm-Aspherical-Digital-Cameras/dp/B000EXR0SI/ref=sr_1_1?s=electronics&amp;ie=UTF8&amp;qid=1320951205&amp;sr=1-1
I shot a whole bunch of rainy weddings in 2018 (a very wet wedding season for Pennsylvania). My second to last wedding for the year was in the low 40s with a consistent heavy rain. With that said, here some things I've learned...
-Change of clothes, including shoes and socks. Hopefully it won't be cold for you, but being wet for the reception sucks.
-Good protection for your camera. I used these: https://www.amazon.com/OP-TECH-USA-9001132-Rainsleeve/dp/B000PTFDYO/ref=sr_1_5?keywords=camera+rain+sleeve&qid=1549636833&sr=8-5 because they are cheap, but they are hardly convenient. I'd recommend practicing with them, because they change your access to controls, lens zoom, etc. I can't comment on other rain sleeves, hopefully they are much easier/nicer to use!
-Ditto on backlit umbrella shots. Those are tons of fun! You'll probably want an umbrella with white interior and black exterior for those shots. An all white umbrella works, but you'll see the couples shadow I inside. An all black umbrella would be too dark. You can also shoot backlit without any umbrella: https://www.instagram.com/p/BsWLRb2HMD7/
-Having nice umbrellas to hand to the couple is a thoughtful gesture. I like all-white umbrellas or there are nice clear umbrellas, too: https://www.instagram.com/p/Bra5x9znYST/
-Be ready for the couple to not want to be outside for anything besides the ceremony. It stinks, but it's their day. Have some indoor posing ideas ready.
So audacity is kind of a pain. If your computer is Mac, I’d just use GarageBand, it’s completely adequate. If it’s a PC, I’m not sure what free software besides audacity is out there... I’m sure there’s something, it’s just not a world of computing I’ve lived in for a while.
As far as recording into an iPad, I know Jason Snell does (or has done) this. Here’s a link to a post he made about it: https://sixcolors.com/post/2019/02/a-week-of-podcasting-with-only-an-ipad-pro/ . You may need an adapter... something like this: Apple Lightning to USB3 Camera Adapter https://www.amazon.com/dp/B01F7KJDIM/ref=cm_sw_r_cp_tai_0k9YCbK51VHET . Or the USB-C version if you have a newer iPad.
The best (and maybe only) app to do this realistically is Ferrite: https://www.wooji-juice.com/products/ferrite/ . It’s made specifically for recording podcasts and editing on iPads. I believe that there are posts on there site that can help.
Getting it on iTunes depends a bit on your hosting. Some hosting has built in ways of submitting the feed to iTunes, others you submit it manually. Do you know where you’re hosting?
Some options:
> If you have a Squarespace site, you can host it there on the site you already pay for and submit manually.
> You can host it on a top-tier site like Libsyn, which requires you to pay monthly for storage space. I believe they have some built in submission tools, but I could be wrong.
> I think you can still host for free on soundcloud, but pretty sure it’s limited and you can submit it manually.
> Anchor.fm is free and has really great built in tools for submitting your podcast. It walks you through it. Probably a good option to not spend money on hosting until you really know what you want your podcast to be! I spent a hundred bucks hosting a defunct podcast for a year, when I ultimately just rolled it onto anchor to (somewhat) preserve it and cut my losses. My two still running podcasts are both on anchor because they’re small (100-150 downloads an episode) and until (or if) they ever get bigger, it just isn’t worth it to me to pay for hosting. Anchor was just bought by Spotify though, so there is a bit of a morale quandary... being a fan of open podcasting vs hosting on a site owned by a pay walled podcast client.
Hope that helps! I’ll answer any other questions you have as you’re diving in!
This refractor on a CG-4 EQ mount looks to me like a good starting point for astrophoto for less than what you want to spend. You have to add motor drives, a polar finder scope, a camera adapter, and T-ring to connect your camera but then you are good to go.
There is a version of this setup using a 150mm reflector as the imaging scope that has given very impressive results. "Jarrodnb" has posted his images here over the last several months. Whether to go with the refractor or the reflector is probably a matter of preference. The reflector gathers more light and has a shorter f/ratio, both of which enable shorter exposure times.
I don't think you can get an imaging setup with autoguiding like the CG-5 for the money you are looking to spend, but a lot of people may say that it is needed for decent results.
I am using a wedge-mounted Celestron 8 I got on Craigslist along with a second hand Canon 400D, and so far I have this image of M13. It's FAR from perfect but I enjoyed the process of making it.
NM posted 10/4/19 at 11:04AM EST
Item Name:|
GoPro Hero 5 Black Kit(COMPLETED)--:|:--
Price:|$180
# of Spots:|45 spots at $4 each
Price Justification:|GoPro Hero 5 with Remote, 154.99, 120.50, 120, 125
Price Justification:|GoPro Hot Shoe Mount, 10
Price Justification:|GoPro Suction Cup Mount, 30
Price Justification:|GoPro Tool, GoPro Backpack Clip, selfie stick
Call spots?|Y
Spot limit per person?|0
Location/Country:|USA
Will ship international?|USA + CA under new shipping rules
Timestamp/pics:|FULL ALBUM HERE
Escrow:|No
Description:|Selling my mint condition GoPro Hero 5 Black with Waterproof Remo and a bunch of accessories. Like my other gear, this comes with full box, papers, and everything in mint condition. I used this for a trip a couple times the past year but no longer need it so would be happy to find it a good home. I've tried to price this fairly given the market and the condition of my stuff, but please let me know if I missed anything. Thanks and best of luck!
/u/michaelmove - if you ever plan to put your mic on a boom and run a long cable ([here] (http://wistia.com/learning/choosing-a-microphone) is why you would want to do that), you should avoid consumer mics with "unbalanced" 3.5mm output, such as the [$225 (with Rycote Lyre Shockmount) Rode Videomic "Pro"] (http://www.amazon.com/gp/product/B00YAZHRZM/ref=as_li_tl?ie=UTF8&amp;camp=1789&amp;creative=390957&amp;creativeASIN=B00YAZHRZM&amp;linkCode=as2&amp;tag=battleforthew-20) (VMP).
Unbalanced output from consumer mics is subject to Radio Frequency Interference (RFI) over long cable runs.
The 3 pin XLR output from a real pro mic, on the other hand, would be balanced - reducing susceptibility to RFI and noise.
In addition, a pro shotgun mic such as the [$269 Rode NTG-2] (http://www.amazon.com/gp/product/B00093ESSI/ref=as_li_tl?ie=UTF8&amp;camp=1789&amp;creative=390957&amp;creativeASIN=B00093ESSI&amp;linkCode=as2&amp;tag=battleforthew-20) will give you better performance than the Rode VMP, e.g.:
If you're plugging the NTG-2 directly into your camera, you will also need a [$22.95 Hosa XLR to 3.5mm line matching transformer/adapter] (http://www.amazon.com/gp/product/B00FC4YR58/ref=as_li_tl?ie=UTF8&amp;camp=1789&amp;creative=390957&amp;creativeASIN=B00FC4YR58&amp;linkCode=as2&amp;tag=battleforthew-20) to match the mic's low "Z" XLR output to the camera's high "Z" 3.5mm input.
All of that said, the [$229 Azden SGM-250] (http://adorama.evyy.net/c/60286/51926/1036?u=http%3A%2F%2Fwww.adorama.com%2Fazsgm250.html) is a better value for your money. Its specs are as good as the NTG-2's for $40 less, plus it comes with a hot shoe shock mount, something you'd have to buy separately with the Rode. Nice review here: https://youtu.be/8FfftoGqCTM
Azden promo video here: https://youtu.be/_Zqh9Fkkk0Q
If you are planning to plug your mic directly into your camera, you might also want to think about getting some sort of preamp or external recorder to compensate for your camera's noisy preamplifiers. I recommend the [$199 Saramonic AR-AX107] (http://www.amazon.com/gp/product/B00SSLCON4/ref=as_li_tl?ie=UTF8&amp;camp=1789&amp;creative=390957&amp;creativeASIN=B00SSLCON4&amp;linkCode=as2&amp;tag=battleforthew-20). By recording clean sound to your camera, you can avoid the extra step of synchronizing your audio and video in the edit. Nice review here: https://youtu.be/NTCEBzxN0zI
You might also want to do some reading. I recommend you download a [$15.99 copy of Ric Viers' Location Sound Bible] (http://www.amazon.com/gp/product/B00ATOUXBI/ref=as_li_tl?ie=UTF8&amp;camp=1789&amp;creative=390957&amp;creativeASIN=B00ATOUXBI&amp;linkCode=as2&amp;tag=battleforthew-20). It will save you a lot of time and headaches on the set and in post.
Hope this is helpful and good luck with your mic upgrade!
> I find that how I gift has less to do with the value of the number of credits that went into the exchange and more to do with what I can determine about a person
Yeah, it's more about the person than it is about how many credits you're using. One of my favorite gifts was a "Los Pollos Hermanos" t-shirt and a lens pen. Neither of the gifts is expensive, but it's actually a very thoughtful gift. I like Breaking Bad, hence the t-shirt, and I'm into film and photography, so she got me the lens pen. I still have both; the lens pen is with arm's reach now and I still get compliments on the shirt when I wear it.
I signed up for the Super Plus this year just to see what it's all about, but I've only done single-credit in the past and will still be doing a 99% majority of single-credit for future exchanges.
Disclaimer: I’m not an expert, I’ve been doing a tiny bit of research because I want to improve my videos but haven’t pulled the trigger yet. I don’t think for your purposes you necessarily need to spend a ton on a top-if-the-line mic. You can get good results for under $25. Not podcast quality, but good.
It depends what you’re recording with. If you’re using a phone or other device with a 3.5mm (standard headphone) jack, and you are currently just using the mic on the device itself, I think it would be worth looking into a lavalier mic such as this one. You could buy the Similar Amazon Basics version to save even more. Or if you have Apple earbuds, you could just try using those as the mic is generally going to give you much better quality than the phone itself. Keep in mind if your recording device happens to be an iPhone 7 or later, you’ll need a lightning adapter too.
If you are using a device such as a laptop with a USB port, you could consider a USB microphone. I absolutely don’t know enough about these to make a recommendation.
Sorry to give unsolicited criticism, I just thought your video was really well put together and thought the audio quality could be slightly improved to let your voice shine.
I’m definitely going to try this recipe when I have the time btw!
OP/TECH USA 9001132 Rainsleeve - Original, 2-Pack https://www.amazon.com/dp/B000PTFDYO/ref=cm_sw_r_cp_api_mKkJzbBMPV614
Also Get a filter for the end of your lens. Don't buy the cheapest one going but you don't need a b+w either. You can get decent uv filters for reasonable money. There are pages dedicated to discussing filter clarity and options for size. I don't know what size your lens is but you can check this out. It will Give you any info you need I'd think l. Not only will it help rain stay out but it will allow you to wipe off the filter without concern of scratching the lens.
http://www.lenstip.com/113.1-article-UV_filters_test.html
Here are the results of you just want to see which ones won and by what margin. Pay attention to the model numbers. Many manufacturers have a bunch of models
http://i.imgur.com/j9kne3H.png
This is a modern filter that rates very well for 72mm lenses. And it's under $50
If you want to get started much cheaper try out any reverse lens mounts. It allows you to mount your lens using the threads on the front. It's produces fantastic macro images.
https://www.amazon.ca/Fotodiox-Reverse-Camera-Adapter-filter/dp/B001G4NBSC
Something like this. Now I shoot canon but nothing is different. I've used this method many times. It will work great with you 18-55. The zoom will allow you to make some slight adjustments to how close you want to be.
One of the downfalls though is you physically have to move to get your image to be in focus. The pay off is marvellous though.
I know I didn't answer your question but hopefully I was if help. Happy shooting.
For a Cell phone, just hold it up to the eyepiece. For extra stability, you could get an eyepiece adapter. With few exceptions (newer cell phone cameras are getting sophisticated enough for long~ish exposure on bright objects), the only objects you will be able to snap will be planets and the Moon.
For a DSLR, you will need 2 components, a T-Ring which acts as a lens attachment (and you will need to find one for your specific camera brand), and a T-Adapter which will allow the camera to insert into the telescope like an eyepice. Given you are going to an actual observatory, they likely use 2" eyepieces, so a 2" T-adapter will probably be needed.
You should also make sure they are OK with you taking pictures like this. I help run a local public observatory (ie no research, just open nights for the public to look up) and we host monthly photo nights, but setting up the scope for photography requires changing the focus and if you are taking photos that means you'll be tying up any lines behind you for several minutes. On the other hand, if this is a private observatory and you don't have to worry about lines, then great. I would call ahead to make sure either way - maybe they already have the adapters you need
Well it is an old camera, so it's definitely not going to perform at the same level as the new hotness, but that could also be a straight out of camera JPEG with no raw editing too.
Have a look through the Flickr D200 pool and see if you're cool with the quality before buying for sure: https://www.flickr.com/groups/nikond200/pool/
I mean, don't expect miracles, but people still do use older cameras (for example, I'm still using my decade-old 5D and love it) with great effect.
Also just for another random suggestion: if you're not committed to Nikon cameras, Canon EOS cameras (anything that has the EF mount) can adapt Nikon F lenses with a simple adapter. A benefit of going with Canon in this particular instance is that stop down metering should work with any camera, not just their mid-range and higher ones.
If this is an attractive option, looking at some used T3s or T1is could be another choice to consider.
For what you're describing, the video camera sounds like it would be sufficient.
Rode's are OK, but I think they're a bit overpriced and not all that awesome for the price. For the money, Takstar makes a widely-touted knockoff that many people feel sounds better. It sells for about $25. Link here: https://www.amazon.com/TAKSTAR-SGC-598-Interview-Microphone-Camcorder/dp/B00E58AA0I/ref=sr_1_5?s=electronics&ie=UTF8&qid=1537758700&sr=1-5&keywords=video+microphone
You also might consider a wired lavaliere mic. There are several on Amazon from about $20-30. I always have a few as backups and frequently use them as primaries, too. Here's one that's pretty highly rated: https://www.amazon.com/Professional-Microphone-Omnidirectional-Recording-Conference/dp/B01AG56HYQ/ref=sr_1_6?s=electronics&ie=UTF8&qid=1537758700&sr=1-6&keywords=video+microphone
Best of luck!
&#x200B;
I can help if you are using an iPhone. I believe garageband is free and records multitrack full quality with decent editing and mixing options. You can even use 3rd party plugin apps! You'll need an USB adaptor to connect an audio interface. you'd be best with this usb adaptor because it also get's power from your charger. This does two things for you, 1) your iPhone won't die on you 2) your iphone will have enough power for the interface. Then you can get something like this behringer. Then all that's left is grabbing a few SM-57 mics, or a shure drum mic kit](https://www.amazon.com/Shure-DMK57-52-Drum-Microphone-Kit/dp/B0002E51C6) to get a usable recording. Toss the big one on your kick, then one 57 on the mic, and then the other two over head pointing at your cymbals and toms. this set up will allow you to get pretty decent recordings, especially if your kit is in a good sounding space. Alternatively you can get an omni/stereo mic for iOS and mess around with placement to get a passable sound. This is cheaper, and still good enough for a more vintage vibe
Absolutely. I started with a Neewer stabilizer, I've yet to invest in a motorized gimbal myself, as those go for upwards of $600 for a decent one. For short docs I find myself using a shoulder rig the most, and for a shoulder rig I started with the Neewer brand as well. This brand was my best friend starting out lol. The stabilizer/glidecam will take a tinsy bit of practice but this particular one has served me very well personally. YouTube search the gear you're eyeballin, see what others say, and you'll surely make the best choice suited for you. Cheers!
https://www.amazon.com/dp/B00NJKJ1IA/ref=cm_sw_r_cp_apa_0tLLzbKA1ZE19
https://www.amazon.com/dp/B00GTMBA7K/ref=cm_sw_r_cp_apa_IzLLzbHH9G1YM
Yes, it comes with controllers.
I found some over-ear headphones were uncomfortable because of the headstrap for some people, but the majority of people I've demoed for have had no problems. On-ear headphones may be a better option, and if its just for you the supplied ear buds are actually surprisingly good.
Depending on your room and whether you are happy to screw the lighthouse sensors to the wall you may need some sort of mount.
I was happy to screw the sensor mounts to the wall at home but I picked up
A couple of these
https://www.amazon.co.uk/Wolfcraft-4042000-80mm-Telescopic-Support/dp/B001BWT2PA/ref=sr_1_2
and a couple of these
https://www.amazon.co.uk/MyArmor-Universial-Threaded-Microphone-Motorcycles/dp/B01A6KJDFG/ref=pd_bxgy_60_img_2
So I could bring the Vive places with me and demo (without having to screw anything to the wall).
Alternatively if you want to attach the sensors to a bookshelf or similar these are great:
https://www.amazon.co.uk/Phot-R-Studio-Multi-Function-Reflector-Cameras/dp/B00MR0VPOQ/ref=pd_bxgy_60_img_3
I also ended up getting a 3m HMDI extention and a 3m USB extension because my play area is a few meters from my PC and out of the box you only get 1m cables to the breakout box.
I needed to extend my Rift too and didn't want to have issues so did homework just as you. After getting a recommended HDMI repeater that didn't work (not sure if it was the cable or repeater but I think the cable was bad) I looked again and discovered I could use a Vive Link Box w/this psu, which definitively works well.
It's an active HDMI/USB repeater made for VR and is also not finicky about cables or long runs or what gpu you have or what you ate for dinner last night. As a bonus, it also has a mini displayport input as well as hdmi which is what I use since I only have 1 port on my card and it's running to my projector. Very nice to have a clean breakout box to plug into in my living room as my computer is in the bedroom.
LimoStudio 700W Photography Softbox Light Lighting Kit Photo Equipment Soft Studio Light Softbox 24"X24", AGG814 https://www.amazon.com/dp/B00E4YS2XU/ref=cm_sw_r_cp_api_ZTQSzbVNKB89F
these lights are amazing. I agree with what someone else on this thread said about sound quality, if your using sound for films a good mic is a necessity.
Rode VMPR VideoMic Pro R with Rycote Lyre Shockmount https://www.amazon.com/dp/B00YAZHRZM/ref=cm_sw_r_cp_api_iXQSzbKQ519VP
This mic is pretty good for recording, your also going to need a boom pole. For the lenses ND filters are a must as well, get these and some stopping down filter rings for your lenses. The lenses someone listed down below look pretty good
I have done about four of these with no ill side effects to my gear. But there is a lot of preparation involved.
Its do-able and I always think its a lot of fun, but you have to be prepared. I used my D600 for the shoots and even switched lenses without negative outcomes.
Using the viewfinder pressed to your eye, one hand on the grip and one hand on the lens is almost all you need usually. Otherwise, might be time to add more weight. A cage or a gunstock to add a fourth point of contact pushing against your chest will help a lot too. A very cheap and effective option is the classic cowboy studio shoulder rig for 30 bucks. https://www.amazon.ca/CowboyStudio-Shoulder-Support-Camcorder-Camera/dp/B0036NMQ7S/ref=sr_1_1?ie=UTF8&amp;qid=1522194992&amp;sr=8-1&amp;keywords=cowboy+studio+shoulder OR if you have some budget zacuto enforcer is great https://www.bhphotovideo.com/c/product/997525-REG/zacuto_z_der_dslr_enforcer.html and edelkrone has a great compact folding gunstock https://edelkrone.com/products/pocketrig-2
Thank you so much for your time. I think I'm going to to go with the Onesky. I really meets nearly all of my needs right now.
I don't know how I haven't seen the Onesky before, it never came up on my google searches. Also I guess while reading through this subreddit I ignored ABW because I didn't recognize the acronym, and had never heard of the maker. I think the mobility of the Onesky is really right up my alley, and the aperture is better than most of the other mobile scopes in this range. I think the 8" or 10" dobs will be a bit too big for my liking, and I'd probably use them a little less often because of that. Also, the dobs are much harder to store in my apartment (which is definitely a factor).
From most of the review I have read, a Barlow is strongly recommended for the Onesky. As the scope is a great value, and I have some wiggle room, is there a eyepiece set or any other accessories that you think would really enhance this kind of scope?
I was looking at the Celestron and came upon this Gosky set. Any thoughts/experience with either of these?
100% i would get the sony A7iii amazon referral links. At the price range right now it's pretty much the daddy with great image quality, stabilisation is decent enough, and sony has by far the best vlogging autofocus going at the moment. stick a rode on top and you're good to go. If you really want ultra smooth video on the move then look at something like the DJI gimbal
I am not a parent, so I know nothing of needs, but I can tell you of something that could be useful.
It may not be a need, but it definitely is something that you will thank yourself for in the future for memory making/keeping. A Gopro, while expensive, can lead to some amazing moments that you could not capture with a traditional camera. Some companies have started making mounts that you can attatch to walkers, and as they get older you could attach a chest strap onto one of them and record little memories like this.
Extension tubes have no glass, air is air. Kenko tubes perform every bit as good optically as Nikon. A set of three is $129. Not much chance finding a set for $40.
They will probably perform best with the prime 35mm, but you may prefer the focal length of one of the zooms, and quality may be acceptable.
What does fit in your budget is a reversing ring for that 35mm - $35. There are off brands that are cheaper, but I have not researched the mechanical quality.
Considering the cost, reversing rings give great results. A very common way to find out if you like macro. This writer likes the generic brand of rings. $12.00
I bought a Vive Link Box to use as a signal/power booster in the middle, and it works great. This cured all my dropouts and audio glitches, as well as giving my system a Bluetooth radio.
This setup works great:
Make sure you power cycle the Vive Link Box whenever you plug or unplug anything into it to for it to reinitialize and detect the headset.
I really wish there was a more elegant solution, but so far this works the best for me.
For eyepieces, I'd consider this goldline set...
SVBONY Telescope Eyepiece Fully Mutil Coated 1.25" Telescope Accessories Set 66 Degree Ultra Wide Angle HD 6mm 9mm 15mm 20mm for Astronomy Telescope https://www.amazon.com/dp/B01MR78I42/ref=cm_sw_r_cp_apa_YCtVBb4T6TJV1
This sub often recommends goldlines to beginners because they are very solid with pretty good views for the price range. The entire set is a nice range of focal lengths. If someone breaks or damages an eyepiece, a replacement wouldn't cost too much.
And maybe a telrad finder?
I don't believe hooking it up to a monitor is a real option. The options that do exist would be relatively expensive and the results would still be pretty poor.
Have you looked for a local astronomy club that would be willing to help? Most clubs love doing public outreach projects and events. Or a local college/university that might have an astronomy department?
See the pattern?
Edit:
Ok more info. Your telescope is a reflector just like mine. There are two mirrors, one at each end of the tube. Your eyepiece has to be lined up correctly with the front mirror, and the front mirror and back mirror have to be lined up properly. The collimator (Celstron calls it the collimation eyepiece) helps you to line up these optics. Without doing this first your experience is going to be like mine was, very disappointing. Unless you're incredibly lucky most everything will be blurry, or smeared to some degree. Once you have collimated the scope properly everything becomes much much sharper. The effect is kind of like shining a flashlight on a wall. If the flashlight is lined up properly the light is sharp and round, if the flashlight is at an angle to the wall the light becomes distorted, stretched out and oval shaped. This is similar to what I experienced with my scope. It's well worth the extra 30 bucks.
Get yourself a set of eyepieces of various sizes. Celestron has a decent entry level one for about 130 bucks I think. This will allow you to really get the best use of your scope once it's collimated.
Have fun!
Edit 2: Here is the collimation eyepiece and here is the eyepiece kit
Yeah. I bought my canon xsi off cregslit complete with a canon 18-55mm and a 55-250mm with 3 SD's a tripod and a case for $450 and i have never had any complaints with that gear.
also if your looking for a nice lens but don't have the dough you can pick up one of these for pretty cheap and get 40 year old nikon lenses that are just as sharp as new ones for much much less.
or if you go nikon you don't have to use the ring. :P
also I would like to see your work! I haven't read the whole thread to see if you posted a link of some kind, but i would love to see some of ur stuff!
First off, that hill isn't that fast and there are no corners you need to slow down for. Second, I've done a lot of skating with Cal and Matt and have the utmost confidence in their skills. Third, I put the camera on one of these things to get a better grip and used one of these to automatically take a photo every second; so I was just pointing it and hoping for the best. Finally--this is key--I have pretty good insurance on my camera gear.
K-5 is a great choice. To get those big skies, you will probably want to budget for a superwide lens, as well.
Congrats on joining the community!
I'm no expert by any means and will just be providing my personal opinion/experience, but to answer your questions:
Question 1: Keep the headset out of direct sunlight, especially the inner lens. Some use the box to keep it stored, I purchased this which works great. Clean the lens with glasses cleaning cloth or lens pen cleaner, such as this.
Question 2: I wear glasses as well. I noticed after months of use a tiny scratch on the lens but it doesn't affect my gameplay at all. There are solutions out there I'm sure, but I have not invested into any. PSVR is considered safe to use with glasses.
Question 3: I don't know the worst game, but I can give you a small list of the ones I've played and would say are worth getting in no particular order:
Batman,
Battlezone,
Eve:Valkyrie,
Resident Evil,
Farpoint (/w Aim Controller),
Playstation VR Worlds,
Robinson: The Journey,
Dirt Rally (/w Steering Wheel),
StarWars Battlefront (for X-wing mission - I found it cheap for $10),
Until Dawn: Rush of Blood
It's not hard to find amazing upcoming game, as this sub posts them often. Just to name a few I'm stoked for:
Skyrim VR,
Ace Combat 7,
Doom VR
Hopefully this helps you - goodluck!
Edit: I missed your last question. I linked already to the VR stand. Get a pair of Move controllers and Aim Controller.
For macro this flash is all you will need "below", "there a cheaper alternatives out there, Amazon will give you a list, make sure they work with the camera you have before purchasing", it's on my macro lenses all the time, it does not mean though that I fire it off all the time "I set up one of the camera buttons that when pressed to dissable the flash from firing" https://www.youtube.com/watch?v=cNUH5dCaLMU&list=PLDWvA0qQrZ290b_1j0f_t9Jfnu34TRJKx&t=0s&index=118 , if natural light is right there is no need, but if you want a nice sharp shot the more light the better "but don't overdue it". In the camera flash compensation settings your camera is set by default at 1/250s of a second, which means that you shutter speed will not exceed 1/250s of a second, I don't use this option, since I shoot in manual mode and like to control my shutter, f-stop, and EV settings myself, what you do is go into the Bracketing/flash exposure settings in your camera customs setting menu and change the Flash sync speed setting from 1/250s of a second to 1/250s (Auto FP), this will give you more creativity and help freeze the subject, which is crucial with insects that constantly move "the black wasp was shot at 1/500s shutter speed with no flash used", if you are new to using a flash just stick to 1/250s, then just experiment with the Auto PF mode until you figure out the right settings for the shooting conditions.
Sigma Ring Flash.
https://www.amazon.com/Sigma-EM-140-Macro-Flash-Cameras/dp/B00064XR64?crid=PZ3KQIEG7QCA&keywords=sigma+ring+flash&qid=1540808499&sprefix=sigma+ring%2Caps%2C127&sr=8-5-fkmrnull&ref=sr_1_fkmrnull_5
&#x200B;
You can also use a regular flash with a small soft box "flash diffuser" attached.
https://www.amazon.com/Altura-Photo-Universal-Collapsible-Speedlight/dp/B01ERRQ802?crid=3SV90PE13KBH8&keywords=softbox+for+speedlight&qid=1540810590&sprefix=soft+box+%2Caps%2C135&sr=8-5&ref=sr_1_5
Best flash diffuser for travel? I'm headed to Mexico with the family and am taking my D7100 and a Yongnuo flash / transmitter. Should I get a small softbox? A flash bender? Something else? I don't have a lot of experience with flash but I don't want super hard shadows on my subjects. Most of the pictures will probably be outside but there will be some inside as well. I'll be aiming for natural light where possible but want to come out with some nice family photos. Needs to be small. Thanks!
i'd avoid in the future the shots like 0:55-1:15, try and get the full body in the shot rather than lower half. generally speaking, the rule of thirds is a pretty good thing to stick to when film making: http://en.wikipedia.org/wiki/Rule_of_thirds
Buying something like this helps a lot when your skating and filming: http://www.amazon.com/Opteka-Professional-Camcorder-Stabilizing-Handle-/dp/B003PBB4ME/ref=sr_1_1?ie=UTF8&amp;qid=1367859643&amp;sr=8-1&amp;keywords=steadicam. Also, mess around with colour correction, it goes a long way in improving the quality of your footage once you get the hang of it. I'd also keep practising syncing your footage with your music. generally making sure things happen (cuts/transitions, effects, or someone sliding, for example) on the bass kick and high hats is a good rule to stick to. I'd start messing around with whatever effects and transitions you have in your editing software and see what else you can sync to the audio which looks good. just don't over do it on the effects, most music videos only have 4 or 5, it gets too confusing and inconsistent otherwise. hope this helps!
My first DSLR was a Canon 350D (with a similar crop sensor to yours). After coming to the conclusion that I wanted a wide angle (and doing some research), I scraped money together for the Sigma 10-20mm f/4
I LOVED it. It was cheaper than the canon equivalent and held up to years of faithful service.
Years later I'm shooting with a 5DII and knowing myself, dove back into research to get myself a worthy wide angle that would work on a full-frame.
I had this same dilemma, and in the end, the Canon 16-35mm f/2.8 won out for very basic reasons.
If you're a working professional, and you're going to upgrade, get something worth your money- this meant going from f/4 to f/2.8.
The sigma was and is lovely, dependable and easy on the wallet, but it does me very little good now.
If you already have a tripod, you can try spreading the legs as wide as they go and holding at the top of the tripod for some stabilization. Film Riot shows off another technique.
Another option might be a coldshoe handle, which I saw for $25 on Amazon, or if you're afraid of damaging the camera hotshoe, you can get something like the Opteka X-GRIP. A slight step up from that would be a cage with two grips on the sides and a top handle, or something like a HaloRig, which goes for $150.
For better stabilization and to fly through the scene, at $200 or below, you're probably looking at a counterbalanced stabilizer, similar to a Glidecam or Steadicam Merlin. Though I wouldn't recommend this alone for hiking, as you arm will quickly get fatigued from all the weight; you'll want to a shoulder rig for added support and better stabilization.
If you can budget around $600, you're getting into gimbal territory, like the ikan Beholder MS1 or which would give you a much lighter active stabilization rig compared to counterbalanced systems.
I do a lot of travel as well have tried out various methods of stabilization over the years. Personally, I think a gimbal is the way to go. It's lighter and way easier to setup than a counterbalanced stabilizer, though the counterbalanced stabilizers usually will give you more fluid motion (gimbals can be pretty robotic with movement, especially with panning left/right). I've gone on hikes with my Nebula 4000 Lite gimbal, and my arm hasn't felt tired at all, probably because I had the rig on an R-Strap and let it hang when not in use.
I've used this USB to Lightning adapter. Works great! $30
https://www.amazon.com/Apple-Lightning-USB3-Camera-Adapter/dp/B01F7KJDIM/
If your iPad is one of the new ones with USB-C, it's an even cheaper adapter. $7 for a pair.
https://www.amazon.com/AUKEY-Aluminum-Compatible-Chromebook-Pixelbook/dp/B07BK2XL2F/
For two people, you'll need an interface to control two XLR mics. The Behringer UMC202HD is probably your best bet for about $100. This would plug into one of the USB adapters above.
https://www.amazon.com/Behringer-U-PHORIA-UMC202HD-Interface-Structure/dp/B079YBLNSX/
Your already have a Q2U. Grab another one for your other host.
I have the 204HD. What I like about it better than the 202HD is the ability to monitor in mono. The 202 will play one mic in your left ear, and the other mic in your right ear while monitoring. I find that annoying. The 204 can play both mics in both ears. The 204 is about $30 more than the 202.
You'll probably need to plug in the phone's Lighting power cable while using the Behringer. I'm not sure if the phone alone can power the interface without the AC adapter.
http://www.amazon.com/GoPro-AUCMT-302-Suction-Cup-Mount/dp/B00F19Q7YI/ref=sr_1_1?s=electronics&amp;ie=UTF8&amp;qid=1463955388&amp;sr=1-1&amp;keywords=gopro+car+mount
Also this mount is awesome for doing a driving timelapse :) super good and can also be used for other shots as well