(Part 2) Reddit mentions: The best cutting tools
We found 368 Reddit comments discussing the best cutting tools. We ran sentiment analysis on each of these comments to determine how redditors feel about different products. We found 178 products and ranked them based on the amount of positive reactions they received. Here are the products ranked 21-40. You can also go back to the previous section.
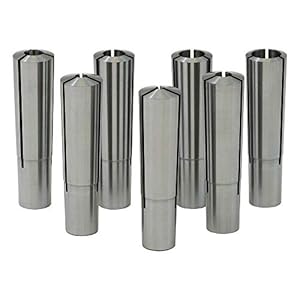
21. Collet Set, 2MT, Set of 7
Set of seven 2 Morse taper round collets3/8"-16 internal drawbar threadMade of high grade tool steelHardened and ground to close toleranceOverall length is 2.67" (68 mm)
Specs:
| Weight | 1.11 Pounds |
| Number of items | 1 |
22. 3.175mm Carbide End Mill Engraving Bits CNC PCB Machinery 0.5mm Cutting Pack of 10
- Cutting edge diameter: 0.5mm
- Shank diameter: 3.175mm /0.125 inch
- A Wide Range of Materials can be engraved, including: Circuit boards,Metal,SMT,Fibre glass ect.
Features:
 ▼ Read Reddit mentions
23. DEWALT Step Drill Bit, Impact Ready, 1/8-Inch-1/2-Inch (DWA1783IR)
Titanium two flute spiral design provides longer life and better chip removalSplit point tip increases speedLaser engraved numbers increases step visibilityOptimized for impact driver usage

Specs:
| Color | Multi |
| Height | 0.75 Inches |
| Length | 6 Inches |
| Weight | 0.01 Pounds |
| Width | 2.88 Inches |
| Size | One Size |
| Number of items | 1 |
24. Niagara Cutter N85684 Carbide Square Nose End Mill, Inch, TiAlN Finish, Roughing and Finishing Cut, 30 Degree Helix, 4 Flutes, 2" Overall Length, 0.250" Cutting Diameter, 0.250" Shank Diameter
- 4 flute design for creating finer finishes and a highter metal removal rate^General purpose end mill for working all types of materials^Made of extra-fine grade carbide for ultra high transverse rupture strength^Titanium Aluminum Nitride (TiAlN) combines high thermal stability with excellent hardness for abrasion resistance and a low coefficient of friction, for lubricity^Center Cutting End Mills are designed with "End Teeth" making these ideal for Slotting and Cavity applications
Features:

Specs:
| Size | 1/4 in |
| Number of items | 1 |
25. THINBIT TT21CR Uncoated Solid Carbide Threading Tool, 27 to 56 threads per inch, 0.125" Minimum bore, 0.419" Reach, Heavy Duty Elliptical neck and 1/8" Shank
- See Downloads section below item photos for detailed product information, technical information and compatible toolholders.
- .125" Minimum bore with .419" tool reach. Heavy Duty Elliptical neck. .020" projection.
- 27 to 56 threads per inch, single lead, 60° Right Hand internal threads.
- Uncoated DURA-MAX 2000 Threading insert for steel, cast iron and stainless steel with interrupted cuts.
- 1/8" Diameter shank, 1.404" Overall length.
Features:

Specs:
| Height | 0.13 Inches |
| Length | 1.4 Inches |
| Width | 0.13 Inches |
| Number of items | 1 |
26. 2L inc. Solid Carbide End Mill, Two Flutes, 1/8" Cutter Dia, 1/4" Shank Dia.500" Flute Length, 2.0" OL, Uncoated, Made in The USA, Part No. E2-250x2.0-.125-.5
- Two Flute Solid Carbide End Mill - High Performance.
- 1/8" (.125") Cutter Diameter.
- 1/4" (.250") Tool Shank Diameter.
- .500" Flute Length, 2.0" Overall Length.
- Made in the USA.
Features:

Specs:
| Color | Bright (Uncoated) |
| Weight | 0.25 Pounds |
| Size | 1/8" Cutter Diameter, 1/4" Shank Diameter |
| Number of items | 1 |
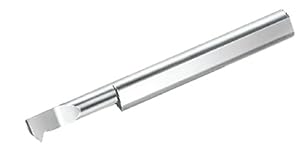
27. Micro 100 IT-180500 Right Hand 60° Internal Single Point Threading Tool, 0.180" Minimum Minor Diameter, 0.040" Projection, 0.500" Maximum Bore Depth, 0.023" Offset Point, 18 to 76 Threads per Inch, 0.2500" Shank Diameter, 2.5" Overall Length, Solid Carbide Tool
- Designed for threading multiple thread pitches (ANSI, UN, and Metric 60°)
- Polished split face for improved edge retention and chip evacuation while reducing galling
- Split geometry makes the tool as rigid as possible
- Corner radius profile
- Lockdown flat automatically locates tool on center
Features:
Specs:
| Height | 0.3 Inches |
| Length | 2.3 Inches |
| Weight | 0.02 Pounds |
| Width | 0.4 Inches |
| Number of items | 1 |
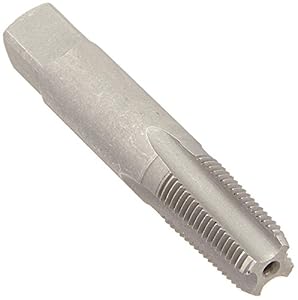
28. Vermont American 20371 1/8-27 NPT High Carbon Steel Pipe Tap
- Manufacturer: Vermont American
- Country of manufacture: China
- Power Cutting & Sawing
Features:
Specs:
| Color | Silver |
| Height | 0 Inches |
| Length | 0 Inches |
| Weight | 0.03 Pounds |
| Width | 0 Inches |
| Number of items | 1 |
29. Century Drill & Tool 95002 High Carbon Steel Fractional Plug Tap, 4-40 NC
- High carbon steel machine screw tap
- Precision cut threads for accurate threading.
- 1" hex across flats.
Features:
Specs:
| Color | steel |
| Height | 0.089 Inches |
| Length | 1.875 Inches |
| Weight | 0.01 Pounds |
| Width | 0.089 Inches |
| Size | 4-40 NC |
| Number of items | 1 |
30. Step Drill,Knoweasy 10 Step Sizes Titanium Step Drill Bit,High Speed Steel 1/4 to 1-3/8 Inches Drill Bits Set for Metal Hole Drilling
- ✅【Includes 10 step sizes:】1/4",3/8",1/2",5/8",3/4",7/8",1",1-1/8", 1-1/4",1-3/8"
- ✅【Application:】Perfect for home repairs and light jobs such as drilling holes in plastic, aluminum, copper, iron sheet and many other types of sheet metal
- ✅【High Quality Material:】Made of strong high speed steel with titanium coating, the bits have strong durability
- ✅【Unique Design:】Two-fluted design provides faster,smoother cutting,provided with small pressure and the sets
- ✅【What you get:】Knoweasy Step drill with safe plastic case,12 month wmonths warranty
Features:

Specs:
| Size | Step Drill Bits 8 |
31. Allstar Performance ALL11040 Step Drill Set - 3 Piece
- Package Dimensions: 17.78 L x 10.16 W x 1.016 H (centimetres)
- Country of Origin : Taiwan
- Package Weight: 0.5 pounds
- Fit type: Vehicle Specific
Features:

Specs:
| Height | 0.7 Inches |
| Length | 4.05 Inches |
| Weight | 0.2425084882 Pounds |
| Width | 6.95 Inches |
| Number of items | 1 |
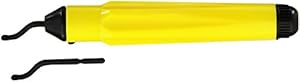
32. Cobra PST090 Deburring Tool
- Product Type:Wrench
- Item Package Dimension:1.27 cm L X 8.89 cm W X 21.082 cm H
- Item Package Quantity:1
- Country Of Origin: China
Features:
Specs:
| Height | 3.5 Inches |
| Length | 8.4 Inches |
| Weight | 0.1 Pounds |
| Width | 1 Inches |
| Size | 0.15 |
| Number of items | 1 |
33. Quick Change Tool Post Set, AXA
- Our part # ALL-47126
- For use on lathes with up to 12" swing (defined as the diameter that can be turned over the bed)
- Precision-engineered to assure repetitive accuracy
- Quickly and easily installed on an engine, bench, or turret lathe for a wide range of operations
Features:

Specs:
| Weight | 11.6 Pounds |
| Number of items | 1 |
34. uxcell Lathe Milling 1/2" Thread Round Spout Flexible Oil Coolant Pipe Hose 16.1"
- Product Name : Flexible Coolant Pipe;Material : Plastic
- Thread External Diamter : 19.6mm ;Thread External Size : 1/2" PT
- Nozzle Diameter : External:10mm/ 25/64,Internal:6.7mm / 17/64";Total Length (Approx.) : 41cm / 16.1"
- Main Color : Indigo Blue , Orange;Weight : 74g
- Package Content : 1 x Flexible Coolant Pipe
Features:

Specs:
| Color | "Indigo Blue , Orange" |
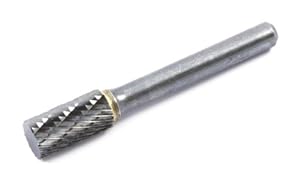
35. Forney 60121 Tungsten Carbide Burr with 1/4-Inch Shank, Cylindrical, 3/8-Inch
Shank mounted Tungsten Carbide burrs are double cut for fine workDesigned for use on ferrous metals, plastic, fiberglass and other Machin able materialsGreat for deburring, sculpting and removing material in hard to reach areas
Specs:
| Color | Dark Grey |
| Height | 5 Inches |
| Length | 8 Inches |
| Weight | 0.05 Pounds |
| Width | 1 Inches |
| Size | No |
| Number of items | 1 |
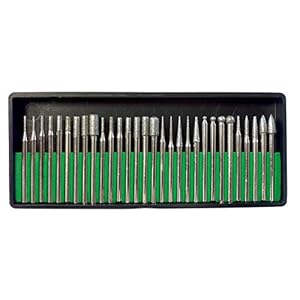
36. HTS 401B3 90 Pc Multi-Grit Diamond Burr Set (600 Fine, 150 Medium, 40 Coarse)
- 40, 150, & 600 grit sets
- Heads coated with industrial diamonds on all sides
- 1 3/4" length with 1/8" shank
- 90 different head shapes & sizes
- Includes 3 plastic storage cases
Features:
Specs:
| Height | 5.75 Inches |
| Length | 2.5 Inches |
| Weight | 0.81 Pounds |
| Width | 0.75 Inches |
37. DRILLPRO Double Cut Carbide Rotary Burr Set-10 Pieces 1/8"(3mm) Shank and 1/4"(6 mm) Head SizeTungsten Steel - for Grinder Drill, DIY Wood-working Carving, metal polishing,Engraving,Drilling

Specs:
| Is adult product | 1 |
| Height | 3.94 Inches |
| Length | 3.94 Inches |
| Weight | 0.15 Pounds |
| Width | 3.94 Inches |
38. Kutzall Original Sphere Rotary Burr 1/8" Shaft, Coarse - Woodworking Attachment for Dremel, Foredom, DeWalt, Milwaukee Tools. Abrasive Tungsten Carbide Coating, 3/8" (9.5mm) Head Diameter, S-38-E
Rapid material removal saves you time and effort, letting you focus on the task at hand.Tungsten Carbide teeth give you outstanding wear-life for a much longer lasting burr.Comfortable, effortless operation allows you to easily and quickly remove a variety of materials.Coarse coating provides fast s...

Specs:
| Height | 4 Inches |
| Length | 2 Inches |
| Weight | 0.0625 Pounds |
| Width | 2 Inches |
| Size | Head Diameter: 3⁄8", Head Length: 3⁄8" |
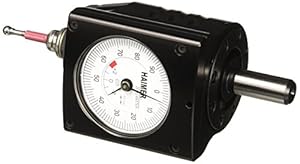
39. Haimer 80.960.00 Zero Master Analog Sensor
- 3-dimensional edge finder locates in X,Y and Z axis
- Measure work piece dimensions
- 1 Short Probe Tip Included w/ Sensor
- Measure surface flatness
- No subtracting indicator tip diameter = NO MATH!
Features:
Specs:
| Weight | 0.86 Pounds |
| Number of items | 1 |
40. KEO 53522, 1/2" Body Diameter 90 Degree Zero Flute Cobalt Deburring Tool,
KEO ZErO flute countersink and deburring tools are simple, all-purpose tools made of Colbalt that provide flawless countersinking and deburringSingle flute countersinksThe chatter-free cutting action requires minimal power The micro-smooth CNC precision ground construction produces clean, smooth cut...

Specs:
| Height | 0.5 Inches |
| Length | 2.5 Inches |
| Weight | 0.02 Pounds |
| Width | 0.7 Inches |
| Number of items | 1 |
🎓 Reddit experts on cutting tools
The comments and opinions expressed on this page are written exclusively by redditors. To provide you with the most relevant data, we sourced opinions from the most knowledgeable Reddit users based the total number of upvotes and downvotes received across comments on subreddits where cutting tools are discussed. For your reference and for the sake of transparency, here are the specialists whose opinions mattered the most in our ranking.
Subcategories:
Interested in what Redditors like? Check out our Shuffle feature
Shuffle: random products popular on RedditTop Reddit comments about Cutting Tools:
Summary
21. Collet Set, 2MT, Set of 7
Set of seven 2 Morse taper round collets3/8"-16 internal drawbar threadMade of high grade tool steelHardened and ground to close toleranceOverall length is 2.67" (68 mm)
Specs:
| Weight | 1.11 Pounds |
| Number of items | 1 |
22. 3.175mm Carbide End Mill Engraving Bits CNC PCB Machinery 0.5mm Cutting Pack of 10
- Cutting edge diameter: 0.5mm
- Shank diameter: 3.175mm /0.125 inch
- A Wide Range of Materials can be engraved, including: Circuit boards,Metal,SMT,Fibre glass ect.
Features:
▼ Read Reddit mentions23. DEWALT Step Drill Bit, Impact Ready, 1/8-Inch-1/2-Inch (DWA1783IR)
Titanium two flute spiral design provides longer life and better chip removalSplit point tip increases speedLaser engraved numbers increases step visibilityOptimized for impact driver usage
Specs:
| Color | Multi |
| Height | 0.75 Inches |
| Length | 6 Inches |
| Weight | 0.01 Pounds |
| Width | 2.88 Inches |
| Size | One Size |
| Number of items | 1 |
24. Niagara Cutter N85684 Carbide Square Nose End Mill, Inch, TiAlN Finish, Roughing and Finishing Cut, 30 Degree Helix, 4 Flutes, 2" Overall Length, 0.250" Cutting Diameter, 0.250" Shank Diameter
- 4 flute design for creating finer finishes and a highter metal removal rate^General purpose end mill for working all types of materials^Made of extra-fine grade carbide for ultra high transverse rupture strength^Titanium Aluminum Nitride (TiAlN) combines high thermal stability with excellent hardness for abrasion resistance and a low coefficient of friction, for lubricity^Center Cutting End Mills are designed with "End Teeth" making these ideal for Slotting and Cavity applications
Features:
Specs:
| Size | 1/4 in |
| Number of items | 1 |
25. THINBIT TT21CR Uncoated Solid Carbide Threading Tool, 27 to 56 threads per inch, 0.125" Minimum bore, 0.419" Reach, Heavy Duty Elliptical neck and 1/8" Shank
- See Downloads section below item photos for detailed product information, technical information and compatible toolholders.
- .125" Minimum bore with .419" tool reach. Heavy Duty Elliptical neck. .020" projection.
- 27 to 56 threads per inch, single lead, 60° Right Hand internal threads.
- Uncoated DURA-MAX 2000 Threading insert for steel, cast iron and stainless steel with interrupted cuts.
- 1/8" Diameter shank, 1.404" Overall length.
Features:
Specs:
| Height | 0.13 Inches |
| Length | 1.4 Inches |
| Width | 0.13 Inches |
| Number of items | 1 |
26. 2L inc. Solid Carbide End Mill, Two Flutes, 1/8" Cutter Dia, 1/4" Shank Dia.500" Flute Length, 2.0" OL, Uncoated, Made in The USA, Part No. E2-250x2.0-.125-.5
- Two Flute Solid Carbide End Mill - High Performance.
- 1/8" (.125") Cutter Diameter.
- 1/4" (.250") Tool Shank Diameter.
- .500" Flute Length, 2.0" Overall Length.
- Made in the USA.
Features:
Specs:
| Color | Bright (Uncoated) |
| Weight | 0.25 Pounds |
| Size | 1/8" Cutter Diameter, 1/4" Shank Diameter |
| Number of items | 1 |
27. Micro 100 IT-180500 Right Hand 60° Internal Single Point Threading Tool, 0.180" Minimum Minor Diameter, 0.040" Projection, 0.500" Maximum Bore Depth, 0.023" Offset Point, 18 to 76 Threads per Inch, 0.2500" Shank Diameter, 2.5" Overall Length, Solid Carbide Tool
- Designed for threading multiple thread pitches (ANSI, UN, and Metric 60°)
- Polished split face for improved edge retention and chip evacuation while reducing galling
- Split geometry makes the tool as rigid as possible
- Corner radius profile
- Lockdown flat automatically locates tool on center
Features:
Specs:
| Height | 0.3 Inches |
| Length | 2.3 Inches |
| Weight | 0.02 Pounds |
| Width | 0.4 Inches |
| Number of items | 1 |
28. Vermont American 20371 1/8-27 NPT High Carbon Steel Pipe Tap
- Manufacturer: Vermont American
- Country of manufacture: China
- Power Cutting & Sawing
Features:
Specs:
| Color | Silver |
| Height | 0 Inches |
| Length | 0 Inches |
| Weight | 0.03 Pounds |
| Width | 0 Inches |
| Number of items | 1 |
29. Century Drill & Tool 95002 High Carbon Steel Fractional Plug Tap, 4-40 NC
- High carbon steel machine screw tap
- Precision cut threads for accurate threading.
- 1" hex across flats.
Features:
Specs:
| Color | steel |
| Height | 0.089 Inches |
| Length | 1.875 Inches |
| Weight | 0.01 Pounds |
| Width | 0.089 Inches |
| Size | 4-40 NC |
| Number of items | 1 |
30. Step Drill,Knoweasy 10 Step Sizes Titanium Step Drill Bit,High Speed Steel 1/4 to 1-3/8 Inches Drill Bits Set for Metal Hole Drilling
- ✅【Includes 10 step sizes:】1/4",3/8",1/2",5/8",3/4",7/8",1",1-1/8", 1-1/4",1-3/8"
- ✅【Application:】Perfect for home repairs and light jobs such as drilling holes in plastic, aluminum, copper, iron sheet and many other types of sheet metal
- ✅【High Quality Material:】Made of strong high speed steel with titanium coating, the bits have strong durability
- ✅【Unique Design:】Two-fluted design provides faster,smoother cutting,provided with small pressure and the sets
- ✅【What you get:】Knoweasy Step drill with safe plastic case,12 month wmonths warranty
Features:
Specs:
| Size | Step Drill Bits 8 |
31. Allstar Performance ALL11040 Step Drill Set - 3 Piece
- Package Dimensions: 17.78 L x 10.16 W x 1.016 H (centimetres)
- Country of Origin : Taiwan
- Package Weight: 0.5 pounds
- Fit type: Vehicle Specific
Features:
Specs:
| Height | 0.7 Inches |
| Length | 4.05 Inches |
| Weight | 0.2425084882 Pounds |
| Width | 6.95 Inches |
| Number of items | 1 |
32. Cobra PST090 Deburring Tool
- Product Type:Wrench
- Item Package Dimension:1.27 cm L X 8.89 cm W X 21.082 cm H
- Item Package Quantity:1
- Country Of Origin: China
Features:
Specs:
| Height | 3.5 Inches |
| Length | 8.4 Inches |
| Weight | 0.1 Pounds |
| Width | 1 Inches |
| Size | 0.15 |
| Number of items | 1 |
33. Quick Change Tool Post Set, AXA
- Our part # ALL-47126
- For use on lathes with up to 12" swing (defined as the diameter that can be turned over the bed)
- Precision-engineered to assure repetitive accuracy
- Quickly and easily installed on an engine, bench, or turret lathe for a wide range of operations
Features:
Specs:
| Weight | 11.6 Pounds |
| Number of items | 1 |
34. uxcell Lathe Milling 1/2" Thread Round Spout Flexible Oil Coolant Pipe Hose 16.1"
- Product Name : Flexible Coolant Pipe;Material : Plastic
- Thread External Diamter : 19.6mm ;Thread External Size : 1/2" PT
- Nozzle Diameter : External:10mm/ 25/64,Internal:6.7mm / 17/64";Total Length (Approx.) : 41cm / 16.1"
- Main Color : Indigo Blue , Orange;Weight : 74g
- Package Content : 1 x Flexible Coolant Pipe
Features:
Specs:
| Color | "Indigo Blue , Orange" |
35. Forney 60121 Tungsten Carbide Burr with 1/4-Inch Shank, Cylindrical, 3/8-Inch
Shank mounted Tungsten Carbide burrs are double cut for fine workDesigned for use on ferrous metals, plastic, fiberglass and other Machin able materialsGreat for deburring, sculpting and removing material in hard to reach areas
Specs:
| Color | Dark Grey |
| Height | 5 Inches |
| Length | 8 Inches |
| Weight | 0.05 Pounds |
| Width | 1 Inches |
| Size | No |
| Number of items | 1 |
36. HTS 401B3 90 Pc Multi-Grit Diamond Burr Set (600 Fine, 150 Medium, 40 Coarse)
- 40, 150, & 600 grit sets
- Heads coated with industrial diamonds on all sides
- 1 3/4" length with 1/8" shank
- 90 different head shapes & sizes
- Includes 3 plastic storage cases
Features:
Specs:
| Height | 5.75 Inches |
| Length | 2.5 Inches |
| Weight | 0.81 Pounds |
| Width | 0.75 Inches |
37. DRILLPRO Double Cut Carbide Rotary Burr Set-10 Pieces 1/8"(3mm) Shank and 1/4"(6 mm) Head SizeTungsten Steel - for Grinder Drill, DIY Wood-working Carving, metal polishing,Engraving,Drilling
Specs:
| Is adult product | 1 |
| Height | 3.94 Inches |
| Length | 3.94 Inches |
| Weight | 0.15 Pounds |
| Width | 3.94 Inches |
38. Kutzall Original Sphere Rotary Burr 1/8" Shaft, Coarse - Woodworking Attachment for Dremel, Foredom, DeWalt, Milwaukee Tools. Abrasive Tungsten Carbide Coating, 3/8" (9.5mm) Head Diameter, S-38-E
Rapid material removal saves you time and effort, letting you focus on the task at hand.Tungsten Carbide teeth give you outstanding wear-life for a much longer lasting burr.Comfortable, effortless operation allows you to easily and quickly remove a variety of materials.Coarse coating provides fast s...
Specs:
| Height | 4 Inches |
| Length | 2 Inches |
| Weight | 0.0625 Pounds |
| Width | 2 Inches |
| Size | Head Diameter: 3⁄8", Head Length: 3⁄8" |
39. Haimer 80.960.00 Zero Master Analog Sensor
- 3-dimensional edge finder locates in X,Y and Z axis
- Measure work piece dimensions
- 1 Short Probe Tip Included w/ Sensor
- Measure surface flatness
- No subtracting indicator tip diameter = NO MATH!
Features:
Specs:
| Weight | 0.86 Pounds |
| Number of items | 1 |
40. KEO 53522, 1/2" Body Diameter 90 Degree Zero Flute Cobalt Deburring Tool,
KEO ZErO flute countersink and deburring tools are simple, all-purpose tools made of Colbalt that provide flawless countersinking and deburringSingle flute countersinksThe chatter-free cutting action requires minimal power The micro-smooth CNC precision ground construction produces clean, smooth cut...
Specs:
| Height | 0.5 Inches |
| Length | 2.5 Inches |
| Weight | 0.02 Pounds |
| Width | 0.7 Inches |
| Number of items | 1 |
I'm using this one:
https://www.woodturnerscatalog.com/p/101/4400/Apprentice-Collet-Chuck-7-Piece-Set
I think the Beal might be slightly nicer, but have no complaints about the Apprentice. Both use ER32 compatible collet inserts so you have a huge range of options if you want to buy more specific ones for special things. I also know some folks who went straight to the machinists ER32 collet holders which can be cheaper but most of the holders for those are MT2 with a drawbar which precludes putting long skinny things through them into the headstock.. and it was easy to find a woodturners version that fit my lathe :)
A picture and an coherent explanation on the custom sized insert is worth a million other words so I'll point over at David Reed Smiths article on knitting needles and collet chuck inserts: http://www.davidreedsmith.com/articles/knittingneedles/knitting_needles.htm
Scroll down in there to the bit about the "one-slit sub-collet" for details. I might well have even gotten the idea from there (his website is a wealth of interesting ideas). I haven't used these in the scroll chuck, but I think they should work reasonably well if you're careful where you align the slit.
I haven't used a pin chuck (I assume you mean one kind of like this https://youtu.be/XEwEG_sYGFU?t=146 - not the "pin chuck" used for holding tiny drill bits - which I have used quite a bit). That looks super handy for things you want to turn with inside openings that are large enough to register in a stable fashion (I don't think I'd use it for things a lot bigger around than they are thick maybe? have to try it..). I've used a tapered peg held <various ways> in the headstock to as sort of a jam-it-on-there holder which works pretty well with a light hand. The trick with those is to have just barely enough taper to matter to get a good grip.
I've also picked up some MT2 collets - akin to these https://www.amazon.com/Collet-Set-2MT-7/dp/B002YPFSEM (although I've only bought a couple of onsies that I found cheap). They're pretty handy for really small stuff and are best used with a drawbar through the headstock to pull them closed (you can easily make the drawbar out of some appropriately sized all-thread).
For fitting an MT2 taper the critical thing is that you have good front and back contact so it's better if the taper is a bit concave than convex. The fellow who gave me the idea is John K Jordan (the "other" John Jordan as he notes.. heh) who uses a brass gauge with a U at each side matching the major and minor diameters he wants plus marks for the length, part each side to where the gauge slips over, then remove the middle. A slightly dubious looking but seemingly fine URL that has a PDF of his class describing this is at: http://nebula.wsimg.com/036285412d6ef72ec47c952e88ecf282?AccessKeyId=8E1EC0DC707F1FE36FCB&amp;disposition=0&amp;alloworigin=1
I don't think I'd use the MT2 trick for these pegs though, because you want the sides of the tenons to be straight/parallel to get them to glue nicely into whatever you're putting them into... unless of course you bought an MT2 taper reamer and reamed the holes to match.. but even then getting the sizing right would be a lot trickier than just a straight tenon.
Get yourself a good build surface if you don't already have one. BuildTak works pretty well but there are plenty of options now. Don't mess with things like hairspray or plastic slurry, they are messy and a waste of time. Just google '3d printer build surface'. You can also just stick with Kapton tape on the 2x, that works fine too but It's not as durable, you'll be replacing it much more often and it really depends if you want to print in ABS or PLA.
I own a Replicator 2 and one of the 2X clones from Monoprice and have used a Flashforge creator, all are basically the same printer. As long as you have the upgraded extruder which most of them came with after the first Makerbot Rep 2 year and a good build surface, you don't likely "need" anything else.
If you do plan on doing a lot of printing though, get yourself a nice set of build removal tools. I use a cheap square headed exacto knife, the more flexible the better but it takes a little bit of practice to not cut your build plate that way. The other options are small spatula with very thin, sharp front edge. I have a kit like this one https://www.amazon.com/Synkia-Print-Removal-Enhanced-Version/dp/B01IMWL1HS/ref=sr_1_1?ie=UTF8&amp;qid=1480291918&amp;sr=8-1-spons&amp;keywords=3d+print+removal+tool&amp;psc=1 that works ok as well.
Also you might want to pick up some small end mills/PCB cutting bits to use for cleaning the nozzle. Something like this https://www.amazon.com/3-175mm-Carbide-Engraving-CNC-Machinery/dp/B00SMDOUPS/ref=sr_1_6?ie=UTF8&amp;qid=1480291965&amp;sr=8-6&amp;keywords=pcb+mill Make sure they are smaller than the diameter of your nozzle before you buy them.
Take your time, get to know the machine, don't go nuts trying to upgrade it until you find out where your pain is. That generation of printer can be hit or miss, either its the best darn thing you've ever owned or... you have a lot of pain. Newer versions of that design should work great out of the box but if it's a machine from the first release year without any upgrades it will have problems.
Good Luck.
Bastard files with remove the most metal of all other file grinds.
I got started making knives several years back using a hand jig inspired by Aaron Gough.
Here's a link:
https://www.youtube.com/watch?v=r9iNDRwwBQQ
You can find several more youtube video's on the subject.
Your design looks pretty good, I would recommend doing one blade from start to finish until you perfect your process. 6 mm stock is pretty thick so you might want to skeletonize the handle a bit to better balance the blade and reduce weight. Here is a link to an example:
&#x200B;
https://www.knifecenter.com/item/WTWRATK/white-river-knives-owen-baker-jr-atk-always-there-knife-s35vn-stonewashed-blade-skeletonized-handle-kydex-sheath
&#x200B;
be careful not to take out too much material just behind where the knife meets the handle, this can create a weak point if you decide to baton with the knife.
&#x200B;
I would get a step of bit for drilling pin holes and skeletonize the knife, I like this one. https://www.amazon.com/DEWALT-DWA1783IR-8-Inch-1-2-Inch-IMPACT/dp/B0090IHBL4/ref=sxts_sxwds-bia?gclid=Cj0KCQiAn8nuBRCzARIsAJcdIfNba4wvdHAT8G-Xw7-192SSo25KbGIIFRTaciL4vTm_fm1Ye7TqVvoaAignEALw_wcB&hvadid=153692517255&hvdev=c&hvlocphy=9031951&hvnetw=g&hvpos=1t1&hvqmt=e&hvrand=1119223531089504081&hvtargid=aud-837686656069%3Akwd-6841401801&hydadcr=1611_9512018&keywords=dewalt+step+bit&pd_rd_i=B0090IHBL4&pd_rd_r=3301b045-680f-4746-bf0c-1409a9698aae&pd_rd_w=U7oJ6&pd_rd_wg=l4rot&pf_rd_p=1cb3f32a-ccfd-479b-8a13-b22f56c942c6&pf_rd_r=HW4NWM70PNESNP2QKEG0&psc=1&qid=1574091165
So much easier to make holes than a typical drill bit, even if you use a carbide drill bit.
Also make sure you make all of your holes and rough grind the bevels before you heat treat, as once hard, removing or drilling metal will be tough. Also keep the edge of the blade at least 0.4 mm or so at the edge before you heat treat, if you grind it too think, the blade will warp.
&#x200B;
Good luck!
Did it all with a hacksaw, a file, cordless drill and sandpaper. Before I put the grip on it weighed about 14 ounces (receiver, barrel and full mag weigh about 4 lbs). Spent about $16 on material. Need some sort of pad for the buttplate.
edit: more pics: 1, 2
edit:
Here's the process. I should mention that the receiver is a 10/22. Here's the basic drawing. It is to scale but I don't know what scale. If someone knows where to host a pdf without it being smushed into a png let me know. The square part is 6061-T6 rectangular tube, 24", the cylinder is 6061-T6 round tube, random length (discount codes)and the grip is a standard AR-15 grip. I had an extra but they're pretty cheap. The inside dimension of 1.5" rectangle tube is 1.25", the exact outside dimension of the receiver. Basically you just want to remove just enough material from the rectangle tube so that it fits snugly into the cylinder. When you're satisfied with the fit drill through both pieces while they are fitted together so that all of the holes align. Use a short machine screw on each side to fasten.
Next remove enough material so that the receiver fits into the rectangular piece. Note that all cuts made along red lines are at 5.5° angle from the edge of the stock material. Also note that if you have tech sights you'll have to remove the front tower to fit a 1.75" cylinder over the end of the barrel. When you're satisfied with that fit drill a hole for the takedown screw.
Now start removing material for weight reduction. Be sure to leave connections between the side walls for strength. For cutting arcs it helps to have a jigsaw blade. If you use a jigsaw you have to run it at a very low speed because the teeth gum up with softened aluminum. In hindsight I wish I had left more material in this area. The butt end should look kind of like a tuning fork. You'll just clamp the prongs together, drill and apply fasteners.
The grip requires cutting to fit snugly and it helps to have a tap and die set so that the stock will receive a screw in the same way it does on an AR.
In the process of building it I found out that they make 1/4" shank milling ends that will fit into most any router. You'll need some way to cool your workpiece though. If anyone has experience with this method let me know how well it works.
There are smaller internal threading tools, I have seen ones that hold carbides down to 5mm, but with everything they are still around 1/4" minimum hole size. You can also find some from thinbit.com, they have a line called microbit that can get really small, from their website "For internal diameters of .077" and larger. ". Amazon has some of them like https://www.amazon.com/MICROBIT-Uncoated-Carbide-Threading-Elliptical/dp/B01MTIZ8W3 and the price isn't horrible, but be careful to follow the recommended feed and speed suggestions, would hate to break one. If you search "thinbit" you can find other offerings too.
One other option is cut an external thread and make a tap that matches what you want and tap the hole.
If you make your own, a good reference is https://sct-usa.com/wp-content/uploads/2015/08/Catalog2015_081015_QUALIFIEDTHREADTOOLS.pdf, this is also an option instead of the microbits above, but I haven't seen prices of these tools.
OK, going to leave the above info, but was looking around Amazon and found the "Micro 100" line, search for "Micro 100 single point", the price is right, and you can get a good selection of sizes. I think this might be the way to go. Here is an example https://www.amazon.com/Micro-100-Internal-Threading-Projection/dp/B00Q8M1HQ0 but look around to get what fits your needs best.
Thanks for the question, I have ordered a couple of the Micro 100 ones to try out, as I hadn't seen them before and they look really nice for the job.
This should do nicely: https://www.amazon.com/2L-inc-Carbide-Uncoated-E2-250x2-0-125-5/dp/B01J2KKGDY/ref=sr_1_2?ie=UTF8&amp;qid=1527553815&amp;sr=8-2&amp;keywords=1%2F8+dia+1%2F4+shank+2+flute+endmill
As far as what works in aluminum: 2 flutes, coated HSS or carbide, but you cant really make use of the cutting ability of carbide without the machine rigidity to take a super heavy depth of cut. And I'd get in touch with your local Kennametal or other cutting tool distributor, they can probably get you some free samples. Oh and safety glasses, all the safety glasses. Lexan machine guards if you can.
Best of luck!
First, most guns operate around 90 psi. 10-20 psi is ridiculously small.
There is a trade off that you have to confront.
CO2 holds WAAAAY more energy than compressed air ever will. If size is your main concern, CO2 would be the way to go. The reason, as you know, is because CO2 goes through a phase change and there's a lot of energy in that step.
Yes, there are 2 or 3 oz co2 bottles. You're going to want to ask on mcarterbrown.com where ot get them. They are specialty made in limited runs for people who play pump paintball. I think they go for 40 bux. The same customers also buy very small compressed air tanks.
Now then, CO2 has a lot more energy stored, but god damn is it dirty. First, you need to make sure it expands. That expansion uses up a lot of heat. If you are continuously running the bottle, it is entirely possible that everything will freeze up. BUT, if it's only 10-20 psi, that may just be a small enough flow to where ambient temperature will work. However, with a constant flow I would bet that your device would freeze up on CO2 Either way, you will probably want to buy an old school "expansion chamber."
https://www.amazon.com/Kingman-Paintball-Expansion-Bottomline-conversion/dp/B00APL4KPK/ref=zg_bs_3488731_1
That's a really crappy one. Try to buy a used one (pbnation.com or mcarterbrown.com) that has multiple chambers and FINS. The one with the fins is really great. (20 bux).
Compressed air in a small tank may struggle to provide you with enough energy to run for 1 hour. A larger tank, like a 45 cubic inch/4500 psi (called a 45/45) would definitely last you.
Either way, you will need at least two regulators. All tanks, whether CO2 or HPA, expel air out of them at 800 psi (standard) or 400 psi (low pressure HPA tanks only). So you will need to regulate the pressure down from 800 down to 100 using a high pressure regulator. If you are using CO2, (Or even if not) one of the best most consistent regulators is a Palmer's male stabilizer.
https://palmers-pursuit-shop.myshopify.com/collections/stabilizers
90 dollars.
You want to put this 100 psi air into some sort of dump chamber, roughly the size of your thumb or larger. I highly recommend using macroline and macroline fittings in order to make these connections.
http://www.oringmonkey.com/macroline-fittings-c-210.html
The straight one here is 8 dollars. It's a premium, higher costed macroline fitting. Most go for 4-5. But o ring monkey is good people and I always order from there. Pick up some 010 o rings to fix any leaks you may get in your macroline fitting later (which will definitely occur with CO2). The macroline connectors fit into 1/8 NPT threads, which is easy enough to drill and tap.
https://www.amazon.com/Vermont-American-20371-Carbon-Steel/dp/B000K1LZ76
Then feed that into a low pressure regulator. Now these are getting rarer as most guns have ditched them. Anyways, once again Palmers is going to be your best bet for CO2, and they're one of the best regs there is, hands down. I cannot say for certain that such a regulator will get down to 10 psi and work properly. This is outside the range of almost every paintball gun there is. You definitely are going to have to "Ask the Experts" over at mcarterbrown.com
Most Low Pressure Regulators (LPR) output the air through microline which is different from macroline. You want SOFT microline for the fittings. The only source of soft microline that I have ever been able to locate is from a guy on mcarterbrown.com . His handle is "maggot" and you are looking for his "autococker hose kit." 12 bux
http://www.mcarterbrown.com/forums/dealers-forum/255801-slps-kit-cocker-parts-macroline-halfblock-delrin-grips-benchmark-sliders.html#post2949265
As far as refilling, CO2 is very easy to refill from a larger bottle wit a CO2 fill station
https://www.amazon.com/Ninja-Paintball-Mini-Fill-Station/dp/B0023U7RH4
As far as refilling HPA, it is really easy to do so from a scuba fill station.
https://www.amazon.com/Ninja-Paintball-SCUBA-Fill-Station/dp/B001T6I1K0
Of course, be warned. DO NOT EVER PUT OIL INTO A HPA TANK AS IT CAN AND WILL EXPLODE That's really the only thing you'd have to worry about with filling.
I dunno. Aero doesn't really offer anything that you can't DIY pretty easily other than finish and I do like to rattlecan guns. As soon as we replace the oven in the kitchen, that might be migrating out to the garage to see if I want to get into Cerakote.
> The intergrated trigger guard is really nice
I like the ability to pick and choose, but I usually default to MagPul plastics.
> threaded bolt catch is a god send of making the hardest part of the lower build the easiest
Knipex flat jaw pliers for all the roll pins makes it super simple.
> I like the set screw in the back
4-40 tap and tap wrench along with a phat sack of these. If you chop a couple coils off the safety detent you can tap and thread that for the same screws as well.
Hey friend. you're on the right track with your idea to drill a hole and plumb it to a larger tank. Be careful when you choose the spot to drill. You don't want to drill in to a very round side, as that will be harder to make watertight. i would recommend trying to find a nice flat spot, just below the max fill of that unit's tank, and then drilling a hole for a bulkhead fitting(so that its watertight) and then just attach a hose to the drain end of the fitting and you can just set the other end of the hose in to a 5 gallon bucket below the unit or something.
a 1/2 bulkhead fitting is less than 5$ on amazon(also might not hurt to look around for a smaller sized one of these, as a 1 1/2" hole may be kind of big for this small tank) i only looked around for a second.
https://www.amazon.com/Lifegard-Aquatics-Standard-Threaded-Bulkhead/dp/B0002Z7U1K/ref=sr_1_15?keywords=bulkhead+drain+with+gasket&qid=1565284477&s=gateway&sr=8-15
If you go with this route, i would get a step bit (drill bit for drilling a precise hole by gradually widening it)
https://www.amazon.com/Knoweasy-Sizes-Titanium-Drill-Drilling/dp/B07NKXLTCB/ref=sr_1_1_sspa?keywords=step+bit&qid=1565284634&s=gateway&sr=8-1-spons&psc=1&spLa=ZW5jcnlwdGVkUXVhbGlmaWVyPUEyMEU0WExMM0Y1NUNZJmVuY3J5cHRlZElkPUEwMDQzOTM5RjNOQkZRRFgzUVFXJmVuY3J5cHRlZEFkSWQ9QTAwODExNDgyUEtUR1lBS1NJNzM4JndpZGdldE5hbWU9c3BfYXRmJmFjdGlvbj1jbGlja1JlZGlyZWN0JmRvTm90TG9nQ2xpY2s9dHJ1ZQ==
then you would just need a female 1/2 thread to 1/4" barbed fitting and some 1/4 tubing to run to the bucket. I have similar setups to this for top-off tanks in my hydro systems. If you need any help figuring it out and sourcing parts, just shoot me a message!
Best of luck!!
Alright, First thing is first. The firewall is the think sheet of metal that separates the inside of the car, from the engine bay.
First thing is first, look at your firewall (The back wall of the engine bay) and try to find out if there is some way to run a thick wire through there.
Look for rubber seals that already have wires running through them.
Also note, you want to run your power wire on the same side of the vehicle as the battery. So if your battery is on the drivers side, you want your power wire to run drivers side. Passenger side battery means you run your power wire on the passenger side of the vehicle.
If you do NOT have an easy or reasonable path to run your power wire, then you drill. You drill CAREFULLY! If you make a mistake, you can end up costing yourself thousands of dollars in damage from 1 little mistake.
Easy way to know where to drill is to use your eyes! LOOK at what you are drilling before you drill! DO NOT DRILL THROUGH SOMETHING IMPORTANT! Use things going through the firewall as guides. If your throttle cable runs from one side of the firewall, and it has a spot above it that looks good to drill, make sure to look at the opposite side of the firewall to make sure you're not going to hit something.
Once you have a hole, use a grommet! (some sort of protective device, rubber or plastic) so the metal doesn't shred the power wire's shielding.
if you're unsure, then drill a pilot hole first, and poke a coat hanger or some kinda rod through it first, if it clears, and you can see that the other side is clear, then you're home free!
I use a step-bit set that looks like this! http://www.amazon.com/Allstar-Performance-ALL11040-Step-Drill/dp/B003BZR1Z8/ref=sr_1_17?s=industrial&amp;ie=UTF8&amp;qid=1448935934&amp;sr=1-17
Good luck!
I know this might just be another tool you don't have access too, but These seemed to work the best for cleaning up the edges. Go slow, and use a drill press if possible so its completely vertical. Good Luck!
That machine is a combo lathe/mill. They are "hobby" level machines, not capable of very good precision or accuracy, but they have their uses in small shops.
At the minimum you will need:
Some kind of toolpost, I would recommend a knockoff of a quick change toolpost from Aloris, they are affordable and will be good enough. This would be a good choice
A drill chuck to go in the tail stock. The taper on the tailstock spindle is probably something like a MT1 or MT2.
Measuring tools will be required to use the machine. A basic assortment would include a pair of calipers, a couple of micrometers (0-1" and 1"-2" range), and a couple of dial indicators.
These are kind of the basics, and you will find you need more tooling as you want to do different jobs.
I'm mainly making things that work over wifi, lots of of sensors, dedicated RF gateways, LED lighting, relay controllers, little screens.
Decent volt meter
Decent Soldering Iron
Home Made soldering stand made with these
Flux, Soldering Iron Tip cleaner Don't use water on your soldering iron.
Component Boxes. I use the Stanley Fatman
Component Drawers for small components and "stuff" like resistors , solid state relays, solder bits, sensors, LEDs etc. These sit on a shelf above my desk for easy access.
CPU Component Box with loads of ESP32, Wemos D1 Mini and Mini Pro (long range garden work), Leftover Raspberry Pis from realising that 99% of what I want to do will work on an ESP (wemos) platform.
A Stack of project boxes bought on clearance including a load of waterproof ones.
Stacks of LED strips, RGB, RGBW, White tuneable etc.
Heatshrink, Tapes, Glues, zip ties ( got a set of sizes in a 1000 pack for something like £10, Epoxy, solvents, respirators, safety goggles, a range of protective gloves.
Storage crate of Epoxy handling and mixing kit.
Reels of cabling mounted under the shelf in front of me.
Huge box of half finished projects that got too complicated.
Stack of breadboards.
Dupont cable maker kit
Various biscuit tins full of dupont cables
Dremel
Enough "Big Tools" to build a house.
Load of 24v - step down regulators, load of pwm controllers.
A0 cutting matt
Soldering Project mat that has raised sections to hold components.
Magnifying Headset
USB Phone flexible borescope thing
About 2,000 lumens of adjustable lighting on my hobby desk.
A separate DIY 2,000 Lumens "Work Lamp"
All lighting under control of Alexa.
Since shipping is usually more than the component costs, buying in bulk makes sense, when you have organised storage.
I can build literally anything I need in a few hours including modify my code base that auto discovers in home assistant through mqtt + device based web interface and rest API.
Both camber bolts and slotted holes have a risk of slippage. It's definitely important to tighten them down well. When tight they shouldn't slip, though it is always a risk. It isn't excessively risky though. I actually put a WRX through some serious paces with wobbly bolts in the lower front holes. You could feel when they should shift camber and the front end washed out, but that is pretty controllable.
I would recommend a carbide bit if you can. It will be more precise and easier than a drill bit. Something like This, though you should be able to find it cheaper.
I'd just stipple it. I can tell you what to buy and how to do it including the borders. You'll need the following:
https://www.amazon.com/Dremel-107-Engraving-Cutter-Shank/dp/B00008Z9ZV/ or https://www.amazon.com/Dremel-106-Engraving-Cutter-8-Inch/dp/B00008Z9ZU
https://www.amazon.com/Dremel-120-volt-Variable-Attachment-Accessories/dp/B075174NCV/ (you may have your own dremel, but definitely get a flex shaft for it)
https://www.amazon.com/HTS-401B3-Multi-Grit-Diamond-Medium/dp/B00U0E0KRE
https://www.amazon.com/AUSTOR-Grinding-Polishing-Accessories-Attachment/dp/B078Y5XGM8 (careful with these, light touch and keep it moving)
https://www.amazon.com/Flitz-Multi-Purpose-Fiberglass-Aluminum-Sterling/dp/B000MUSOW4
First use your engraving cutter to cut the borders that you've drawn on with a water-removable Stabilo marking pencil. Try to cut as smoothly as possible, with a steady hand. Don't try to cut it all at once, be patient (be patient for all of this, it took me a whole week doing a little at a time to complete the whole process, and turning my dremel off periodically because I have an older model flex shaft that gets hot after some use - solved this by wrapping the grip with bicycle inner tube)
The smoother you cut it the easier the rest will be. Some people just use the engraving cutter for borders, but I followed someone's guide and then used the diamond burs to smooth it out and polish it. Go from the lowest grit to the highest. You can either use the ball bits that are the same size as your cutter, or use the rounded cylinder bits. You can angle the cylinder bits in certain ways to get around curved surfaces, you'll kind of have to experiment with that. Once you get to the highest grit, I found that the only way to get it near-glass smooth was to apply a lot of pressure. It doesn't remove much material and you kind of want it to heat up the plastic to get it smooth. Then, still not satisfied with this, I got those felt wheels and cut the very tip off the smallest one, and used a bit of flitz paste, and then went over all the borders. That got it close enough for me. You can get more advice from the Weapons Stippling group on Facebook.
After you do the borders, I use the round tip on the walnut hollow wood burner on a medium heat setting. You don't want it too hot, not with the P80 plastic anyway. My technique was to press in, not too much but just enough, and drag downwards. A random totally pattern is best, I did a somewhat orderly snake pattern and then went over it again and smeared it out to give it a more organic texture. Then I went over it one more time, lightly and fastly rubbing all along the surface to blend the ridges that were created into the rest of the texture. You can do this several times to get it just right. The result is a texture that is grippy, yet not rough. That's how I like it, but you can experiment. The key is not to heat it up too much and don't stick any of the tips in too deep, and don't try to do it perfectly ordered unless you've gotten good at that with practice and are using an appropriate tip. You can make your own tips out of #8-32 brass screws or buy blanks from OT Defense, or some other place.
I've had a lot of people ask for a build video but if you check out my 15 second typing video in this thread you'll see my video production is really lacking. Given the whole process is 2-3 hours, that's also a pretty long video.
But to answer your direct question, I definitely sculpt the key into its external shape first. I tried the other way around when I first started and quickly gave up.
It might seem like it would be easy to cut too far but this didn't happen once when I switched to walnut.
What worked really well was doing most of the hollowing using the sphere bit in the link below. This handles 75% of the hollowing out and it does so in a very predictable spherical shape.
Problem is, the interior of a Cherry MX keycap isn't spherical. So I then used a reverse code bit square out the interior, this left the walls of the keycap about 1-1.5mm in thickness, which leaves enough room for the switch.
Sphere:
https://www.amazon.com/dp/B0037MI5RI/ref=twister_B07CRQ7LLL?_encoding=UTF8&amp;psc=1
Reverse cone (far right in the picture):
https://www.amazon.com/DRILLPRO-Double-Carbide-Rotary-SizeTungsten/dp/B06W9JFW66/ref=sr_1_1?ie=UTF8&amp;qid=1536972165&amp;sr=8-1&amp;keywords=reverse+cone+rotary+bit
Ok, I looked for about an hour and I honestly could not find a video. Here's the best I can do to give you instructions.
(I'll try to skim over the obvious)
First, you're using this edge finder or similar
Offset the edge in the y-direction such that it is towards the part. Bring it in to the part until it touches and keep moving at a lower rate (about .01 should be efficient) until the cylinder looks all but solid. Now moving at about 0.001, keep moving while rubbing your thumb up and down the side inline with the y-axis until you no longer feel a lip. Mark the position and then continue in the same direction by 0.001 (or smaller) until you feel a lip again. At the point that you feel a lip again, you are about .0985 (+- .0005) off from the edge of the part assuming you did this right.
Do the exact same thing on the x-axis.
Let me know how this works out for you. It should be the next best thing to buying a dial edge finder for like $470+
If you're working with soft materials, you want something called a 0-flute countersink. They're designed for merely deburring metals, but in wood and plastic they make beautifully clean countersinks. There are several brands, but Keo is the one I'm most familiar with and can endorse.
82° if you mostly work with Imperial hardware
90° if you mostly work with Metric hardware